You’ve just snagged a domain from Namecheap, and you’re ready to make your mark on the internet. But wait—how do you set it up?
Whether you’re launching a personal blog, a small business site, or an online portfolio, setting up your domain is a crucial first step. You might feel a bit overwhelmed, but don’t worry. You’re not alone, and it’s easier than you think.
By the end of this article, you’ll have the confidence and know-how to set up your Namecheap domain effortlessly. Ready to dive in and unlock the full potential of your new online space? Let’s get started.
Choosing The Right Domain
Setting up a Namecheap domain is simple and straightforward. Start by visiting Namecheap’s website to search for your desired domain name. Once you find the right domain, follow the easy steps to register and configure it for your needs.
Choosing the right domain is a crucial step in setting up your online presence. A domain name is more than just an address; it’s a reflection of your brand and identity. Selecting the right one can significantly impact your website’s success. Think of your domain as the first impression you make on visitors. It should be memorable, relevant, and easy to spell. But how do you choose the perfect domain? Let’s dive into some practical steps.Researching Domain Names
Start by brainstorming keywords related to your business or blog. What words best represent your mission or content? Use online tools like Namecheap’s domain search to generate ideas. These tools can help you discover unique combinations and variations you might not have considered. Remember, simplicity is key. You want something that people can easily remember and type. Avoid complex words or unusual spellings that might confuse your audience.Checking Availability
Once you have a list of potential domains, it’s time to check their availability. This step ensures that your ideal domain isn’t already taken. Use Namecheap’s domain search feature to see what’s available. If your first choice is taken, don’t be discouraged. Be creative and try different extensions like .net, .org, or newer ones like .shop or .blog. Consider whether you need multiple domains. Sometimes, securing similar names or common misspellings can help protect your brand. Have you ever found your perfect domain only to realize it’s already in use? It’s a common challenge, but don’t give up! Keep experimenting until you find the one that perfectly fits your vision.
Credit: www.codementor.io
Creating A Namecheap Account
Set up your Namecheap domain easily by creating an account. Visit Namecheap’s website and click “Sign Up” to begin. Fill out the registration form with your details, then verify your email. Once verified, log in to your account, and you’re ready to manage your domains effortlessly.
Creating a Namecheap Account is your gateway to owning a domain and establishing your online presence. It’s simple, straightforward, and can be completed in a matter of minutes. Whether you’re launching a personal blog or setting up a business website, having a Namecheap account is the first step. Let’s walk through the process together, ensuring your account is secure and ready for domain registration.Account Registration Process
Setting up your Namecheap account is easy and only requires a few basic details. Start by visiting the Namecheap website and clicking on the “Sign Up” button. You’ll be prompted to enter your email address, choose a username, and create a password. Once you’ve entered your information, you’ll need to agree to their terms of service. After that, click on “Create Account” and check your email for a confirmation link. Clicking this link will activate your account. Now you’re ready to explore domain options!Securing Your Account
Security is crucial, especially when dealing with online assets like domain names. Ensure your password is strong and unique. Consider using a mix of letters, numbers, and symbols. Enable two-factor authentication for an extra layer of security. This step helps protect your account from unauthorized access. You’ll receive a verification code on your phone or email whenever you log in. Think about this: how devastating would it be to lose control of your domain due to a weak password? Taking these steps will give you peace of mind. Your digital assets will be safe and sound. By following these tips, you’re not just setting up an account, you’re laying a strong foundation for your online success. Are you ready to take control of your digital journey?Purchasing Your Domain
Setting up a Namecheap domain is simple. Start by visiting Namecheap’s website. Enter your desired domain name and check availability.
Purchasing your domain is a pivotal step in establishing your online presence. It’s where your digital identity begins. Namecheap offers a user-friendly platform to buy your domain, ensuring you don’t need to be tech-savvy to get started. Whether you’re setting up a blog, an online store, or a personal website, selecting the right domain is crucial. But how do you make the right choice? Let’s dive into the details.Selecting Domain Options
When choosing your domain, think about the purpose of your website. Is it a personal blog or a business site? Your domain name should reflect this. Namecheap offers a variety of domain extensions, from the classic .com to niche options like .tech or .store. The domain name should be easy to spell and remember. A good tip is to avoid numbers and hyphens. They can confuse your audience. You want your visitors to find you easily, not struggle with typing errors. Consider keywords that relate to your site. If you’re launching a cooking blog, incorporating words like ‘recipe’ or ‘kitchen’ can be beneficial. This not only helps users understand your site but also improves your search engine visibility.Completing The Purchase
Once you’ve settled on your domain name, it’s time to make the purchase. Namecheap simplifies this with an intuitive checkout process. Start by adding your selected domain to the cart. Review your order carefully. Ensure the domain name is spelled correctly and the extension is what you want. Namecheap allows you to select privacy protection options, which is worth considering to keep your personal data secure. Proceed to payment. Namecheap supports various payment methods, including credit card and PayPal. After completing the transaction, you officially own your domain. Congratulations! Have you ever wondered how a domain name can impact your website’s success? A memorable name can draw in visitors and keep them coming back. It’s the first impression of your site, so choose wisely.Configuring Domain Settings
Configuring domain settings is crucial for your online presence. It ensures your site runs smoothly and efficiently. This process involves accessing the domain dashboard and updating DNS settings.
Accessing Domain Dashboard
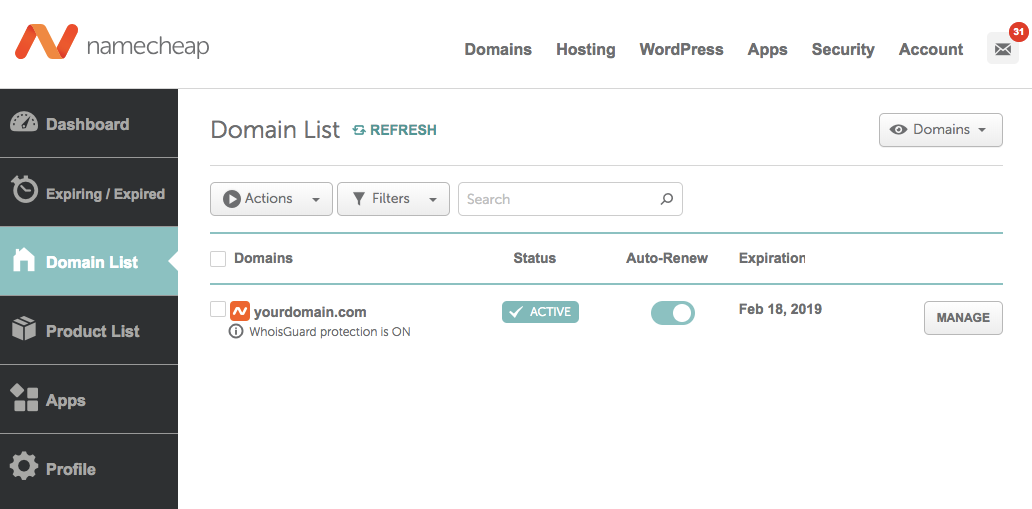
To configure your domain, first access the domain dashboard. Log in to your Namecheap account. Navigate to the “Domain List” section. Find the domain you wish to configure. Click on “Manage” next to the domain name. This takes you to the dashboard with all settings.
Updating Dns Settings
Once on the dashboard, update DNS settings. DNS settings control how your domain connects to your website. Click on the “Advanced DNS” tab to begin. Here, you can add or edit DNS records. Use the instructions provided by your web host. Ensure you save changes after updating. This step is vital for your site to function correctly.
Connecting Domain To Hosting
Setting up a Namecheap domain with your hosting is simple. First, log into your Namecheap account. Next, navigate to the domain list and select your domain. Update the nameservers to match those provided by your hosting provider. Save the changes, and your domain will soon connect.
Connecting your Namecheap domain to your hosting is crucial. This process allows your website to go live. It enables visitors to access your content. Namecheap makes this task simple for users. Below are essential steps to connect your domain. Let’s make your website visible to the world.Choosing A Hosting Provider
First, select a reliable hosting provider. Many options exist like Bluehost, SiteGround, and HostGator. Each hosting service offers unique features. Consider your website’s needs before choosing. Look for good uptime and customer support. Compare pricing plans and storage limits. Ensure the provider supports your domain type.Setting Up Domain In Hosting Account
Log into your hosting account. Find the “Domain” or “Domains” section. Click “Add Domain” or “Connect Domain”. Enter your Namecheap domain name. Follow prompts to complete the setup. Update DNS settings if required. Use hosting name servers for seamless connection. Wait for propagation to finish. Your domain is now linked to hosting. Visitors can access your site easily.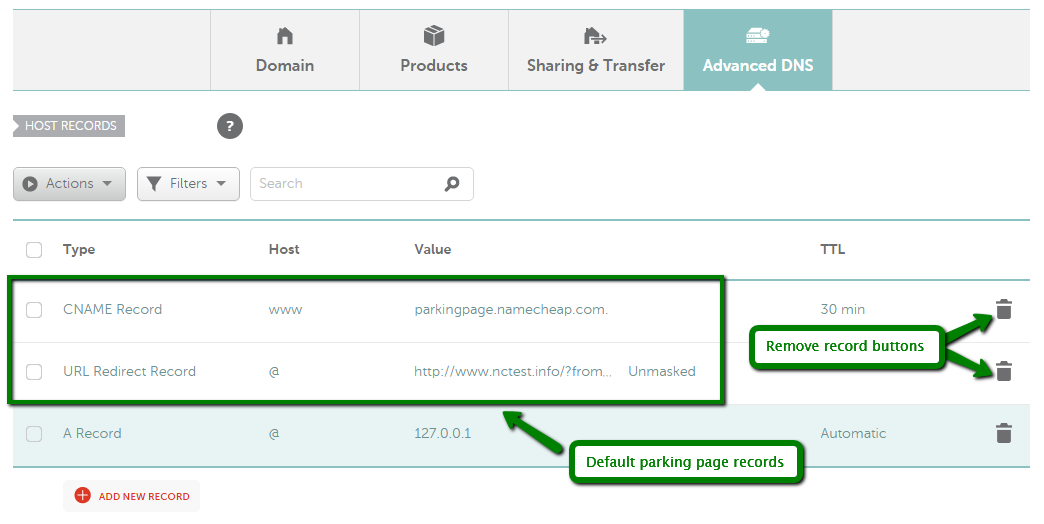
Credit: www.namecheap.com
Setting Up Domain Email
Setting up domain email with Namecheap is simple. First, log in to your Namecheap account. Navigate to the domain list and select your domain. Access the email section and follow the prompts to configure your email settings.
Setting up your domain email is a crucial step when establishing your online presence. It not only adds professionalism to your communications but also enhances brand credibility. Whether you’re a small business owner or a personal blogger, configuring your domain email can streamline your interactions and keep your communications organized. ###Email Hosting Options
When setting up a domain email through Namecheap, the first decision you’ll face is choosing an email hosting option. Namecheap offers several choices, such as Private Email Hosting and third-party services like Google Workspace or Microsoft 365. Each option has its pros and cons. For instance, Namecheap’s Private Email is a cost-effective solution with essential features, ideal for startups. On the other hand, Google Workspace provides robust tools like Google Drive and Calendar, but at a higher price. Consider your needs and budget before making a choice. ###Configuring Email Forwarding
After selecting an email hosting option, you might want to set up email forwarding. This feature allows you to redirect emails from your domain address to another email account, such as your personal Gmail or Yahoo Mail. To configure email forwarding in Namecheap, log into your account and go to the Domain List. Select the domain you wish to configure and click on the ‘Manage’ button. Navigate to the ‘Advanced DNS’ tab, where you’ll find the ‘Mail Settings’ section. Here, you can easily set up email forwarding by entering your existing email address. Email forwarding ensures you never miss important emails. It’s especially useful if you’re managing multiple email accounts. Have you ever missed a crucial email? Forwarding can help avoid that by consolidating your messages in one place. Setting up your domain email with Namecheap might seem daunting at first, but breaking it down into manageable steps makes it easier. Consider your hosting options carefully, and make use of email forwarding to keep your communications seamless. As you grow, you’ll appreciate the professionalism and organization that a dedicated domain email brings to your endeavors.Enhancing Security
Enhancing the security of your Namecheap domain is crucial for protecting your website and its visitors. By taking steps to secure your domain, you reduce the risk of unauthorized access, data breaches, and malicious activities. Let’s explore how you can enhance security with Namecheap by enabling domain privacy and implementing SSL certificates.
Enabling Domain Privacy
Domain privacy is like putting your contact details in a safe. Without it, your personal information is exposed to the public through the WHOIS database. This can lead to spam, identity theft, or even targeted attacks.
With Namecheap, enabling domain privacy is straightforward. It hides your contact details, replacing them with generic information. This simple step can greatly reduce unsolicited communications and protect your identity.
Have you ever received unexpected spam emails after registering a domain? Enabling domain privacy can prevent this nuisance and safeguard your personal data. Take control of your privacy today.
Implementing Ssl Certificates
An SSL certificate is essential for any website. It encrypts data between your website and visitors, ensuring sensitive information like passwords and credit card numbers are secure.
Namecheap offers affordable SSL certificates that are easy to install. Once your domain is secured with SSL, you’ll see the coveted padlock icon in the browser’s address bar. This boosts your credibility and trustworthiness.
Imagine visiting a site without a padlock icon—would you feel safe entering your information? Implementing SSL certificates not only enhances security but also improves user confidence in your website.
By focusing on these security measures, you are not just protecting your website; you’re nurturing a safer online environment for everyone who visits. Are you ready to take your domain’s security to the next level?
Credit: ghost.org
Troubleshooting Common Issues
Setting up a Namecheap domain can sometimes lead to issues like DNS configuration errors or domain not connecting. To troubleshoot, ensure DNS settings are correct, domain is active, and there’s no server downtime. Adjust settings carefully for seamless connectivity.
Setting up a Namecheap domain can be a straightforward process, but sometimes you might run into a few bumps along the way. These common issues can be frustrating, but they are usually easy to fix with a bit of guidance. Let’s dive into some typical problems you might face and how to solve them efficiently.Resolving Dns Problems
DNS issues can cause your website to be unreachable, which is a major headache. If your site isn’t showing up, the first step is to check if your DNS settings are correct. Log into your Namecheap account, go to the Domain List, and ensure that the DNS settings match those provided by your web host. Sometimes, changes in DNS settings can take time to propagate. If you’ve recently made changes, wait a few hours and check again. If the problem persists, try clearing your browser’s cache or testing your site using another network. Consider using a DNS checker tool to see if the DNS records are correctly pointing to your hosting server. This tool can show you if there are any discrepancies that might be causing the issue.Fixing Email Configuration Errors
Email configuration errors can prevent you from sending or receiving emails, which can impact your communication. Check that your MX records are correctly set up in your Namecheap account. They should point to your email provider’s servers. Using an incorrect email server address is a common mistake. Double-check the server address and port numbers. If they are incorrect, update them in your email client settings. Ensure that your SPF and DKIM records are set up to avoid your emails being marked as spam. These records help verify that your email is coming from a trusted source. Have you ever missed an important email because of configuration errors? It can be nerve-wracking. Regularly test your email setup to ensure everything is working smoothly, and don’t hesitate to reach out to Namecheap support if you’re stuck. Isn’t it reassuring to know that most issues have a simple solution? By following these steps, you can troubleshoot common problems and get your domain running smoothly. What issues have you faced while setting up a domain, and how did you resolve them? Share your experiences and insights in the comments below!Frequently Asked Questions
How To Set Up A Domain On Namecheap?
To set up a domain on Namecheap, log into your account. Click “Domain List” and select your domain. Choose “Manage” and adjust settings under “Domain” and “Advanced DNS”. Save changes and verify your domain’s functionality. For detailed guidance, refer to Namecheap’s support resources.
How To Setup Dns With Namecheap?
Log in to your Namecheap account. Go to the “Domain List. ” Click “Manage” next to your domain. Select the “Advanced DNS” tab. Add or modify DNS records as needed. Save changes.
Does Namecheap Domain Come With Hosting?
Namecheap domains do not include hosting. You need to purchase hosting separately to set up your website. Consider Namecheap’s hosting plans for easy integration and management of your domain and website. Hosting options vary in pricing and features to suit different needs.
How To Manage A Domain In Namecheap?
Log in to Namecheap, go to “Account Dashboard,” select “Domain List,” and click “Manage” next to your domain. Adjust settings like DNS, contact details, and domain forwarding there. Save changes after each update for effective management.
Conclusion
Setting up a Namecheap domain is straightforward. Follow the steps carefully. Start by choosing a memorable domain name. Ensure it reflects your brand or idea. Next, register your domain on Namecheap’s website. Fill out the required information accurately. Then, configure DNS settings.
Point them to your hosting provider. Secure your domain with privacy protection. It keeps your information safe. Finally, test your domain. Confirm everything works correctly. Now, your domain is ready for use. Share it and grow your online presence. Simple steps lead to successful results.
Enjoy your new domain!