
Are you ready to take control of your online presence with Namecheap DNS setup? Whether you’re launching a new website or optimizing an existing one, understanding how to configure your DNS settings can make all the difference.
Imagine having the power to ensure your site is fast, reliable, and easily accessible to your audience. By mastering Namecheap’s DNS setup, you can do just that. In this guide, you’ll discover straightforward steps to configure your DNS effortlessly, helping you enhance your website’s performance and ensure seamless connectivity.
Dive in and unlock the potential of your website with Namecheap’s DNS settings, and see how easy it is to create a more efficient digital environment for your visitors.
Credit: help.mailgun.com
Choosing A Namecheap Domain
Setting up a domain with Namecheap is a smart move. This platform offers affordable prices and excellent customer service. Picking the right domain name is crucial for your website’s success. It should reflect your brand and be easy to remember. A strong domain boosts your online presence.
Choosing The Perfect Domain Name
Start by brainstorming ideas. Think about what represents your business best. Use relevant keywords that describe your services or products. Ensure the name is unique and stands out. Short names are usually easier to remember.
Check Domain Availability
Once you have a list of potential names, check if they are available. Namecheap’s search tool can help you with this. Type your chosen name and see if it’s free to register. If taken, consider variations or try another name.
Consider Domain Extensions
Domain extensions affect how users perceive your site. Popular options include .com, .net, and .org. Choose an extension that suits your business. If you’re a nonprofit, .org might be ideal. For a tech company, .tech could be a good fit.
Register Your Domain
Once you’ve settled on a name, register it. Namecheap makes this process simple and quick. Follow the steps provided on their website. Secure your domain before someone else takes it.
Protect Your Domain Privacy
Consider adding domain privacy protection. This service hides your personal information from public databases. Namecheap offers this at a low cost. It keeps your data safe and reduces spam.
Credit: help.mailgun.com
Accessing Namecheap Dashboard
Easily access the Namecheap dashboard to set up your DNS. Log in, navigate to “Domain List,” and select “Manage” next to your domain. Adjust DNS settings under the “Advanced DNS” tab, ensuring your domain functions smoothly.
Accessing the Namecheap Dashboard is your first step in setting up DNS. This is where you manage your domain settings and make changes. Whether you’re a seasoned pro or a newcomer, navigating this dashboard effectively is crucial.How To Log Into Your Namecheap Account
Start by visiting the Namecheap website. Click on the “Sign In” button located at the top right corner. Enter your username and password, then press enter to access your account.Finding Your Domain List
Once logged in, look for the “Domain List” tab on the left-hand side. This is where all your registered domains are displayed. Click on it to see the list of domains you own.Selecting The Domain To Manage
Scroll through the domain list to find the one you want to manage. Click on the “Manage” button next to the domain. This takes you to the domain management page.Navigating The Domain Management Page
On this page, you’ll find several tabs such as “Dashboard”, “Products”, and “Advanced DNS”. Each tab offers different settings for your domain. Familiarize yourself with these options to understand what changes you can make.Exploring The Dashboard Features
The dashboard provides a snapshot of your domain’s status. You can see renewal dates, current DNS settings, and more. If you ever feel lost, remember that Namecheap’s support is a click away. Accessing the Namecheap Dashboard doesn’t have to be daunting. Have you ever noticed how a simple interface can make complex tasks easier? Dive in, and you’ll find that managing your domain is simpler than you think.Navigating To Dns Settings
Accessing DNS settings on Namecheap is straightforward. First, log into your Namecheap account. Then, select your domain and click on “Manage. ” Navigate to the “Advanced DNS” tab to adjust your DNS settings quickly.
Navigating to DNS settings on Namecheap is crucial for managing your domain. This process allows you to set up domain forwarding, subdomains, and more. Understanding how to access these settings is the first step. Follow these simple steps to get started with ease.Accessing Your Namecheap Account
Log in to your Namecheap account. Use your registered email and password. This takes you to your dashboard where your domains are listed.Locating Your Domain List
Click on ‘Domain List’ in the left sidebar. This shows all domains you own. Select the domain you want to manage. Click on ‘Manage’ next to your chosen domain.Finding Dns Settings
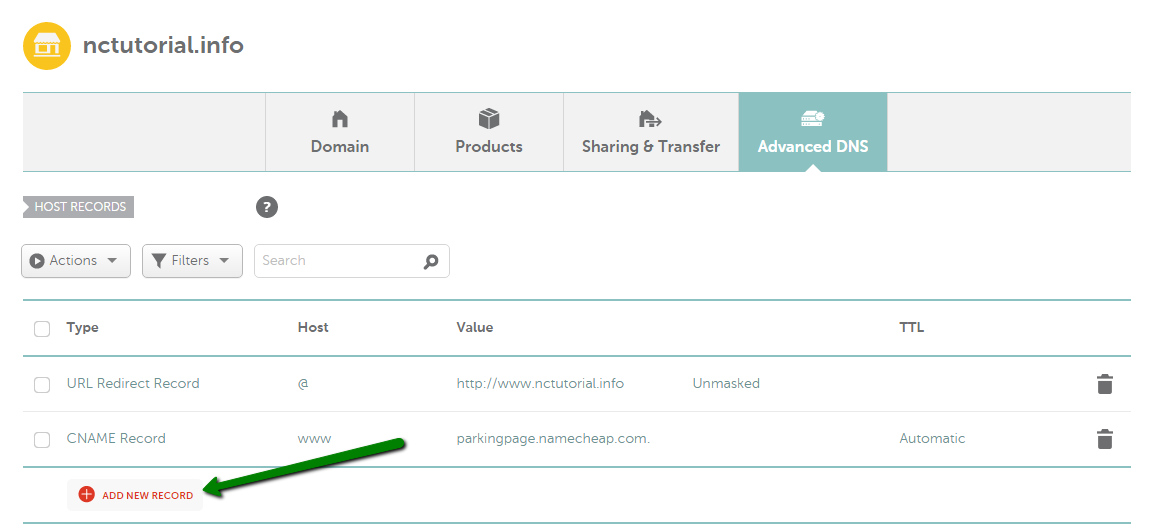
Once in the domain management section, look for the ‘Advanced DNS’ tab. Click to access the DNS settings. Here, you can add records, modify existing ones, and more. DNS records are crucial for directing traffic. They tell where to send requests for your domain. Types include A, CNAME, MX, and TXT records. Each serves a different purpose.Modifying Dns Records
To change a record, click ‘Add New Record’. Choose the type you need. Fill in the necessary details. Save changes to update your DNS settings. Navigating these settings ensures your domain functions correctly. Proper DNS setup enhances your website’s accessibility. Follow these steps to manage your domain effortlessly.Understanding Dns Records
Setting up DNS on Namecheap involves accessing your account and navigating to the Domain List. Select your domain, then go to the Advanced DNS tab. Add or edit records as needed, such as A records for IP addresses or CNAME records for domain aliases.
Ensure each entry is correct for seamless connectivity.
Understanding DNS Records is crucial for managing your domain on Namecheap. These records direct internet traffic to your website. Each type of DNS record serves a unique purpose. Knowing them helps you optimize your domain settings.A Records
A Records map your domain to an IP address. This ensures users find your site when they type your domain. It acts like a phone number for your website. Always ensure your A Record points to the correct server IP.Cname Records
CNAME Records alias one domain name to another. They simplify domain management. Use them for subdomains or aliasing. For example, point “www” to your main domain. This keeps your domain structure neat and organized.Mx Records
MX Records determine where your email is delivered. They point to your email server. This ensures emails arrive in your inbox. Set them correctly to prevent email delivery issues. Always verify your mail server details.Txt Records
TXT Records hold text information. They verify your domain and improve security. Often used for SPF, DKIM, and other verifications. They help prevent email spoofing. Keep them updated for secure communication.Adding Dns Records
Adding DNS records is an essential step in managing your domain. Each record serves a unique purpose, directing traffic to the correct server and service. Namecheap makes it easy to configure these records, ensuring your domain functions seamlessly. This section will guide you through the process of adding DNS records on Namecheap, including A Record, CNAME Record, and MX Record.
Creating A Record
An A Record maps your domain to an IP address. Start by logging into your Namecheap account. Go to the domain list and click on ‘Manage’. Navigate to the ‘Advanced DNS’ tab. Click on ‘Add New Record’. Select ‘A Record’ from the drop-down menu. Enter your domain or subdomain name in the ‘Host’ field. Provide the IP address in the ‘Value’ field. Save changes. Your domain will now point to the specified IP address.
Setting Up Cname Record
CNAME records alias one domain to another. Access your Namecheap account and select ‘Manage’ for your domain. Go to ‘Advanced DNS’. Click ‘Add New Record’. Choose ‘CNAME Record’. Enter your subdomain in the ‘Host’ field. Fill in the domain you want to point to in the ‘Value’ field. Save the record. This will redirect your subdomain to the target domain.
Configuring Mx Record
MX records are crucial for email delivery. Log into your Namecheap account. Select your domain and click ‘Manage’. Go to ‘Advanced DNS’. Click ‘Add New Record’. Choose ‘MX Record’. Enter ‘@’ or your preferred subdomain in the ‘Host’ field. Provide the mail server address in the ‘Value’ field. Set the priority number. Lower numbers indicate higher priority. Save the record. Your emails will now be routed through the specified mail server.
Verifying Dns Changes
Navigating DNS changes with Namecheap involves accessing your account and updating the DNS settings. Ensure correct entries to avoid connectivity issues. Confirm changes by checking propagation status through online tools.
Verifying DNS changes is a crucial step after you’ve made updates to your DNS settings on Namecheap. This process ensures that the changes you made are correctly propagated across the internet, allowing your domain to function as intended. Without proper verification, you might encounter issues with website accessibility or email delivery. It’s a bit like double-checking your work before you hand it in—making sure everything is in order.Understanding Dns Propagation Time
DNS changes don’t happen instantly. It can take anywhere from a few minutes to 48 hours for changes to propagate fully across the internet. This delay is because DNS records are cached on numerous servers worldwide. Patience is key during this process. Keep in mind that while your changes might appear in some regions quickly, others may take longer.Using Online Tools For Verification
Several online tools can help you verify your DNS changes. Websites like DNS Checker or What’s My DNS provide a simple way to check if your changes have propagated globally. Input your domain and choose the record type to see real-time results from different servers worldwide. This is an effective way to confirm that everything is set up correctly without manually checking each region.Checking Dns Changes Locally
Sometimes, you may want to verify DNS changes on your local machine. You can use the command prompt or terminal to check DNS records using commands like `nslookup` or `dig`. These commands provide detailed information about your DNS settings and can help confirm that your local DNS resolver has updated. This is particularly useful if you’re troubleshooting and need to ensure that your local view aligns with global records.Monitoring For Errors
After making DNS changes, it’s crucial to monitor for any potential errors. Look for issues like incorrect IP addresses or MX records that could affect your website or email. Set up alerts or periodic checks to catch and resolve issues promptly. This proactive approach can save you from headaches down the road.Seeking Expert Assistance
If you’re unsure about your DNS settings or encounter persistent issues, don’t hesitate to seek expert help. Namecheap offers support services that can guide you through the process. They can provide insights and solutions tailored to your specific needs. Remember, it’s always better to ask for help than to struggle with complex technical problems. Taking the time to verify your DNS changes ensures that your domain functions smoothly. Do you have any other tips or tools that you use for DNS verification? Share your thoughts and experiences in the comments below!Troubleshooting Common Issues
Setting up DNS with Namecheap can be smooth. Yet, common issues might arise. Understanding these can help you avoid confusion and delays.
Propagation Delays
DNS changes take time to update globally. This period is known as propagation. It usually takes 24 to 48 hours. During this time, your site might not be accessible. It’s normal and requires patience. To speed it up, avoid frequent changes.
Incorrect Record Types
Using the wrong DNS record type can lead to issues. Ensure you select the correct type for your need. For a website, use an A or CNAME record. An MX record is for email services. Double-check your entries to avoid errors.
Conflicting Dns Entries
Conflicting entries can disrupt your DNS settings. Ensure each record is unique. Avoid duplicate entries. Check for old or unused records. Remove them to prevent conflicts. This keeps your DNS clean and functional.
Credit: www.namecheap.com
Advanced Dns Features
Setting up DNS with Namecheap involves accessing the dashboard and configuring records like A, CNAME, and MX. These advanced DNS features ensure your website connects efficiently and securely. Follow simple steps to enhance your site’s performance and reliability.
Setting up DNS on Namecheap opens doors to advanced features. These features enhance domain management. They offer flexibility and control. Exploring these features can elevate your domain’s performance. Dive into subdomains, custom servers, and dynamic DNS.Subdomains Management
Subdomains create separate sections under a main domain. Use them to organize content. For instance, ‘blog.yourdomain.com’ directs visitors to your blog. Namecheap allows easy subdomain setup. Manage them effortlessly through the control panel. Each subdomain can host unique content. This helps in segmenting information. Subdomains boost navigation and user experience.Custom Name Servers
Custom name servers personalize your domain’s identity. They enhance brand recognition. Namecheap lets you create custom servers. These servers replace default ones. Custom servers offer better control over DNS settings. They streamline domain management. Setting up custom servers is straightforward. Follow the guide in Namecheap’s dashboard. Ensure your domain stands out with custom servers.Dynamic Dns
Dynamic DNS keeps your domain updated with changing IPs. It’s essential for devices with fluctuating IP addresses. Namecheap supports dynamic DNS. This ensures your domain points to the correct IP. Setup is simple through the control panel. Dynamic DNS maintains seamless connectivity. It’s useful for home servers and remote access. With dynamic DNS, your domain stays reliable.Frequently Asked Questions
Does Namecheap Have Free Dns?
Yes, Namecheap offers free DNS services with every domain registration. Their DNS is reliable and user-friendly, making it easy to manage domain settings. You can quickly update records and ensure your domain runs smoothly. Namecheap’s DNS service is trusted by millions worldwide for its efficiency and security.
Is Namecheap Dns Better Than Cloudflare Dns?
Namecheap DNS offers simplicity and affordability. Cloudflare DNS provides enhanced security and performance features. Choose based on your needs: cost-effective management or advanced protection and speed. Both are reliable, but Cloudflare excels in global content delivery and security enhancements. Consider your priorities before deciding.
How To Setup A Domain With Namecheap?
Log in to Namecheap. Go to “Domain List” and select your domain. Click “Manage”, then “Advanced DNS”. Add DNS records as needed. Save changes.
What Is Dns In Namecheap?
DNS, or Domain Name System, translates domain names into IP addresses. Namecheap DNS helps manage domain settings, directing traffic to your website. Properly configuring DNS ensures your website is accessible and functions correctly.
Conclusion
Setting up DNS with Namecheap is straightforward and accessible. Follow the steps carefully. First, log into your Namecheap account. Navigate to the “Domain List” and select your domain. Next, find “Advanced DNS” and click it. Add records as needed for your domain’s services.
Save your changes. Remember, DNS changes may take time to propagate. Patience is key. Regularly check your setup to ensure everything works. Understanding DNS settings boosts your website’s reliability. With practice, it becomes easier. Now, you can manage your domain like a pro.
Keep learning, and your confidence will grow.


