Have you just bought a domain name and a hosting account, but don’t know how to connect them? Pointing your domain name to your hosting account is a crucial step to make your website live for everyone to see.
It might sound technical, but with the right guidance, you can do it yourself quickly and easily. You’ll learn exactly what you need to do to link your domain and hosting without any confusion. Keep reading, and you’ll have your website up and running in no time!
Credit: www.namecheap.com
Choose Your Domain Registrar
Choosing the right domain registrar is the first step in pointing your domain name to your hosting account. The registrar is where you buy and manage your domain. This choice affects how easily you can update your DNS settings later.
Pick a registrar with a simple, clear control panel. You want to change domain settings without confusion. Some registrars offer extra tools like email forwarding or privacy protection. These features can be useful but are not always necessary.
Check the registrar’s support options. Good customer service can save time if you face problems. Look for registrars that provide guides or live chat support for quick help.
Understand Registrar Reputation
Choose a registrar known for reliability and security. Reputable companies keep your domain safe from theft or accidental loss. Research reviews and user feedback before making a decision.
Compare Pricing And Renewal Fees
Check the initial price and renewal costs of the domain. Some registrars offer low first-year prices but charge more later. Be sure the total cost fits your budget over time.
Check Domain Management Features
Look for easy DNS management options. You should be able to update nameservers and records quickly. Some registrars provide one-click setups for popular hosting services.
Consider Domain Transfer Policies
Know the rules for transferring your domain to another registrar. Avoid registrars with long lock periods or high transfer fees. Flexibility helps if you change hosting providers.
Find Your Hosting Nameservers
Start by locating your hosting nameservers in your hosting account dashboard. Enter these nameservers into your domain registrar’s settings to connect your domain to your hosting. This links your website address to the server where your site files are stored.
What Are Hosting Nameservers?
Nameservers tell the internet where your website lives. They link your domain name to your hosting account. Without nameservers, your domain cannot show your website.
Each hosting provider gives you unique nameservers. These nameservers guide visitors to your site’s files.
How To Find Your Hosting Nameservers
Check the welcome email from your hosting company. It usually has your nameservers listed. Look for lines named “Nameserver 1” and “Nameserver 2.”
If you can’t find the email, log in to your hosting control panel. Go to the section called “DNS Settings” or “Domain Settings.” Your nameservers are listed there.
Common Nameserver Formats
Nameservers often look like ns1.examplehost.com and ns2.examplehost.com. They always start with “ns” followed by numbers and your host’s name.
Write them down exactly as shown. Small mistakes will stop your domain from linking properly.
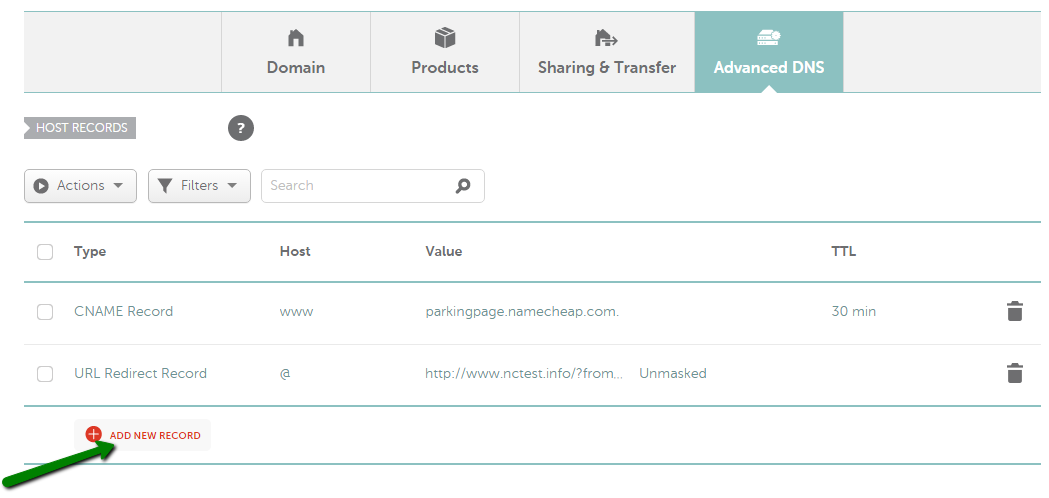
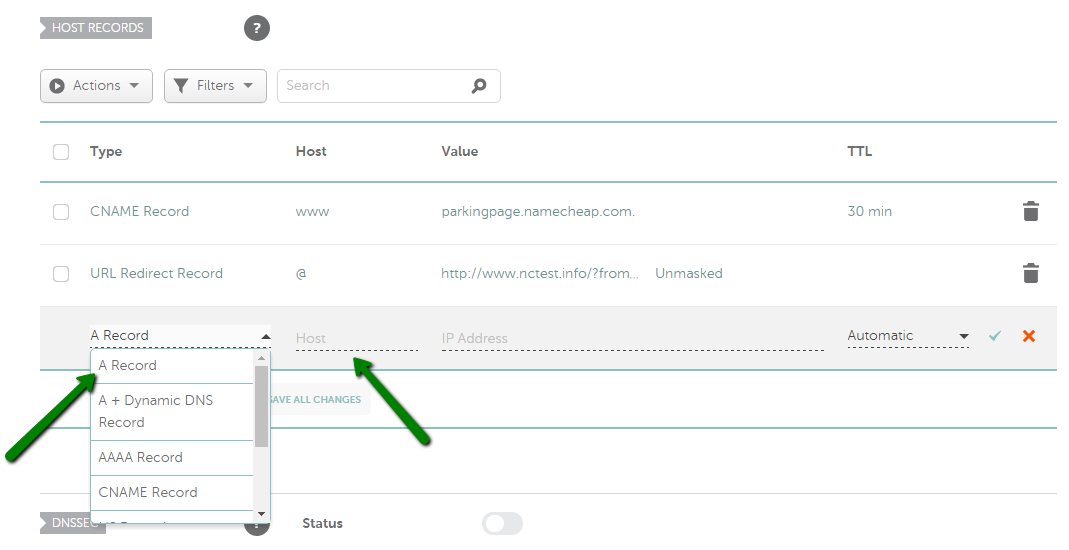
Access Domain Dns Settings
Accessing your domain’s DNS settings is the first step to point your domain to your hosting account. These settings control how your domain name connects to the internet. You must find the right place to update these details.
Each domain registrar has a different way to access DNS settings. Usually, you start by logging into your account where you bought your domain. This section helps you change where your domain points.
Log Into Your Domain Registrar Account
Open the website of your domain registrar. Enter your username and password. Access your dashboard or control panel after login. This area contains all your domain management tools.
Locate The Dns Management Section
Find the link or tab labeled “DNS,” “DNS Management,” or “Name Server Settings.” This section lets you change the domain’s DNS records. It might be under “Domain Settings” or “Manage Domains.”
Identify The Correct Domain
If you have multiple domains, select the one you want to point to your hosting. Verify the domain name carefully. Editing the wrong domain’s DNS can cause website issues.
Backup Current Dns Records
Before making changes, save a copy of your current DNS records. This step helps you revert changes if something goes wrong. You can take a screenshot or write down the details.
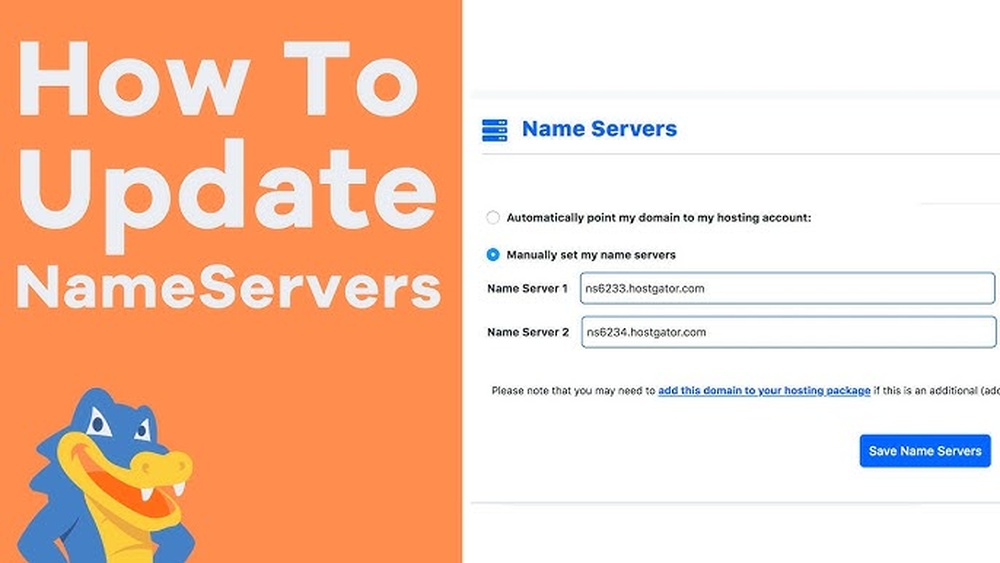
Update Nameservers
Updating nameservers is a key step to connect your domain with your hosting account. Nameservers tell the internet where to find your website files. Without updating them, your domain will not show your website.
This process is simple and usually done through your domain registrar’s control panel. You will replace the default nameservers with those provided by your hosting provider. This change directs visitors to your hosting server.
Replace Default Nameservers
Log in to your domain registrar’s dashboard. Find the section for managing DNS or nameservers. Here, you will see the default nameservers set by the registrar.
Delete these default nameservers. Enter the new nameservers from your hosting provider. These usually look like ns1.yourhost.com and ns2.yourhost.com. Make sure to enter them exactly as given.
Save Changes
After replacing the nameservers, look for a save or update button. Click it to apply your changes. The update might take some time to spread across the internet.
Wait up to 48 hours for the changes to fully take effect. During this time, your website may not be accessible. After propagation, your domain will point to your hosting account correctly.
Wait For Dns Propagation
After you point your domain name to your hosting account, the changes do not happen instantly. The internet needs time to update and recognize the new settings. This waiting period is called DNS propagation.
During DNS propagation, servers worldwide update their records. This update tells them where your website now lives. It can take some time for all servers to refresh.
Patience is key. Your website might not appear immediately. Some visitors will see the new site, while others see the old one. This difference happens because of varying update speeds across servers.
What Is Dns Propagation?
DNS propagation is the process of updating domain information worldwide. It happens after changing domain settings, such as pointing to a new host. This process ensures users reach the correct website address.
How Long Does Dns Propagation Take?
Propagation usually takes between 24 to 48 hours. Sometimes it finishes faster, within a few hours. At times, it may take up to 72 hours. The exact time depends on internet service providers and server caches.
How To Check Dns Propagation Status
Use online tools to check if DNS has propagated. These tools show if servers around the world see your new website. Enter your domain name to get instant results. This helps track the update progress easily.
What To Do During Dns Propagation?
Avoid making more domain or hosting changes during propagation. Keep your hosting active to prevent downtime. Clear your browser cache to see the latest website version. Wait patiently for the process to complete fully.

Credit: www.youtube.com
Verify Domain Connection
Verifying your domain connection is a key step after pointing your domain to your hosting account. It confirms that your website is ready to go live. This process helps avoid errors and downtime. Clear verification ensures visitors reach your site without issues.
Verification also helps search engines find your site faster. It boosts your site’s credibility and trustworthiness. Let’s explore the main ways to verify your domain connection effectively.
Check Dns Propagation Status
DNS propagation takes time to update worldwide. It can take from a few minutes to 48 hours. Use online tools to check if your DNS has updated. Enter your domain name and see if it points to your hosting IP. This step confirms your domain is linked to your server.
Use Hosting Account Tools
Most hosting providers offer tools to verify your domain. Log in to your hosting control panel. Look for domain verification or site status features. These tools check if your domain is connected properly. They show if your server recognizes the domain name.
Test Website Access
Open a browser and type your domain name. Your website should load without errors. If it shows a default or error page, DNS might not be fully updated. Try clearing your browser cache or using a different device. Successful loading means your domain connection is verified.
Verify Email Functionality
Check if your domain email works if you set up email accounts. Send and receive emails using your domain address. Proper email function means DNS records are correct. This confirms your domain connection beyond just the website.
Troubleshoot Common Issues
Sometimes, pointing your domain to your hosting account does not work as expected. Common problems can stop your website from showing up online. Troubleshooting these issues helps you find and fix errors fast. This way, your site goes live without delay.
Check Nameserver Accuracy
Nameservers link your domain name to your hosting server. Ensure you enter the correct nameservers from your hosting provider. A small typo can cause major problems. Double-check every letter and number. Use the exact format given by your host.
Clear Dns Cache
Your computer and browser save DNS data to load sites faster. Sometimes, this cache holds old information. Clearing your DNS cache forces your device to fetch fresh data. This update helps display your website correctly after changing nameservers.
Contact Support
Support teams know the details of your domain and hosting setup. If problems persist, reach out to them. Provide clear information about your issue. They can guide you through complex steps or fix server-side problems quickly.
Credit: www.namecheap.com
Frequently Asked Questions
How Do I Point My Domain To Hosting?
To point your domain, update its nameservers to your hosting provider’s. This connects the domain to your hosting account effectively.
What Are Dns Records And Why Update Them?
DNS records direct internet traffic to your website. Updating them ensures your domain points correctly to your hosting server.
How Long Does Domain Pointing Take?
Domain pointing typically takes 24 to 48 hours due to DNS propagation across the internet globally.
Can I Point My Domain Without Changing Nameservers?
Yes, by editing A or CNAME records in your domain’s DNS settings, you can point without nameserver changes.
Conclusion
Pointing your domain name to your hosting account is simple. Just follow the right steps carefully. Changing DNS settings takes some time to work. Patience helps while waiting for updates. Check your website after a few hours. Make sure everything loads correctly and works well.
This process connects your website to the internet. Keep your login details safe for future changes. Stay calm and double-check your steps if problems appear. Soon, your site will be live and ready for visitors.