
Are you ready to take your web application live but unsure where to start? Hosting with GoDaddy might just be the solution you need.
Known for its reliability and user-friendly interface, GoDaddy offers a seamless experience for hosting web applications. In this guide, we’ll walk you through the essential steps to get your application up and running in no time. Imagine the satisfaction of seeing your project accessible to users worldwide, with just a few simple clicks.
Stick around to discover how easy it can be to make your digital vision a reality with GoDaddy. Let’s dive in and get your web application on the map!

Credit: www.godaddy.com
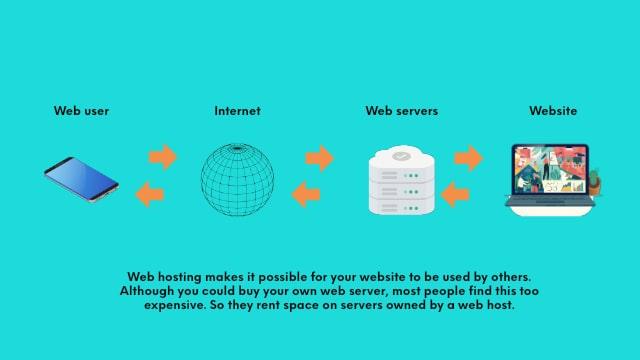
Choosing The Right Hosting Plan
Shared hosting is like sharing a room with friends. Everyone uses the same space. It’s cheap and good for beginners. Many websites share resources. Sometimes, it can be slow. Best for small websites. If you have low traffic, it’s a great choice.
VPS hosting is better than shared hosting. It’s like having your own apartment. You get more control and privacy. It’s faster and more secure. Costs are more than shared hosting. Suitable for growing websites. It helps if you need extra space or power.
Dedicated servers give full control. You have the whole house to yourself. No sharing with others. It’s expensive but powerful. Best for large websites. Offers high security and fast speed. Perfect for sites with lots of traffic. It’s the top choice for big businesses.
Setting Up Your Domain
First, visit the GoDaddy website. Find the domain search bar. Type your desired domain name. Check if it’s available. If it’s available, click Add to Cart. Follow the steps to purchase it. Make sure to enter your correct details. Complete the payment process. Your domain is now registered.
Log into your GoDaddy account. Go to the My Products page. Find your domain name. Click on DNS next to your domain. Locate the A Record section. Set the IP address of your hosting server. Save the changes. Wait for the DNS to update. This can take a few minutes.
Preparing Your Web Application
Keep your code clean and simple. Remove any unnecessary lines. This helps your app run faster. Use comments to explain complex parts. Minify CSS and JavaScript files. Smaller files load quicker. Ensure all images are small. Compress them if needed. Always test your code. Make sure everything works well. Fix any errors you find.
Choose a reliable database for your app. Set up tables for storing data. Define columns with correct data types. Keep it simple. Ensure you have a backup plan. Use indexes for faster searches. Test your database. Check for any bottlenecks. Fix any issues before going live. Always keep your database secure.
Credit: www.godaddy.com
Uploading Files To Godaddy
cPanel helps you manage your website easily. To upload files, log in to your cPanel account. Find the File Manager and click it. Choose the folder you want. Click the “Upload” button. Select the files from your computer. Wait for the upload to finish. Check if all files are there.
FTP stands for File Transfer Protocol. It moves files from your computer to the server. First, install an FTP client like FileZilla. Open the app. Enter your FTP credentials. Connect to the server. Choose the files to upload. Drag them to the server window. Wait until the transfer completes. Verify the files on the server.
Configuring Server Settings
Setting up PHP and MySQL is important. First, access your Godaddy account. Look for the cPanel. Inside, find PHP settings. Choose the correct PHP version. It must match your application needs. Configure the memory limit. Set it according to your app size. Then, check MySQL settings. Create a new database. Assign a username and password. Keep them safe. Link your application to this database. This step is crucial for smooth operations.
SSL certificates keep data safe. Start by visiting Godaddy’s SSL section. Purchase the right certificate. Follow instructions to install it. This adds a secure layer to your site. Ensure all site pages use HTTPS. Check for any mixed content errors. Fix them promptly. SSL makes your site trusted. Users feel secure visiting your web application.
Testing Your Application
Check if all buttons work. Click each one. See what happens. Ensure links lead to the right pages. No broken links should exist. Fill out forms and submit them. Do forms send data correctly? Ensure the app shows messages. Success and error messages are important. Test with different data inputs. Try numbers, letters, and symbols. Make sure the app handles each correctly.
Speed is crucial. Load the app on different devices. Try phones and tablets. Is the app quick? Test on slow internet connections. Does it still work well? Check how many users can use it at once. Open the app on many devices. See if it slows down. Ensure images load fast. No one likes waiting. Try different browsers. Make sure the app works on all.
Troubleshooting Common Issues
Hosting a web application on GoDaddy involves setting up domains, configuring databases, and managing server settings. Common issues include DNS errors, PHP version mismatches, and database connectivity problems. Solving these requires checking domain settings, updating software, and verifying database credentials.
Error Logs
Checking error logs can help find problems. These logs show what went wrong. Open the control panel in GoDaddy. Look for the error log section. Read the messages carefully. They may show missing files or wrong settings. Fix the errors based on the messages. This step can solve many common issues.
Technical Support
Sometimes, fixing problems alone is hard. GoDaddy offers technical support to help. Visit their support page for help options. You can find guides and FAQs there. If the problem continues, contact support. Call or chat with a support agent. They can guide you step by step. Always have your account details ready. This makes the process quicker.
Credit: www.godaddy.com
Frequently Asked Questions
How Do I Deploy An Application On Godaddy?
Deploy your app on GoDaddy by accessing the Hosting Control Center. Upload files using File Manager or FTP. Configure domain settings, and ensure database setup if needed. Test the application thoroughly to confirm successful deployment.
How Do I Host My Own Web Application?
Choose a reliable web hosting provider. Set up a server that meets your application’s requirements. Upload your files via FTP or a control panel. Configure domain settings and ensure security measures. Test your application to confirm everything works correctly.
How Do I Host A Godaddy Web Api?
To host a GoDaddy web API, purchase a hosting plan from GoDaddy. Set up your server environment, upload your API files, and configure settings. Ensure your domain points to the hosting server for accessibility. Utilize GoDaddy’s support if needed for seamless integration and management.
Is Godaddy Good For Website Hosting?
GoDaddy offers reliable website hosting with various plans. It’s user-friendly and provides 24/7 customer support. The performance is decent for small to medium websites. Prices are competitive, but renewal rates can be higher. Evaluate your specific needs to determine if GoDaddy fits your requirements.
Conclusion
Hosting your web application on GoDaddy is straightforward. Start with selecting the right plan. Then, set up your domain and hosting account. Upload your web files using the cPanel. Remember to configure your database and security settings. Test your application thoroughly to ensure it runs smoothly.
Follow these steps, and your web application will be live in no time. Keep your site updated and secure. Regular checks help maintain performance. With GoDaddy, hosting becomes a simple task. Enjoy a seamless experience with your web application.


