
Are you looking to take your web application to the next level by hosting your Web API on Azure? You’re in the right place.
Azure offers a seamless and scalable solution for deploying your APIs, ensuring they are robust, secure, and accessible. Imagine the peace of mind knowing your API is backed by Microsoft’s powerful infrastructure, guaranteeing performance and reliability. Whether you’re a seasoned developer or just starting out, understanding how to efficiently host your Web API on Azure can transform your project’s success.
Dive in, and discover the straightforward steps to get your API up and running in the cloud, so you can focus on what truly matters—delivering value to your users.
Credit: faun.pub
Setting Up An Azure Account
Begin by visiting the Azure website. Look for the “Sign Up” button. Click it. Enter your email. Choose a strong password. Fill in other details. Follow the prompts. Complete the signup process. Verify your email. You will receive a confirmation. Click the link in the email. Your account is now ready.
Explore the Azure portal. This is where you manage your services. The portal has many features. It might look complex. Take your time. Familiarize yourself with the dashboard. It shows your resources. Check the billing section. Understand your subscription type. You can start using Azure now.
Configuring Azure Environment
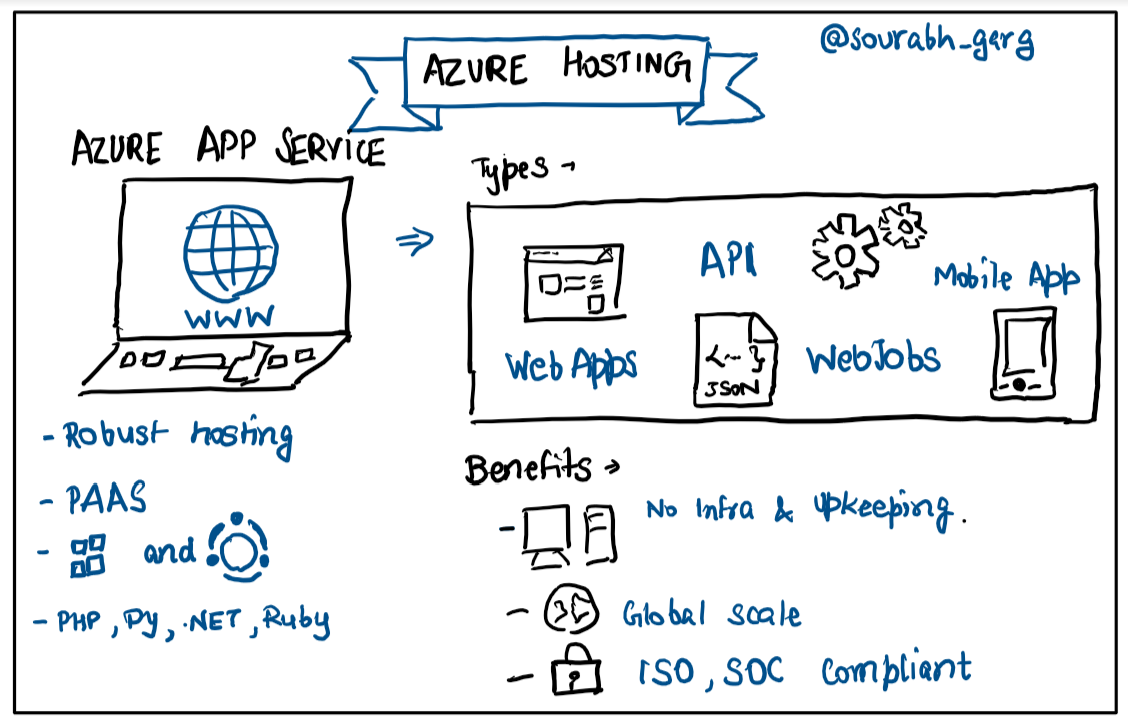
Azure offers many services for hosting web APIs. Picking the right one is important. Azure App Service is a good choice. It is easy to use and manages many tasks. Another option is Azure Functions. It is great for event-driven tasks. Both have their own benefits. Decide based on your needs and project size.
A Resource Group is like a folder. It keeps all your resources together. To create one, go to the Azure portal. Click on the “Resource groups” option. Then, click “Add.” Choose a name that makes sense. Also, pick a region close to your users. This helps in reducing delays. After that, you are ready to add resources to it.
Deploying Web Api
Ensure your project is ready for deployment. Check all files. Ensure there are no errors. Update your dependencies. This helps avoid issues. Add a web.config file if needed. This file helps in configuration. Use a version control system. It helps to track changes. Git is a good option. Remember to push your latest code.
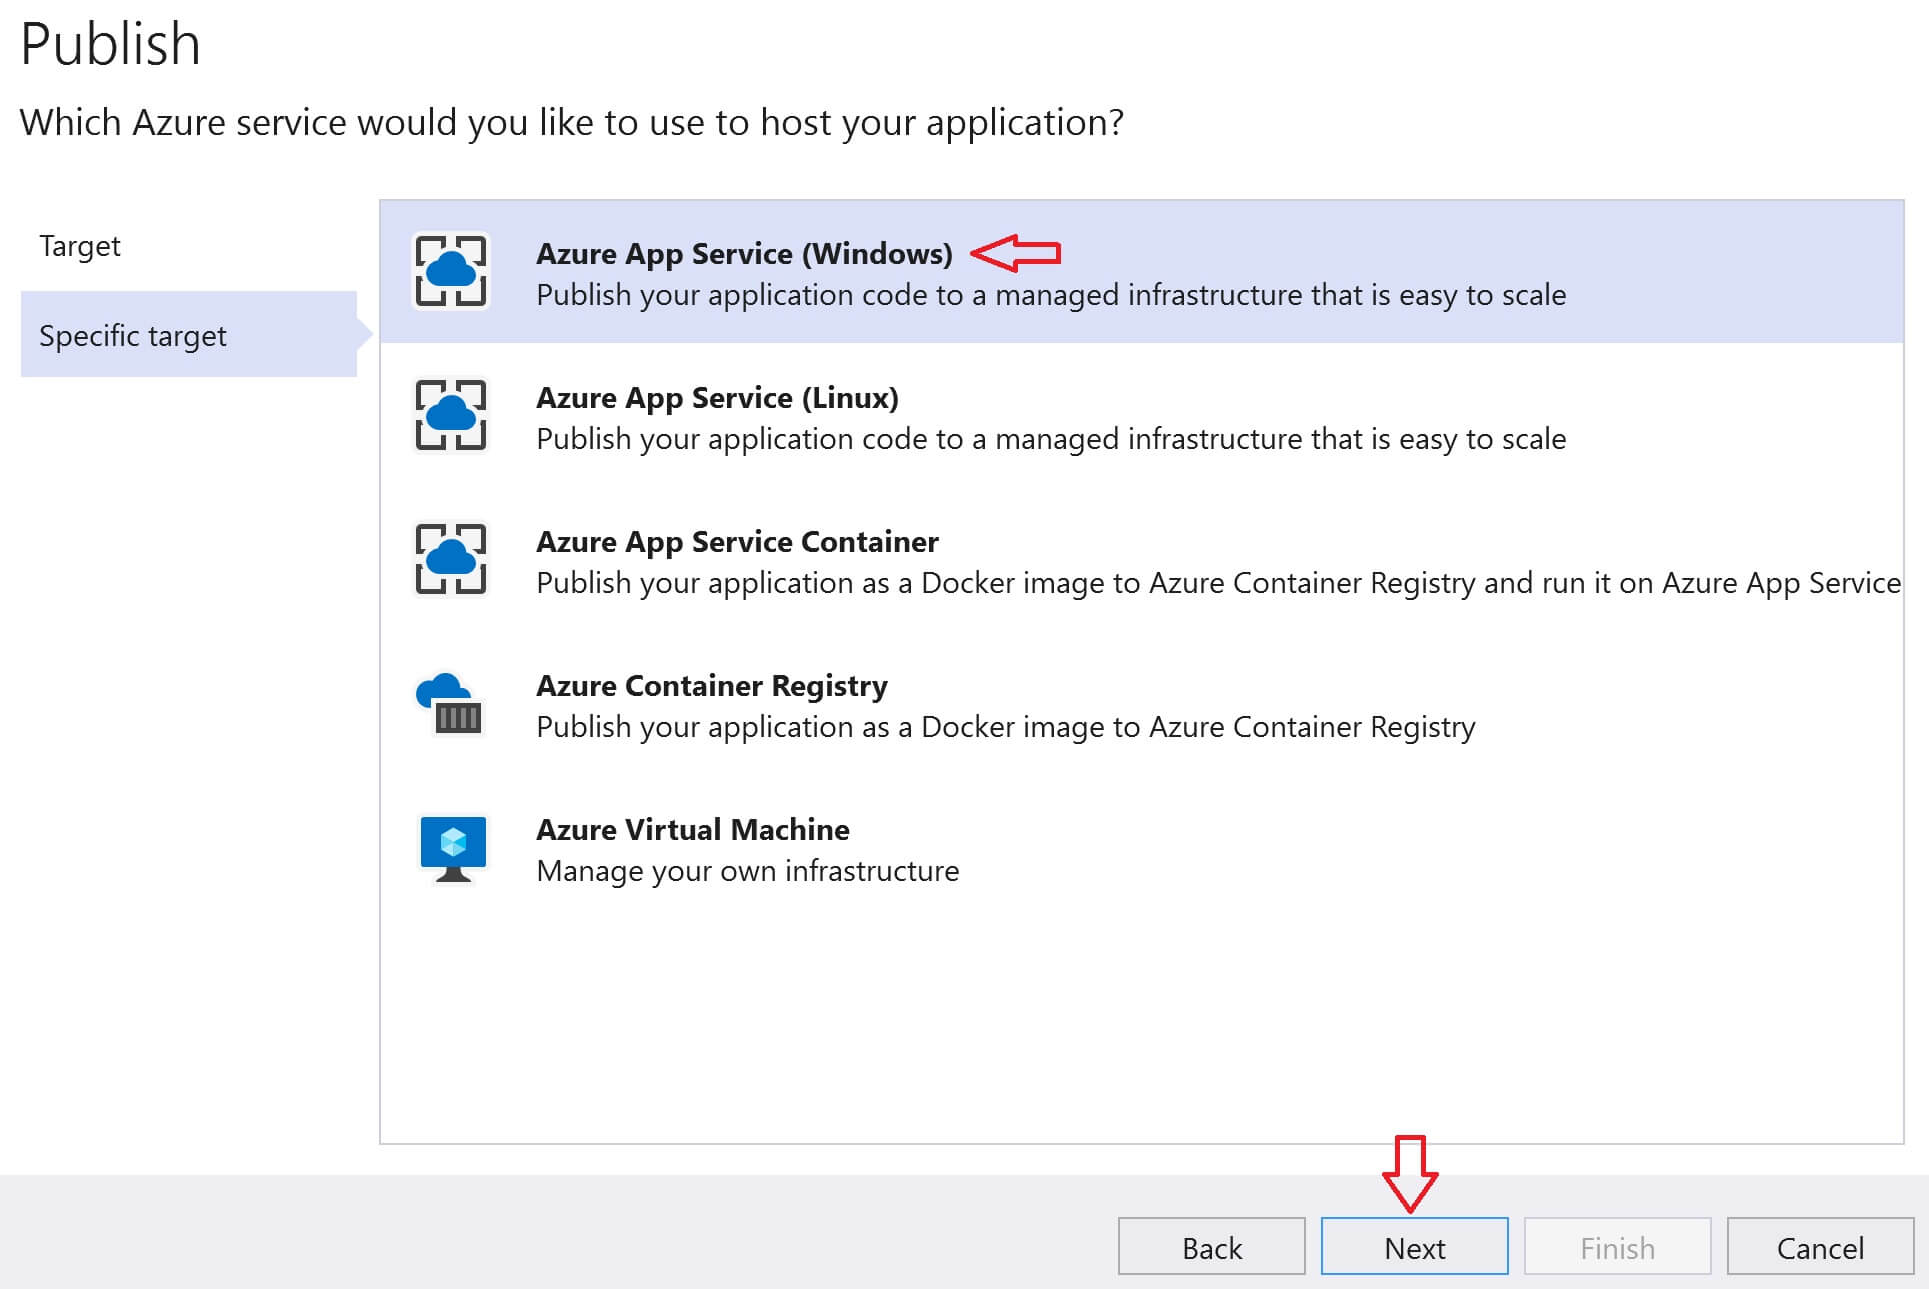
Start by opening the Azure Portal. Sign in with your account. Create a new App Service. Choose your project. Click on publish. Follow the simple steps. Select Azure App Service as your target. Click on publish again. Wait for the process to complete. Your Web API is now on Azure.
Managing Api Services
Azure helps to keep your API fast. It can handle many users at once. This is called scaling. Azure makes scaling easy and automatic. You don’t need to worry. Azure also watches your API. This is called monitoring. It checks if everything works well. Azure sends alerts if there is a problem. This helps keep the API running smoothly. It can save you from big problems.
Keeping your API safe is very important. Azure offers many security features. It keeps bad people out. Azure uses strong passwords and keys. It also checks who is trying to use the API. Only trusted users can access it. Azure updates these features regularly. This keeps your API safe from new threats. Safety is important for everyone using the API.
Optimizing Performance
Caching helps web services run faster. It saves data that gets used often. This way, the service does not keep asking the database for the same data. Reduce server load with caching. It also helps users see faster responses. Cache static content like images and stylesheets. This saves time for users. Use distributed caches for large applications. They help share data across many servers. This keeps the service smooth and fast.
Load balancing means sharing work among servers. This stops one server from working too hard. It helps all servers work evenly. Use multiple servers for big applications. This keeps the service from breaking. Auto-scaling helps add or remove servers as needed. It helps when traffic changes. With load balancing, users get better service. The app stays fast and reliable.
Credit: learn.microsoft.com
Troubleshooting Common Issues
Deploying a Web API on Azure can encounter issues like incorrect configuration and security settings. Ensure your network settings are correct and the API is properly authenticated to avoid common pitfalls. Debugging these aspects can help smoothly host your API on Azure.
Error Handling
Errors happen. It’s normal. Understanding and fixing them is important. Always check your error messages. They tell you what went wrong. Use logs. Logs show details. They help you find the issue. Sometimes, errors are simple. A missing comma or wrong file path. Fix them quickly. For complex errors, take your time. Follow each step. Patience helps you solve problems.
Debugging Tools
Debugging tools are your best friends. They help find bugs. Use Visual Studio. It’s a popular tool. It shows your code clearly. You can see each line. Breakpoints are useful. They stop your code. This helps you check it slowly. Another tool is Azure Monitor. It watches your API. It reports problems fast. Always use these tools. They save time and effort.
Cost Management
Hosting a Web API on Azure efficiently manages costs by utilizing scalable resources. Azure’s pay-as-you-go model helps control expenses by only charging for used resources. This approach ensures flexibility and budget-friendly operations, making it an ideal choice for developers.
Understanding Pricing Tiers
Azure offers different pricing tiers for hosting Web API. Each tier provides specific features and capacities. Basic tier is suitable for small apps. It has limited features but is cheaper. Standard tier suits medium-sized applications. It offers more resources and flexibility. Premium tier is for large-scale applications. It provides advanced features and highest performance.
Choosing the right tier is important. It affects your cost and performance. Evaluate your application’s needs. Align them with the tier’s offerings. This helps in making cost-effective decisions.
Cost Optimization Tips
Monitor your Azure usage regularly. Use Azure Cost Management tools. They help track spending. Set up alerts for cost thresholds. This avoids unexpected expenses. Optimize resource allocation. Turn off unused resources. This saves money. Consider scaling options. Scale resources as needed. It reduces unnecessary costs. Use discounts like Reserved Instances. They offer reduced rates for long-term commitments.
Choose the right region. Regions have different costs. Select a region that meets your budget. Consider using Azure Advisor. It provides optimization recommendations. Follow these tips to manage costs effectively.
Credit: www.pragimtech.com
Frequently Asked Questions
How Do I Host My Web Api?
To host your web API, choose a reliable cloud provider like AWS or Azure. Set up a server, deploy your API code, and configure domain settings. Use Docker for easy deployment and scalability. Ensure security measures are in place, like HTTPS and API keys, for protection and functionality.
How To Set Up An Api In Azure?
Set up an API in Azure by navigating to Azure Portal. Create a new API Management service. Configure API settings, add APIs, and define operations. Test and publish your API using the Azure API Management interface. Ensure security and scalability with Azure features.
How To Deploy An Api Project In Azure?
Deploy an API project in Azure by creating a new App Service. Use Azure Portal to configure settings. Push your code using Git or FTP. Integrate with Azure DevOps for continuous deployment. Monitor your API with Azure Application Insights for performance analytics.
What Is The Difference Between Web Api And Azure Api?
Web API is a framework for building HTTP services, while Azure API Management provides tools to manage APIs on Azure. Web API focuses on creating APIs, and Azure API Management emphasizes API management capabilities, including security, analytics, and scalability. Both enhance API functionalities, but serve different aspects.
Conclusion
Hosting your Web API on Azure is straightforward and efficient. Azure offers a scalable, reliable platform. You now know the steps to deploy your API. This knowledge helps you manage resources better. Azure makes monitoring and updating easy. Your API remains secure and high-performing.
Follow these steps carefully for success. Azure’s tools simplify complex processes. Explore Azure’s features to enhance your API further. Remember, consistent management is key. Keep learning and adapting to new technologies. You’re ready to host your Web API confidently on Azure.
Your journey in cloud computing begins here.


