
Imagine you’ve just finished building your React web app, and you’re eager to share it with the world. But now comes the crucial step—hosting it.
Whether you’re a seasoned developer or just getting started, hosting can seem like a complex puzzle. You might be wondering, “Where do I begin? ” Or “What steps do I need to follow? ” This article is designed to simplify that process for you.
We’ll guide you through hosting your React web app, offering clear instructions and tips to ensure your app runs smoothly and efficiently. By the end of this read, you’ll feel confident about putting your creation online, ready for users to experience what you’ve built. Don’t miss out on the opportunity to make your app accessible to everyone. Dive in to learn how you can effortlessly host your React web app today!
Setting Up The Development Environment
First, download Node.js from the official site. It’s free. Node.js comes with npm. npm helps you manage packages. These packages are small tools. They help you build your web app faster.
After download, install Node.js. Follow the steps on screen. It’s easy. Check the installation. Open a terminal. Type node -v to see the version. Then type npm -v for npm’s version. If numbers show up, it’s done.
To start a new project, use Create React App. This is a tool. It sets up everything you need. Open a terminal. Type npx create-react-app my-app. Replace “my-app” with your project name. This creates a folder. Inside, you’ll find all files you need.
Now, move into your new project. Type cd my-app. Start the development server. Type npm start. Your browser will open. You’ll see your new React app.
Credit: docs.aws.amazon.com
Building The React Application
React apps need a build step. This step turns the code into small files. These files run in a browser. The process uses tools. Webpack and Babel are common tools. They help in making the code smaller and faster. Developers start by writing code. Then they use the tools to build it. This step is important. It makes the app ready for users. Without it, the app might not work.
Webpack is like a magic box. It packs all the files together. For production, settings change a bit. Minification helps make files smaller. Smaller files load faster. Code splitting is another trick. It splits files into parts. Only needed parts load first. This speeds up the app. Also, set environment variables. This helps in managing different settings. For example, development and production settings.
Choosing A Hosting Platform
Amazon Web Services, Google Cloud, and Microsoft Azure are popular choices. These services offer great tools for developers. You can also look at Netlify and Vercel. They are user-friendly and ideal for small projects. Each platform has its own benefits. Choose based on your needs and budget.
Free services are good for beginners. They provide basic features without cost. Limited support and resources might be a downside. Paid services offer more features and better support. This is great for large projects or businesses. Think about your project’s size and future needs.
Deploying To Github Pages
Start by creating a new GitHub repository. Name it the same as your app. Next, push your React app code to the repository. Make sure to include the build folder. This folder is crucial for deployment. After pushing, check if all files are on GitHub.
GitHub Actions automates the deployment. Create a new file in the .github/workflows directory. Name it deploy.yml. This file contains the deployment instructions. Use a simple action script to build and deploy. Make sure it points to the build folder. Finally, commit and push the file to GitHub. This triggers the deployment process.
Deploying To Netlify
Deploying a React web app to Netlify simplifies hosting with its seamless integration and automatic build processes. Just connect your GitHub repository, and Netlify handles the rest, making deployment straightforward and efficient. Enjoy reliable hosting with a user-friendly interface and easy updates.
Connecting Git Repository
First, log into Netlify. Click on “New site from Git”. Choose your Git provider. Select the correct repository. This lets Netlify pull your code. It’s easy and quick. Netlify does the hard work for you. Your React app is now connected.
Setting Build Commands And Environment Variables
Set the build command to “npm run build”. This tells Netlify how to build your app. Add any needed environment variables. They help in running the app correctly. You can find them in your app settings. Make sure you save changes. Now, your app is ready to deploy.
Deploying To Vercel
Vercel is a great place to host your React app. Start by creating a new project. Connect your GitHub account to Vercel. This helps in importing your app code. Choose the correct repository for your app. After selecting, Vercel will guide you through the setup.
Automatic deployments make life easy. Each time you push to GitHub, Vercel deploys your changes. This means your app is always up to date. To set this up, ensure your project is linked. Vercel will monitor your GitHub repository. Each commit triggers a new deployment. This is a hands-free way to keep your app current.
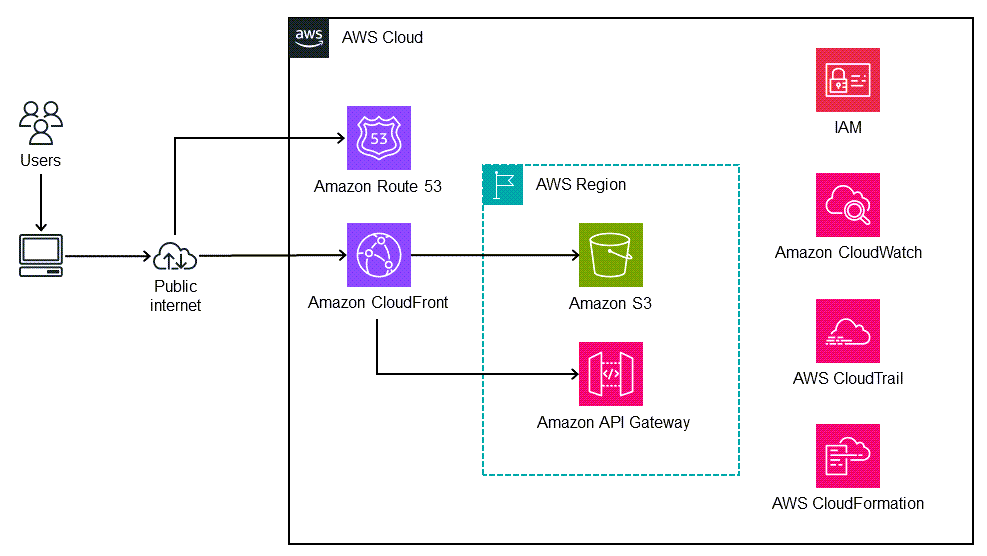
Deploying To Aws S3 And Cloudfront
Host a React web app on AWS S3 for easy deployment. Use CloudFront to speed up content delivery worldwide. This setup ensures your app loads quickly and efficiently for users everywhere.
Creating S3 Bucket
First, log in to your AWS account. Go to the S3 service. Click on “Create Bucket”. Choose a unique name for your bucket. Select the region close to your users. This helps with speed. Click “Create” again. Your bucket is ready now.
Configuring Cloudfront Distribution
Open the CloudFront service in AWS. Click on “Create Distribution”. Choose the Web option. Enter your S3 bucket name as the origin. Leave other settings as default. Click “Create Distribution”. Wait for the status to become “Deployed”. This may take a few minutes. Now, your React app is ready on CloudFront.
Credit: medium.com
Optimizing For Performance
Hosting a React web app involves choosing the right server and optimizing for speed. Ensure efficient bundling and code splitting to enhance performance. Select a reliable hosting platform to support seamless updates and quick load times.
Minimizing Bundle Size
Smaller bundle sizes make apps load faster. Use tools like Webpack or Rollup. These tools help you reduce the bundle size. Remove unnecessary libraries and code. Only include what you need. This will help your app run smoother. Also, compress JavaScript files. It will save space and speed up loading.
Implementing Lazy Loading
Lazy loading means loading parts only when needed. This way, the initial load is faster. Code-splitting helps with lazy loading. Use libraries like React.lazy or React Loadable. They make lazy loading easier. This method helps in improving user experience. Users won’t wait long for the app to open.
Ensuring Security
Securing your React web app is crucial for safe hosting. Implement HTTPS protocols to encrypt data. Regular updates help fix vulnerabilities and enhance security features.
Enabling Https
Secure your app by enabling HTTPS. It keeps data safe. Use a SSL certificate for this. Web hosts often help with this task. It makes sure data travels securely. Without HTTPS, data can be stolen. Protect user information with it. It’s essential for any website today.
Handling Environment Variables Securely
Environment variables hold important data. Keep them safe from others. Use a .env file for storing them. Never share this file online. Use tools like dotenv to manage them. This helps in keeping secrets safe. Never hard-code sensitive data in code. It’s risky. Always handle with care.

Credit: www.youtube.com
Frequently Asked Questions
Which Hosting Is Best For A React Js Website?
Vercel is optimal for hosting a React JS website. It offers seamless integration, fast deployment, and scalability. Netlify is another excellent choice, providing easy setup and continuous deployment. Both platforms support serverless functions, ensuring efficient performance and reliability.
Which Web Server Is Best For React?
Node. js is the best web server for React applications. It offers fast performance and seamless integration. Node. js handles asynchronous requests efficiently, making it ideal for modern web applications. Its compatibility with npm packages enhances development flexibility.
How To Deploy React App To Internet?
Deploy a React app by building it using `npm run build`. Host the build folder on platforms like Netlify, Vercel, or GitHub Pages for easy internet access. Ensure your domain settings and SSL configurations are correct for security and accessibility.
Can Netlify Host The React App?
Yes, Netlify can host React apps seamlessly. It offers a simple deployment process and integrates well with GitHub. Deploy your React app by connecting your repository to Netlify and enjoy features like continuous deployment, custom domains, and serverless functions. Netlify provides reliable hosting for modern web applications.
Conclusion
Hosting a React web app can be simple. Choose a reliable hosting service. Set up your server correctly. Test your app thoroughly before launching. Optimize your code for faster loading. Keep security in mind always. Regularly update your app to fix bugs.
Engage with user feedback for improvements. Make sure your app loads quickly and smoothly. A well-hosted app enhances user experience. Ensure your app is accessible on different devices. Now, you are ready to share your React app with the world.
Happy hosting!


