
Are you looking to host a file on a web server but aren’t quite sure where to start? You’re in the right place.
Whether you want to share documents, images, or any other type of file, understanding how to effectively host them online is crucial. It’s not just about uploading; it’s about ensuring accessibility, security, and speed. Imagine the convenience of accessing your files from anywhere in the world or sharing them with others in just a few clicks.
Sounds great, right? By the end of this guide, you’ll have the confidence and know-how to host your files seamlessly. Dive in to discover the step-by-step process that will make hosting on a web server a breeze for you.
Choosing A Web Server
Selecting the right web server is essential for hosting files online. Understand server types like Apache or Nginx. Consider server features, security, and scalability for your needs.
Types Of Web Servers
Many web servers are available. Apache is popular. It is free. Nginx is another choice. It handles many requests. Microsoft IIS works on Windows. LiteSpeed is fast. It uses less power. Choose based on needs.
Factors To Consider
- Performance: How fast is the server?
- Security: Is the server safe from attacks?
- Cost: Is it within your budget?
- Ease of Use: Can you set it up easily?
- Support: Is help available when needed?
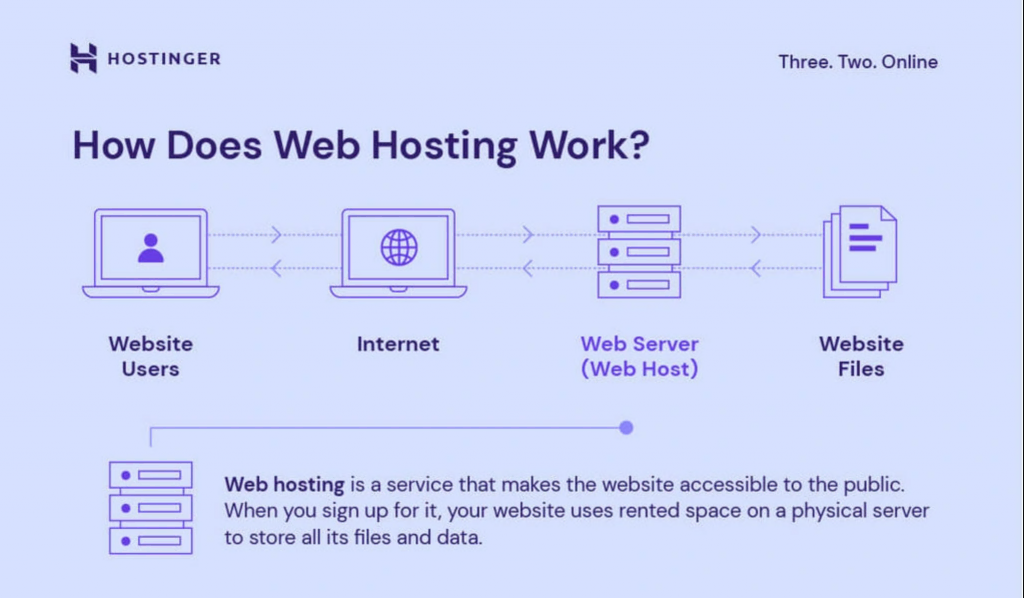
Credit: www.hostinger.com
Setting Up The Server Environment
First, you need a computer with internet. Then, choose a web server software like Apache or Nginx. Download and install it on your computer. Follow the instructions on the screen. Make sure everything installs correctly. Now, your computer can serve files to the internet.
Open the server configuration file. This file tells your computer how to behave online. Change the settings to fit your needs. Set the document root to the folder with your files. Save the changes. Restart the server for changes to take effect. Now, your server is ready to host files.
Preparing Files For Hosting
Good organization helps find files quickly. Create folders for different files. Label folders clearly. Use a main folder for the project. Inside, make separate folders for images, scripts, and styles. This keeps files tidy. Easy to access. Easy to manage.
Choose the correct file format. Some formats work better online. For images, use JPEG or PNG. For documents, use PDF. Videos work best as MP4. Make sure files are compatible. Check if browsers support them. This ensures smooth functioning. Everyone can view the files.

Credit: hstechdocs.helpsystems.com
Uploading Files To The Server
FTP clients help to send files to a web server. Download an FTP client like FileZilla. Install it on your computer. Open the FTP client. Enter the server’s address, username, and password. Click connect. Now, you see files on your server. Select the files you want to upload. Drag and drop them to the server. Wait until the upload finishes. You can see the progress on the screen. Now your files are on the server.
Some hosting services offer a direct upload feature. Log in to your hosting account. Go to the file manager option. Find the upload button. Click it. Choose files from your computer. Click open. The upload starts. You can see the progress. Files are now on the server.
Managing File Permissions
Understanding user roles is key to managing file permissions. Each user on a web server has a role. Roles decide what files users can access. Admins control everything. They can edit, delete, and view files. Regular users have limited access. They can view files but not change them. Guests usually have the least access. They might see basic files only.
Setting permissions lets you control who can see or edit files. Use numbers like 755 or 644. These numbers tell the server what users can do. 755 means the owner can do anything. Others can only view. 644 means the owner can read and write. Others can read only. Always check permissions before sharing files. It keeps your server safe.
Testing File Accessibility
Accessing Files via URL is simple. First, open a web browser. Type the file’s URL in the address bar. Press enter. The file should display on the screen. Make sure the URL is correct. Check for typos in the address. Always include “http://” or “https://”. This tells the browser it’s a web link.
Troubleshooting Access Issues may be needed. Sometimes the file won’t load. Check the web server settings. Ensure the server is running. Verify the file is in the right folder. Look for error messages. They often show the problem. Try accessing the file from another device. This can help find out if the issue is local.
Securing Hosted Files
Safeguarding files on a web server involves using strong passwords and encryption. Ensure regular software updates to prevent vulnerabilities. Implement firewalls and access controls to enhance security measures effectively.
Implementing Security Protocols
Security protocols keep files safe on web servers. Use encryption methods to protect data. HTTPS is important. It secures the connection. Set up firewalls to block bad traffic. Firewalls help prevent attacks. Monitor server activity daily. Look for unusual activity. Limit file access to authorized users. Use strong passwords. Passwords should be unique and complex. Two-factor authentication adds extra safety. It requires two steps to log in. Keep software updated. Updates fix security holes.
Regular Security Audits
Security audits are checks for vulnerabilities. Schedule audits regularly. They find weak spots. Fix issues quickly to prevent breaches. Use automated tools for audits. Tools help scan large systems. Check file permissions often. Permissions control who can access files. Review logs for strange activity. Logs show what happened on the server. Train staff about security practices. Staff should know the importance of security. Document audit results and actions taken. Track improvements over time.
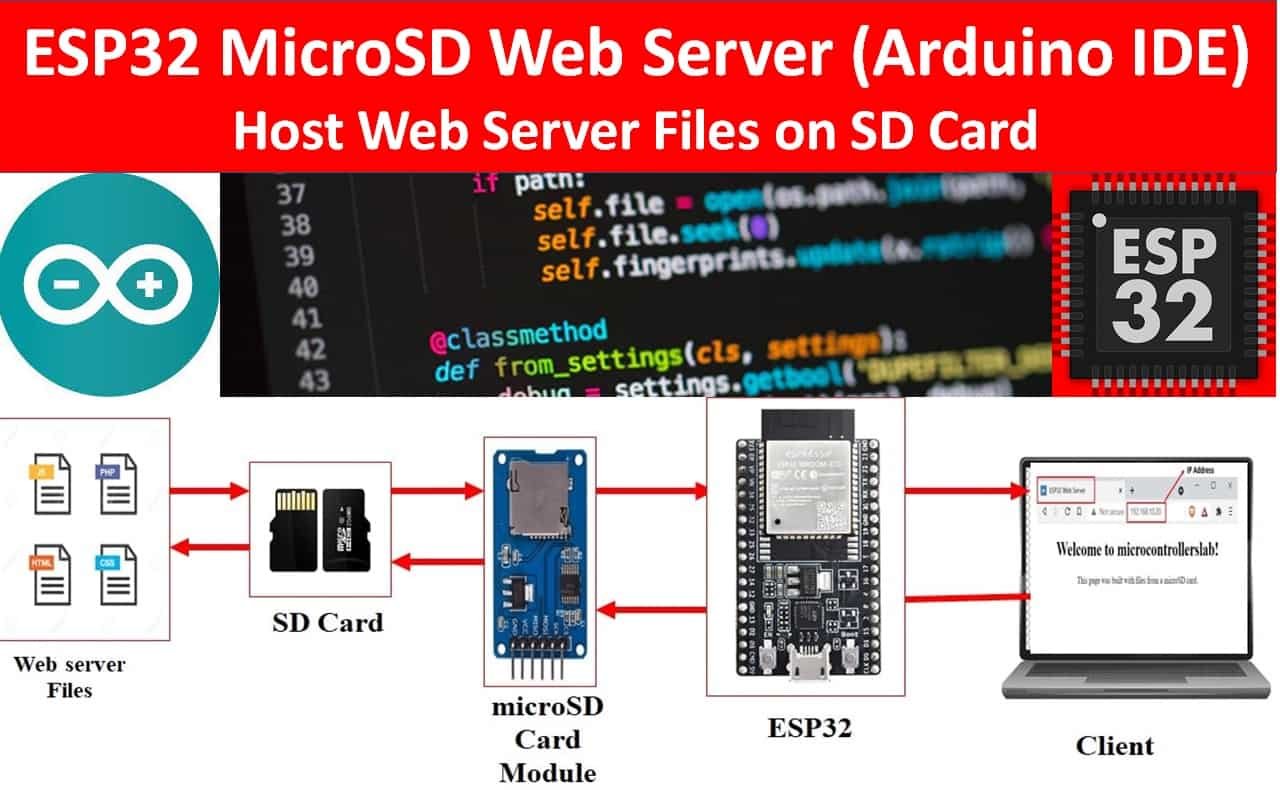
Credit: microcontrollerslab.com
Maintaining And Updating Files
Version control helps manage file changes. It keeps track of file updates. You can see who changed what and when. This is very useful for teams. It helps avoid conflicts in file updates. Tools like Git can help. They make it easy to manage versions. Always use version control to keep files organized.
Regular backups protect your files. They save copies of your important data. If a file is lost, a backup can help. Always schedule backups regularly. This ensures you have the latest version saved. Use cloud services or external drives. These options are reliable. They help keep your data safe.
Frequently Asked Questions
How To Host A File On A Webserver?
To host a file on a webserver, first upload the file using an FTP client or web hosting service. Ensure the file path is correct. Set appropriate permissions for public access. Finally, share the URL link to access the file.
How Do I Create A Host File?
To create a host file, open the text editor with administrator privileges. Navigate to C:WindowsSystem32driversetchosts for Windows or /etc/hosts for Mac/Linux. Add IP addresses and domain names in separate lines. Save changes. This file helps in mapping domain names to IP addresses locally.
Where Is The Host File On The Server?
The host file on a server is typically located at “/etc/hosts” for Unix/Linux systems. For Windows servers, find it in “C:WindowsSystem32driversetchosts”. This file maps hostnames to IP addresses, aiding in network management. Always back up before making changes to the host file.
How Do I Host A Local File?
Use a local server like XAMPP or WAMP to host files. Install the server, place files in the ‘htdocs’ directory, and start the server. Access files via browser using ‘localhost/[file-name]’. Ensure server is running for file accessibility.
Conclusion
Hosting files on a web server is straightforward. Start with choosing a reliable server. Upload your files using FTP or a web-based interface. Ensure your files are organized. This makes them easy to access. Always check file permissions. They keep your data secure.
Regularly update your server software. Updates protect against vulnerabilities. Test your files after uploading. This guarantees they work correctly. Hosting files efficiently enhances your website’s functionality. Follow these steps, and you’ll manage your server with ease. With practice, you’ll gain confidence in handling your web server.
Happy hosting!


