
Are you ready to take your Asp.Net application live on the web? Hosting your application on a web server like IIS might seem daunting at first, but it’s more straightforward than you think.
Imagine the satisfaction of seeing your hard work accessible to users around the world. With the right guidance, you can achieve this seamlessly. In this guide, you’ll discover step-by-step instructions to help you navigate the process. You’ll learn how to configure your server, deploy your application, and troubleshoot common issues.
Get ready to unlock the door to your application’s potential and connect with your audience effortlessly. Read on to transform your web hosting skills and bring your Asp. Net application to life.

Credit: www.youtube.com
Preparing The Application
Build your Asp.Net application using Visual Studio. It helps in creating the files needed. Ensure all files compile without errors. Check for any warnings. Fix them before proceeding. After building, test the application locally. Make sure everything works as expected. This step is crucial before hosting on IIS. Local testing ensures the app runs smoothly.
Ensure your application is compatible with the IIS version. Check the .NET framework version. It should match the IIS server. Compatibility is key for smooth operation. Update any outdated components. Compatibility avoids errors when hosting. Also, review dependencies. Ensure they align with server settings. This helps in avoiding runtime issues. Make sure your app is ready for the IIS environment.
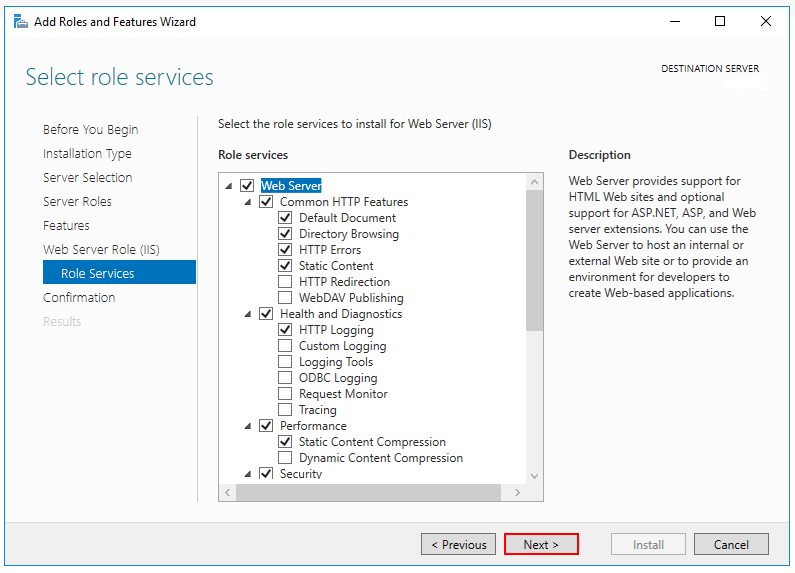
Setting Up Iis
Open the Control Panel on your computer. Find and click on “Programs and Features”. On the left side, see “Turn Windows features on or off”. Click it. A window will open. Look for “Internet Information Services”. Check the box next to it. Click “OK”. Windows will install IIS. Wait for it to finish. You have now installed IIS on your computer. It’s very simple!
Open the IIS Manager. You can find it in the Control Panel. Click on your computer’s name in the left pane. Look for “Features View”. Click on “Add Role Services”. Check the features you need. Common features include ASP.NET and Static Content. After selecting, click “Next”. Then click “Install”. Your IIS will now have the features you need for your app. Configuration is complete!
Deploying The Asp.net Application
First, open the IIS Manager on your computer. Go to the Sites section. Click on Add Website. Enter a name for your website. Choose a folder for your website files. Make sure the folder has the right files. Choose a port number. Usually, port 80 is common. This is for HTTP sites.
You need to assign an Application Pool. This is important. Choose the right pool for your application. Most sites use the .NET CLR Version that matches your app. Check if the pool is running. If not, start it. This helps your site work well.
Credit: learn.microsoft.com
Configuring Application Settings
Set up your ASP. NET application on IIS by carefully configuring application settings. Ensure seamless performance by adjusting parameters like authentication, authorization, and error handling. Proper configuration enhances security and optimizes resource use, ensuring a smooth deployment on the web server.
Set Up Bindings
Bindings help your app connect to the right domain. Open the IIS Manager on your server. Select the site you want to configure. Click on “Bindings” in the Actions pane. Add a new binding by clicking the “Add” button. Choose the type of binding, like HTTP or HTTPS. Enter the correct IP address and port. Fill in the hostname if needed. Click “OK” to save changes.
Adjust Web Configurations
Open the web.config file in your app folder. Locate any settings that need changes. Modify the connection strings to match your server. Check the authentication settings. Ensure error messages are set correctly. Save the file after adjustments. Restart the IIS server to apply changes.
Testing The Deployment
Deploying Asp. Net applications involves configuring the IIS web server. Testing ensures your application runs smoothly online. Verify settings, permissions, and application functionality for a successful deployment.
Access Application Via Browser
Open your web browser. Type the URL of your application. Press Enter. Your application should load on the screen. Check if all functions work well. Look for any errors. If the page does not load, there might be a problem with the server settings. Check the server logs for clues. Make sure the network connection is okay. The application should be accessible from different devices. Test it on a phone and a tablet too. Ensure the performance is smooth.
Troubleshoot Common Issues
Problems can occur anytime. If the application fails, check the error logs. Logs provide helpful clues. Verify the server configuration. Ensure the database connection is active. Sometimes, a firewall may block the application. Disable the firewall temporarily. Check if the application works. Update the server software regularly. Outdated software causes issues. Restart the server if needed. Sometimes, this fixes minor problems. Contact technical support for complex issues. They provide expert help. Follow their guidance step by step.
Securing The Application
SSL certificates help keep data safe. They protect information during transfer. This helps build trust with users. Install the SSL on your server. Ensure it is properly configured. This will make your site secure. Visitors will see a padlock icon in the browser. This shows the site is safe. It also helps with search engine ranking. Many browsers warn if a site lacks SSL. So, it is very important.
Firewalls protect your application from threats. They block unauthorized access. Configure your firewall settings wisely. Allow only needed traffic. Block unwanted sources. This keeps hackers away. Regularly update your firewall rules. This ensures optimal protection. Always monitor traffic patterns. Notice any unusual activities. Act quickly if needed. A good firewall setup keeps your app safe.
Monitoring And Maintenance
Ensuring Asp. Net applications run smoothly requires regular monitoring and maintenance. Identify potential issues early and keep the server optimized. Secure configurations and updates help protect against vulnerabilities.
Set Up Logging
Logging is important for tracking errors and performance. It helps find issues quickly. Use IIS to set up logs. Check logs often. Logs show how your application works. They can show problems or slowdowns. You can change settings to log more information. Choose the right level of detail. This helps you understand what is happening. Good logs make troubleshooting easier.
Schedule Regular Backups
Backups keep your data safe. Schedule backups often. Use IIS to set up automatic backups. They save your work and settings. If something goes wrong, backups restore your application. Choose a safe place to store backups. Check backups to make sure they work. This keeps your application secure. Regular backups protect against data loss. Always have a backup plan.
Credit: weblog.west-wind.com
Frequently Asked Questions
How To Host An Asp.net Application In Iis?
Install IIS via Control Panel. Open IIS Manager, create a new site. Set the site’s physical path. Select an application pool. Bind the site to a port. Deploy your ASP. NET application files to the specified path. Verify the site settings and browse to test the application.
How To Run Asp File On Iis Server?
Enable ASP in IIS Manager. Open “Turn Windows features on or off” and select “Internet Information Services. ” Click “World Wide Web Services,” then “Application Development Features,” and check “ASP. ” Save settings. Place your ASP file in the appropriate IIS directory.
Access the file via a browser using “http://localhost/filename. asp”.
How To Deploy .net Framework Application On Iis?
Deploy your. NET Framework application on IIS by publishing to a folder. Open IIS Manager and create a new site. Point the site’s physical path to the published folder. Set the application pool to use the correct. NET version. Bind the site to a domain and start it.
How Do I Host My Website In An Iis Server?
To host a website on an IIS server, first install IIS via the Control Panel. Create a new website in IIS Manager, set the physical path to your site’s folder, and configure bindings for your domain. Finally, start the website, ensuring firewall and permissions settings allow access.
Conclusion
Hosting an Asp. Net application on IIS is straightforward. Follow the steps to ensure success. Double-check configurations for smooth operation. Always back up your application files. This prevents data loss. Keep your IIS server updated regularly. Updates fix bugs and improve security.
Monitor server performance for optimal functionality. Troubleshoot issues promptly to maintain uptime. Remember, practice makes perfect. Experiment with settings. Learn from any mistakes. Your skills will improve over time. With patience, your application runs smoothly. Enjoy the process and keep refining your approach.
A well-hosted application benefits users and improves their experience.


