
Have you ever developed an Angular web application and wondered about the best way to host it in Azure? You’re not alone.
Many developers find themselves asking the same question. Azure, Microsoft’s cloud computing service, offers a powerful platform for hosting web applications, but navigating its vast array of services can seem overwhelming at first. Luckily, hosting your Angular application in Azure doesn’t have to be complicated.
Imagine the satisfaction of seeing your app run smoothly, with scalable resources and reliable uptime, all powered by the robust infrastructure Azure provides. With a few simple steps, you can make this a reality. Whether you’re a seasoned developer or new to the world of web applications, understanding how to leverage Azure’s capabilities can enhance the performance and reach of your projects. We’ll guide you through the process of hosting your Angular web application in Azure, breaking it down into easy-to-follow steps. You’ll gain insights on how to configure your environment, deploy your app, and optimize its performance. Dive in, and discover how Azure can be the perfect home for your Angular masterpiece.
Credit: devblogs.microsoft.com
Azure Account Setup
First, visit the Azure website and click on “Start Free”. Fill in your details like name, email, and phone number. You will need a credit card for verification. Don’t worry, you won’t be charged. After verification, your account is ready. Now, you have access to Azure’s services.
Log in to your Azure Portal with your new account. Click on “Subscriptions” in the left menu. Choose “Add Subscription”. Pick a plan that suits your needs. Many start with the free tier. This gives you basic resources to explore Azure. Confirm your choice, and your subscription is active.
Preparing Angular Application
First, open your terminal or command prompt. Navigate to your project folder. Use the ng build command. This will create a new build of your project. The build files will go in the dist/ folder. Make sure the build is successful. If there are errors, fix them first.
For the production build, use ng build –prod. This command optimizes the app. It makes the app faster and smaller. Check the angular.json file. Ensure production settings are correct. These include outputPath and fileReplacements. Proper configuration is key for smooth deployment.
Azure Web App Configuration
Begin by logging into the Azure portal. Click on Create a resource. Choose Web App from the options. Enter the necessary details. This includes the App name and the Resource group. Make sure the name is unique. Choose the Runtime stack for Angular. Select your preferred Region. Click on Review + Create to finalize. This sets up the basic structure for your app.
After creating your web app, configure the App Service Plan. This plan decides the performance and cost. Choose a pricing tier that fits your needs. Consider the traffic and scale of your app. Use the Scale up or Scale out options for flexibility. Ensure you choose a plan that provides enough resources. This ensures your app runs smoothly.
Deployment Process
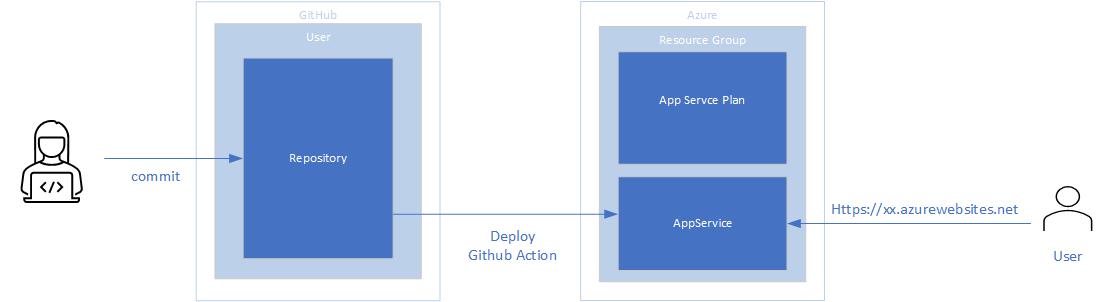
The Azure CLI tool helps in deploying apps quickly. First, install Azure CLI on your computer. Then, log into Azure using the command line. Create a new resource group for your app. This group holds all the resources. Next, create an app service plan. This plan decides how your app runs. After that, deploy your Angular app using the az webapp up command. This command pushes your app to Azure.
Start by logging into the Azure Portal. Create a new resource group first. Next, set up an App Service within this group. Choose your app’s settings and configurations. Upload your Angular files directly in the portal. Use the deployment center to streamline this process. Ensure all settings are correct before you go live. This makes your app visible online.
Custom Domain Setup
Buying a domain is important for your website. It gives a unique name to your site. Use trusted domain providers. They offer many options and good prices. Choose a name that is easy to remember. It should relate to your business or project. Check if the name is available. Many names are already taken. Once you find a good name, register it quickly. This makes sure no one else takes it. Keep your account details safe. You will need them for future updates.
Setting up DNS is like giving your website an address. It helps people find your site online. Log into your domain provider’s website. Look for the DNS settings page. Add a new record for your domain. Enter the IP address of your Azure web app. This connects your domain to the app. Save the changes you made. It can take some time to update. Check if your site opens with the new domain. If it does, your DNS is set up right.

Credit: learn.microsoft.com
Monitoring And Scaling
Azure provides tools to watch your app’s performance. Use Azure Monitor to see how your app runs. It shows if your app is slow or fast. You can check how many users visit your site. If something goes wrong, you will know quickly. This helps fix problems fast. Azure Monitor is like a doctor for your app. It keeps everything healthy.
Sometimes, many people visit your app. Your app may need more power. Azure can help with this. It can add more servers to your app. This is called scaling. Scaling helps keep your app running well. Even with many users. Azure makes scaling easy. You can set it to scale by itself. More power when you need it. Less power when you don’t. This saves money and keeps users happy.
Troubleshooting Common Issues
Deploying an Angular app in Azure often faces issues like server errors or failed builds. Solutions include checking Azure configurations and ensuring all dependencies are correctly installed. Another common problem is routing errors, often fixed by adjusting the Angular application’s base URL settings in the Azure environment.
Debugging Deployment Errors
Deployment errors can cause frustration. First, check the error logs for clues. These logs can show specific issues. Verify that your Angular app files are uploaded correctly. Sometimes, a missing file causes errors. Ensure your build process is complete. A failed build can prevent deployment. Double-check the deployment settings in Azure. Incorrect settings can lead to problems. If errors persist, consult the Azure documentation for help.
Resolving Configuration Problems
Configuration problems often arise from mismatched settings. Make sure your environment variables are correct. Incorrect variables lead to errors. Verify the Azure App Service settings match your app needs. Check your API endpoints. Wrong endpoints cause communication issues. Ensure your CORS settings are accurate. Incorrect CORS settings block requests. Adjust settings until your app runs smoothly. Consult documentation if problems continue.
Credit: blog.codewithdan.com
Frequently Asked Questions
How To Host An Angular App On Azure?
Deploy your Angular app on Azure by creating a Resource Group. Use Azure App Service and configure continuous deployment. Upload your build files via Azure CLI or Visual Studio Code. Ensure proper app settings in Azure Portal for smooth operation.
How To Host An Angular App?
Host an Angular app by building it using Angular CLI. Deploy the production build on a web server like Apache or NGINX. For hosting, use platforms like Firebase, AWS, or Netlify. Ensure the server serves the index. html file and handles routes properly for seamless navigation.
How To Deploy An Angular App In The Cloud?
To deploy an Angular app in the cloud, first build your project using the Angular CLI. Choose a cloud platform like AWS, Azure, or Google Cloud. Upload the build files to the platform’s storage service. Configure the hosting settings and deploy the app via the platform’s deployment tools.
How To Turn Angular App Into Pwa?
To convert an Angular app into a PWA, install Angular PWA package. Add service worker configuration in `ngsw-config. json`. Enable PWA support using `ng add @angular/pwa` command. Build and deploy the app. Ensure the app is served over HTTPS and includes a valid `manifest.
json` file.
Conclusion
Hosting an Angular web application on Azure is simple. Follow the steps carefully. Begin with setting up an Azure account. Use Azure Portal to deploy your app. Choose the right service for your needs. Ensure your app runs smoothly by checking configurations.
Azure provides tools to manage resources efficiently. Regularly monitor your app’s performance. Make updates as needed. This process offers a reliable way to host Angular apps. Enjoy a secure and scalable environment with Azure. By following these guidelines, your web application can thrive on Azure’s platform.


