
Have you ever wanted to customize your WordPress site even further, but felt restricted by the default settings? Imagine being able to add unique features and functionalities wherever you want on your site, elevating its look and user experience.
By learning how to create a widget area in your WordPress theme, you unlock the potential to do just that. This guide will walk you through the process step-by-step, making it easy to enhance your site’s design and functionality. With a few simple tweaks, you can transform your WordPress site into a more dynamic and engaging platform for your visitors.
Ready to take control and make your website truly yours? Let’s dive into the details and unlock the power of custom widget areas in your WordPress theme.

Credit: kinsta.com
Choosing The Right Location
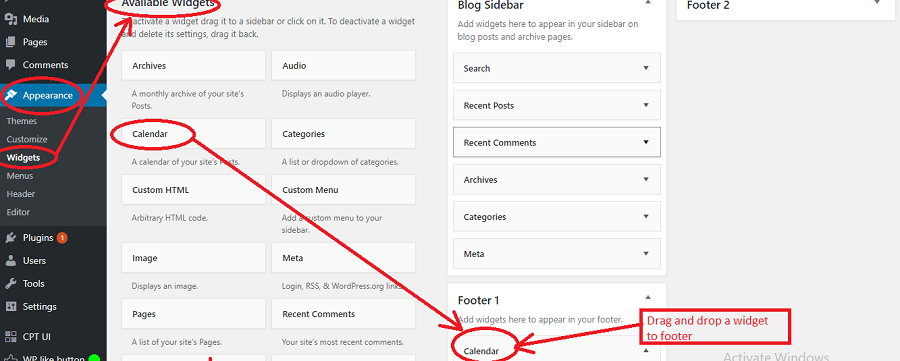
The header and footer areas are ideal for widgets. These parts are always visible. Users often look here for important links. Adding widgets here makes them easy to find. Widgets in these areas can include social media links or contact information. This placement helps users interact with your site.
Sidebars are great for widgets too. Many themes have space for sidebars. These areas are perfect for advertisements or popular posts. Sidebars keep users engaged with extra content. It’s easy for users to explore more on your site. Always keep sidebars neat and clean.
Custom page templates offer unique widget opportunities. These templates can be made for special pages. Widgets here can be for exclusive deals or upcoming events. They provide a personalized touch. Make sure widgets fit the page design. Users will appreciate tailored content on these pages.
Registering A New Widget Area
Modifying Functions.php is simple. First, find the functions.php file in your theme folder. This file controls many features. Add code to register a new widget area. Use the register_sidebar function. It helps create a space for widgets. This code tells WordPress where to put widgets. Save changes after adding code.
Next, Using WordPress Hooks is essential. Hooks let you add functions without changing core files. They ensure your widget area works smoothly. Use the widgets_init hook. It initializes widget areas. Add your function to this hook. This connects your new area to WordPress.
Now, focus on Setting Widget Area Parameters. Parameters define widget area details. Include name, ID, and description. Choose a name that is easy to remember. The ID should be unique. Describe the area clearly. Parameters help manage widgets effectively. Make sure to test after setting them.
Adding Widgets To Your Theme
Creating a widget area in your WordPress theme enhances functionality. Start by registering a widget area in your theme’s functions. php file. Then, use dynamic_sidebar to display it in your theme files. This process allows easy customization and improves user interaction with your site.
Editing Theme Files
Open the WordPress dashboard. Click on Appearance and then Editor. Find the functions.php file. This file is important. It controls many things. Add this code to create a widget area:
function my_theme_widgets_init() {
    register_sidebar( array(
        'name'          => 'New Widget Area',
        'id'            => 'new_widget_area',
        'before_widget' => '',
        'before_title'  => '',
    ) );
}
add_action( 'widgets_init', 'my_theme_widgets_init' );
After adding, save the file. This will make a new space for widgets.
Php Code For Widget Display
To show widgets, open the sidebar.php file. Add this code where you want the widget:
if ( is_active_sidebar( 'new_widget_area' ) ) :
    dynamic_sidebar( 'new_widget_area' );
endif;
This code checks if the widget is active. If yes, it shows the widget.
Ensuring Theme Compatibility
Always use child themes for changes. This keeps updates safe. Check the theme’s documentation. Some themes have special ways to add widgets. Always back up your files before making changes.
Styling Your Widget Area
Create a widget area in your WordPress theme by registering a new sidebar in the functions. php file. Customize it with unique widgets to enhance your website’s appearance and functionality. This allows for a tailored user experience, making your site more engaging and interactive.
Css Customization
Use CSS to make your widget area look nice. Change colors and fonts to match your theme. Add padding and margins for spacing. CSS helps your site stand out. You can also use borders to define sections. Simple CSS changes make a big difference.
Mobile Responsiveness
Ensure your widget area looks good on small screens. Use media queries in CSS. Adjust font size and layout for mobiles. Responsive design is important. It helps users on phones. Make sure everything fits well. No part should be cut off.
Using Theme Customizer
The theme customizer is a handy tool. It allows easy changes to your widget area. Access it from the WordPress dashboard. Change colors, fonts, and layout. See changes in real-time. The customizer is user-friendly. No coding is needed. Adjust settings and click save. Your widget area is updated.
Testing And Troubleshooting
Creating a widget area in a WordPress theme involves editing the functions. php file. Use the register_sidebar function to define the widget area. Test the new widget by adding it to your theme and troubleshoot any errors by checking your code for typos.
Common Errors
Widgets may not appear correctly due to missing code. Check if the widget area code is added in functions.php. Sometimes, widgets overlap or look messy. This can happen if CSS styles conflict. Ensure styles are correctly defined. Widgets might also cause slow loading. This happens if they load too many scripts.
Debugging Techniques
First, enable WP_DEBUG in wp-config.php. This helps to find errors. Check console in your browser for issues. Look for JavaScript errors. They can stop widgets from working. Use Inspect Element to see if HTML is correct. Deactivate plugins one by one. Some plugins can cause conflicts.
Ensuring Cross-browser Support
Test the widget area in different browsers. Sometimes, widgets work in Chrome but not in Firefox. Use browser testing tools. Ensure styles look the same in all browsers. Pay attention to older browsers. They might not support modern CSS. Use fallbacks for unsupported features.

Credit: visualmodo.com
Best Practices
Write code that is easy to read. Use simple functions and comments. This helps others understand your work. Clean code is easier to fix. It also runs better.
Keep your theme up to date. Update plugins and themes often. This keeps your site secure and fast. Old code can break or have bugs.
Make sure the widget area looks good. It should be easy to use. Users like simple and clear designs. Good user experience makes visitors happy. Happy visitors stay longer.
Credit: www.templateonweb.com
Frequently Asked Questions
How Do I Add A Widget Area In WordPress?
To add a widget area, register a sidebar in your theme’s functions. php file using `register_sidebar()`. Then, use `dynamic_sidebar()` in your theme files to display it. Customize the widget area with CSS for styling.
What Is The Purpose Of Widget Areas?
Widget areas allow users to add, organize, and manage widgets easily. They enhance site functionality and design by providing interactive elements like search bars, menus, and social links.
Can I Create Multiple Widget Areas In WordPress?
Yes, create multiple widget areas by using `register_sidebar()` for each area in your functions. php file. Use `dynamic_sidebar()` where needed in your theme files to display them.
How Do I Customize Widget Areas?
Customize widget areas using CSS to change appearance and layout. Use custom widget classes for targeted styling. Modify the widget structure in theme files if needed.
Conclusion
Creating a widget area in WordPress is straightforward. It enhances your site’s functionality. Widgets allow customization without coding. Follow steps carefully to avoid errors. Practice makes perfect, so try different settings. Widgets improve user experience and site navigation. They’re essential for modern websites.
Experiment to find what suits your theme best. Enjoy the flexibility WordPress offers. Keep learning and exploring new features. Your site will soon be more user-friendly. Stay updated with WordPress trends. Happy customizing!


