
Are you looking to give your Sydney WordPress theme a fresh look? Changing the menu font can be a simple yet powerful way to enhance your website’s aesthetics and improve user experience.
Whether you’re aiming for a sleek, modern vibe or a more classic feel, tweaking the font can make a significant difference. In this guide, you’ll discover the step-by-step process to effortlessly customize your menu font, ensuring your site stands out and captures your audience’s attention.
Don’t worry if you’re not a tech guru; we’ll walk you through every click and setting. Ready to transform your website and leave a lasting impression? Let’s dive in!
Accessing The WordPress Dashboard
First, go to your WordPress site. Use your login details to enter. Once logged in, see the left-hand menu. It has many options.
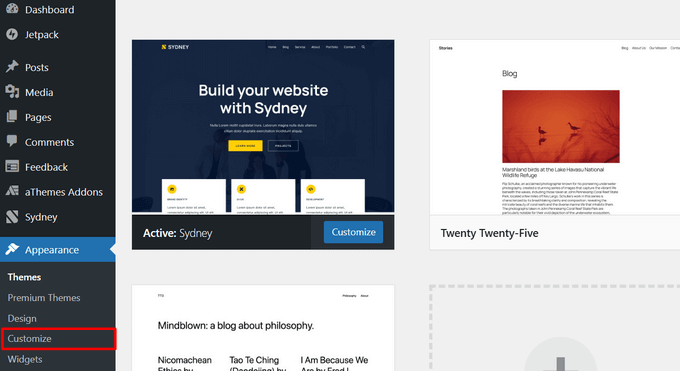
Find the one named “Appearance”. Click on it. A drop-down menu will open. Choose the “Customize” option. This is where you can change things.
The dashboard is your main tool. Here, you can see all your site’s features. Make sure to explore it well. It helps in managing your site better.

Credit: stackoverflow.com
Navigating To Appearance Settings
Accessing the Appearance Settings is simple. First, log in to your WordPress dashboard. Find the menu named “Appearance” on the left side. Click on it to open the settings. Now, look for the Customize option. Click on it to enter the customization area. Here, you can see various options.
Find the Typography section. This area lets you change fonts. Select the Menu Font option. A list of fonts appears. Choose your desired font style. Click Publish to save changes. Your menu font updates instantly. Explore more settings if needed.
Customizing The Theme
Start by finding the WordPress Dashboard. Look on the left menu. Find the Appearance tab. Click on it. A new menu will show up. Here, choose Customize. This is the place where you can make changes. You will see different options. Each option lets you change a part of your site. Always save your changes. This is important.
After clicking on Customize, find the Typography section. This section is important. It controls how text looks. Once inside, look for Menu Font. Here, you can change the style of the menu text. Choose a font you like. Make sure it is easy to read. Some fonts are fancy. Others are simple. Try different ones. See which looks best on your site.
Credit: www.wpbeginner.com
Changing The Menu Font
First, go to your WordPress dashboard. Find the “Appearance” tab. Click on it. Now, choose “Customize”. This opens the customization panel. Look for “Typography”. It’s usually under the “Header” section. Click to open it. Here, you can see font options for your menu. Make sure to select the right one.
Look through the font list provided. Pick a font you like. It should be easy to read. Click on the font name to select it. Once done, look for the “Publish” button. It saves your changes. Now, check your website. The menu font should be updated. If not, refresh the page. Make sure your changes are saved properly.
Adjusting Font Size And Style
Change the font size using theme customizer. Go to the Appearance tab. Select Customize. Look for Typography. Click on Menu Font Size. Adjust the slider. See the preview on the right. Choose a size that fits. Click Publish to save changes.
Choose a font style that suits your site. Visit the Typography section again. Look for Font Style options. Various styles available: bold, italic, and more. Select a style variant. Preview the change immediately. Find a style that enhances readability. Click Save to apply the style.
Previewing Changes
Easily change the menu font in the Sydney WordPress theme through the Customizer panel. Navigate to “Appearance,” then “Customize,” and select “Typography. ” Adjust the menu font settings to fit your style, and preview changes instantly. This simple process gives your site a fresh look without coding.
Using The Live Preview Feature
The Live Preview feature helps see changes quickly. It shows the font changes instantly. This makes it easy to decide if you like the new look. Click on the “Customize” option in the WordPress dashboard. Select the “Typography” section. Here, choose the menu font you want to preview. Look for the changes on the right side of the screen. This is the live preview area. Adjust the settings as needed. Click “Publish” when happy with the look.
Ensuring Compatibility With Design
Font changes should match the overall design. The new font should be easy to read. Make sure it fits with the theme colors and style. Some fonts might look good but not work well with your design. Test different fonts to find the best match. Always check on different devices. This ensures the font looks good everywhere.
Saving And Publishing Changes
Once you change the menu font, it is time to save. Look for the save button on your screen. Click on it to keep your changes. You must press this button before leaving the page. Without saving, changes will be lost. After saving, your changes need publishing. Find the publish option and click. This makes your new menu font visible to everyone. Remember, saving and publishing are two different steps. Both are important. Make sure you do both.
Troubleshooting Common Issues
Changing the menu font in the Sydney WordPress theme can be simple. Navigate to the Customizer in your dashboard. Select “Typography” and adjust the menu font style and size to suit your needs.
Resolving Font Display Problems
Fonts not showing correctly can be frustrating. First, check your theme settings. Ensure the correct font is selected. Sometimes, the font files may be missing. Go to your theme’s font folder. Make sure all files are there. Another issue might be caching. Clear your browser cache. Also, clear your WordPress cache. This can solve display problems.
Checking Browser Compatibility
Different browsers may show fonts differently. Always check your site on multiple browsers. This includes Chrome, Firefox, and Safari. Some browsers may not support certain fonts. Consider using web-safe fonts. These are supported by all browsers. Also, ensure your browser is up to date. An old version may not support new fonts. Keep testing your site after changes. This ensures everything works well.

Credit: www.youtube.com
Frequently Asked Questions
How To Access Sydney Theme Customizer?
To access the Sydney theme customizer, navigate to your WordPress dashboard. Click on ‘Appearance’ and then select ‘Customize’. This section allows you to modify various theme settings, including fonts. Explore the options available to make changes to your menu font easily.
Can I Use Google Fonts In Sydney Theme?
Yes, you can use Google Fonts with Sydney theme. Sydney supports Google Fonts integration, allowing you to choose from a wide range of fonts. Access the customizer and select ‘Typography’ to find Google Fonts. Choose your desired font and apply it to your menu effortlessly.
Is Coding Required To Change Menu Font?
No, coding is not required to change the menu font in Sydney theme. The built-in customizer offers a user-friendly interface. You can easily modify fonts without coding knowledge. Simply access the typography settings in the customizer to select and apply your preferred font.
Does Changing Font Affect Site Speed?
Changing the menu font might slightly affect site speed due to font loading times. However, the impact is usually minimal. Using optimized fonts and proper settings can mitigate any noticeable slowdown. Ensure your selected font is web-friendly to maintain good performance.
Conclusion
Changing the menu font in the Sydney WordPress theme is simple. Follow the steps outlined for a fresh look. This change enhances your site’s appearance. Better readability attracts more visitors. Experiment with different fonts to find the best fit. Remember to save your changes.
Enjoy your new design and improved user experience. Your website now has a unique style. Keep exploring WordPress for more customization options. Stay creative and make your site stand out. With these skills, your website becomes more engaging. Happy designing!


