

Are you wondering how to add “www” to your domain name in WordPress? It might seem like a small detail, but this simple step can make a big difference in how your website looks and functions.
You want your site to appear professional, build trust with visitors, and improve your SEO. In this guide, you’ll learn exactly how to add “www” to your domain name quickly and easily. Keep reading, and you’ll have your site set up just the way you want in no time.
Why Add Www To Your Domain
Adding www to your domain name is a common practice for many websites. It helps set a clear web address for visitors. This small change can improve how your site looks and works. Understanding why to use www is important for website owners. It affects how people see your site and how search engines treat it.
Benefits Of Using Www
Using www creates a clear web address for users. It separates the website from other services on the same domain. This separation helps manage cookies better. It can reduce technical issues with site performance. Many web hosts expect www in the domain. It also looks familiar and professional to visitors. Some older browsers and tools work better with www.
Impact On Seo And Branding
Search engines see www and non-www as different sites. Choosing one version avoids duplicate content issues. Consistency helps search engines rank your site correctly. Using www can improve your site’s authority. It makes your brand look stable and reliable. Visitors remember www sites more easily. This can increase trust and clicks on your site.
Credit: wordpress.com
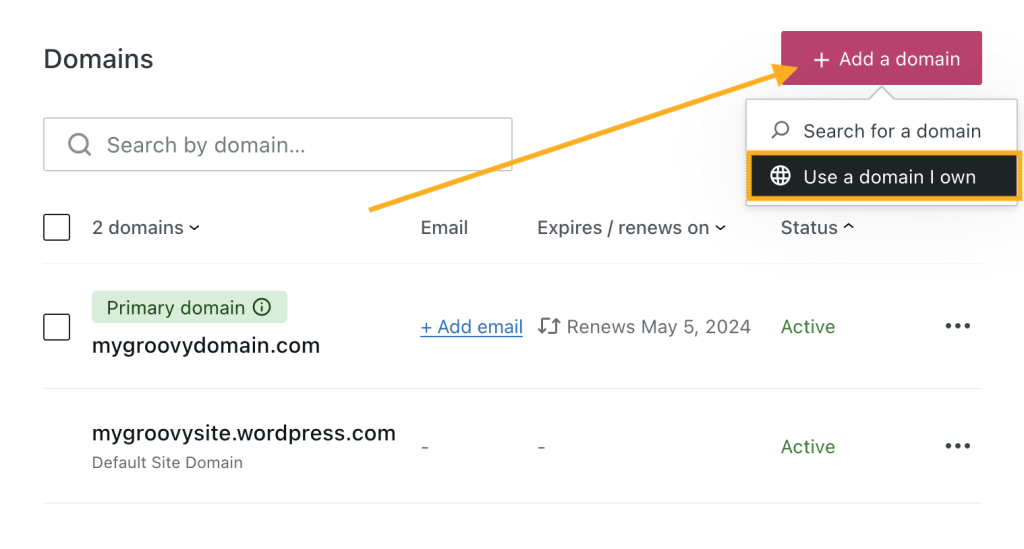
Check Your Current Domain Setup
Before adding “www” to your domain name in WordPress, check your current domain setup. This step helps avoid conflicts and errors. Knowing your current settings saves time and effort.
Accessing Dns Settings
Start by logging into your domain registrar account. Find the section for DNS or Name Server settings. This area shows how your domain points to your website.
Look for records labeled A, CNAME, or TXT. These records control domain behavior. Check if any mention “www” or point to your hosting server.
Identifying Existing Redirects
Check if your domain redirects from “non-www” to “www” or vice versa. Use online redirect checkers or browser tools.
Redirects can be set up in your hosting control panel, .htaccess file, or WordPress plugins. Knowing existing redirects helps plan the next steps correctly.
Modify Dns Records
To add “www” to your WordPress domain, you must modify the DNS records. This step connects the “www” prefix to your main domain. It tells the internet where to find your website. DNS records live in your domain registrar or hosting control panel. Make changes carefully to avoid downtime.
Adding A Cname Record For Www
The CNAME record points “www” to your root domain. It acts like a nickname for your domain name. In your DNS settings, create a new CNAME record. Set the host or name field to “www”. Then, set the value or points to field to your domain without “www”. For example, “example.com”. Save the record. This makes “www.example.com” load the same site as “example.com”.
Verifying Dns Propagation
DNS changes take time to spread worldwide. This process is called propagation. It can take from a few minutes to 48 hours. Use online tools to check if your “www” CNAME is active. Enter your domain and see if “www” points correctly. Refresh until the record shows properly. Once verified, your site works with “www”.
Update WordPress Settings
Updating WordPress settings is a key step to add “www” to your domain name. This ensures your website uses the correct address. It helps avoid issues with site links and search engines. WordPress lets you change the site address easily through its settings or by editing core files.
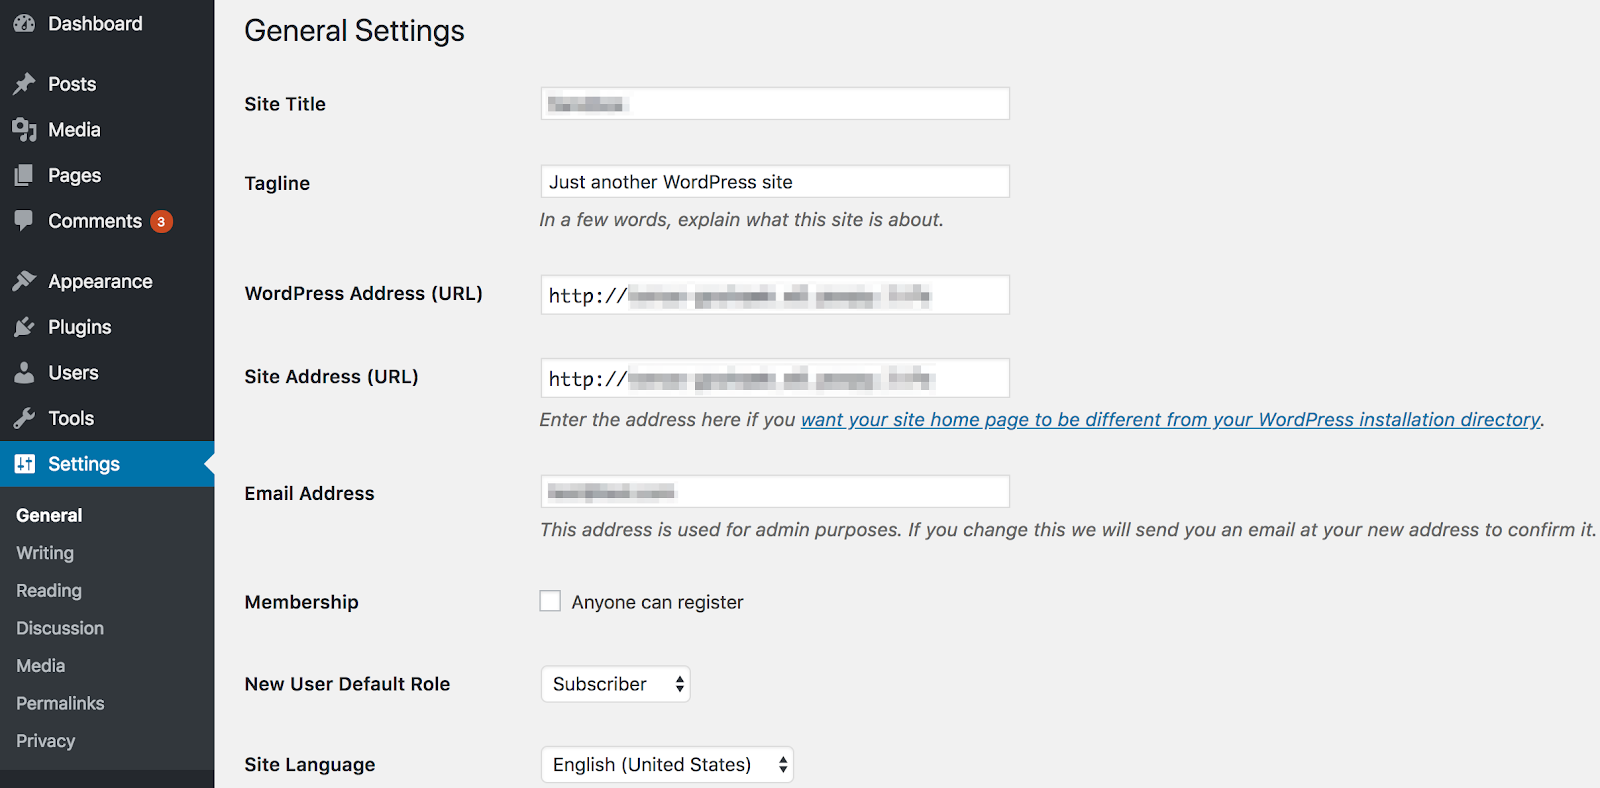
Changing Site Address In General Settings
Start by logging into your WordPress dashboard. Go to Settings and then select General. Here, you will see two fields: WordPress Address (URL) and Site Address (URL).
Both fields should include “www” at the start of your domain. For example, change https://example.com to https://www.example.com. Save the changes by clicking the Save Changes button at the bottom.
This method updates the URLs used by WordPress for your website content and admin area.
Editing Wp-config.php For Url Update
You can also force the “www” version by editing the wp-config.php file. Use a file manager or FTP client to access your WordPress files.
Open the wp-config.php file found in your WordPress root directory. Add these two lines before the line that says / That's all, stop editing! Happy publishing. /:
define('WP_HOME','https://www.example.com'); define('WP_SITEURL','https://www.example.com');Replace example.com with your domain name. Save the file and upload it back if you used FTP.
This method hardcodes the site URL and ensures WordPress always uses the “www” version.
Configure Redirects For Non-www Traffic
Configuring redirects for non-www traffic is essential for a clean website. It ensures visitors reach the correct version of your site. Without this setup, users may see duplicate content. This can harm your site’s SEO and confuse visitors.
Redirects send users from the non-www URL to the www version automatically. This creates a consistent experience and improves search engine ranking. Two main methods help you set up these redirects in WordPress.
Setting Up .htaccess Redirects
The .htaccess file controls how your server handles requests. Editing it allows you to redirect non-www traffic to www easily. Access your site’s root directory using an FTP client or file manager.
Add this code to the top of the .htaccess file:
RewriteEngine On RewriteCond %{HTTP_HOST} ^yourdomain\.com [NC] RewriteRule ^(.)$ http://www.yourdomain.com/$1 [L,R=301] Replace yourdomain.com with your actual domain. This code tells the server to redirect all non-www requests to the www version permanently. Save the file and test your URLs.
Using Plugins To Manage Redirects
Plugins offer an easier way to manage redirects without coding. Many WordPress plugins handle URL redirection efficiently. Popular options include Redirection and Yoast SEO.
Install and activate your chosen plugin from the WordPress dashboard. Use the plugin settings to create a 301 redirect from non-www to www. This method is user-friendly and safe for beginners.
Plugins also help track redirect errors and manage other URL issues. They keep your site tidy and improve user experience.
Credit: wpengine.com
Test Your Www Domain
Testing your www domain is a key step after adding www to your WordPress site. It helps confirm the domain works correctly and visitors see your website without trouble.
This check avoids broken links and ensures a smooth user experience. Let’s explore how to test your www domain effectively.
Checking Website Accessibility
Open a web browser and type your www domain name. For example, www.yourdomain.com.
Make sure the website loads properly without errors. Check pages, images, and links to confirm they all work.
Try accessing the site on different devices and browsers. This reveals any issues that might block visitors.
Ensuring Ssl Works With Www
After setting www, confirm the SSL certificate covers the www domain. This keeps your site secure with HTTPS.
Visit your site using https://www.yourdomain.com. Look for a padlock symbol in the address bar.
No warnings or errors should appear. If they do, update your SSL settings or contact your host.
Troubleshooting Common Issues
Troubleshooting common issues helps keep your WordPress site running smoothly. Adding www to your domain can cause some problems. Knowing how to fix these issues saves time and stress.
Fixing Redirect Loops
A redirect loop happens when your site keeps sending visitors back and forth. This can freeze the browser or show an error. Check your .htaccess file for wrong redirect rules. Remove any conflicting redirects that send users in circles.
Also, look at your WordPress settings under General Settings. Make sure the WordPress Address and Site Address match your www domain. Clear your browser cache after changes to see updates.
Resolving Dns Errors
DNS errors stop your site from loading properly. They happen if your domain’s DNS settings don’t point to the right server. Log in to your domain registrar’s dashboard. Verify that the A record points to your hosting server’s IP address.
Sometimes, DNS changes take time to spread across the internet. Wait up to 48 hours for full propagation. Use online tools like DNS checkers to confirm your settings are correct. Double-check for typos in your domain name records.

Credit: loginpress.pro
Frequently Asked Questions
How Do I Add Www To My WordPress Domain?
To add www, update your WordPress Address (URL) and Site Address (URL) to include www in Settings > General. Also, configure your domain DNS to point www to your site.
Will Adding Www Affect My WordPress Seo?
No, adding www does not harm SEO if you set up proper 301 redirects and canonical URLs. It ensures consistency and avoids duplicate content issues.
How To Redirect Non-www To Www In WordPress?
Use a 301 redirect in your. htaccess file or a plugin to forward all non-www traffic to www. This maintains SEO and user experience.
Can I Add Www Without Changing Dns Settings?
No, you must update DNS records to point the www subdomain to your hosting server, ensuring www loads your WordPress site correctly.
Conclusion
Adding www to your WordPress domain is simple and quick. It helps with site consistency and user trust. Just follow the steps carefully to avoid errors. Double-check your changes to make sure everything works well. Your website will look more professional with www in the address.
Keep your site settings clear and easy to update. This small change can improve your visitors’ experience. Try it today and see the difference yourself.


