
Are you struggling to add a new WordPress user directly through phpMyAdmin? Maybe your WordPress dashboard isn’t working, or you want more control over user roles and permissions.
Whatever your reason, this guide will walk you through the exact steps to add a WordPress user using phpMyAdmin—quickly and safely. By the end, you’ll have full control over your site’s users, even when the usual tools aren’t available. Keep reading to unlock a simple method that can save you time and avoid headaches.

Credit: www.wpbeginner.com
Accessing Phpmyadmin
Accessing PhpMyAdmin is the first step to managing your WordPress database. PhpMyAdmin is a tool that helps you control your website’s data easily. It lets you add users, change settings, and fix issues directly in the database.
You need to access PhpMyAdmin through your hosting account. Most web hosts provide a control panel where you can find the PhpMyAdmin option. This section explains how to log in and navigate to PhpMyAdmin quickly.
Logging Into Your Hosting Control Panel
Start by opening your web browser. Enter the URL for your hosting control panel. It is usually provided by your hosting provider in an email. Use your username and password to log in. These credentials keep your site secure. If you forget them, contact your host’s support for help.
Navigating To Phpmyadmin
After logging in, look for a section named “Databases” or “Database Management.” Inside this area, find the PhpMyAdmin icon or link. Click on it to open PhpMyAdmin. The tool will load in a new tab or window. Now you are ready to manage your WordPress database.

Credit: wpengine.com
Locating The WordPress Database
Before adding a WordPress user in PhpMyAdmin, you need to find your WordPress database. This database stores all site data, including users, posts, and settings. Knowing its exact location helps you work safely and quickly.
Locating the database is simple. It involves two key steps: finding the database name and opening it in PhpMyAdmin. Follow these steps carefully to avoid errors.
Identifying Your Database Name
Start by accessing your WordPress files. Use an FTP client or your hosting control panel’s file manager. Find the file named wp-config.php in the root folder.
Open this file with a text editor. Look for the line define('DB_NAME', 'your_database_name');. The value inside the quotes is your database name.
Note this name carefully. You will need it to open the correct database in PhpMyAdmin.
Opening The Database In Phpmyadmin
Log in to your hosting control panel. Locate PhpMyAdmin from the list of tools or databases.
Once PhpMyAdmin opens, find your database name on the left panel. Click on it to open its tables.
Now you have access to your WordPress database. You can safely add a new user or make other changes.
Inserting A New User
Inserting a new user directly in phpMyAdmin can help you manage your WordPress site faster. This method is useful if you cannot access the WordPress dashboard. It allows you to add users with specific roles and details. Careful steps ensure the new user works properly without errors.
Finding The Users Table
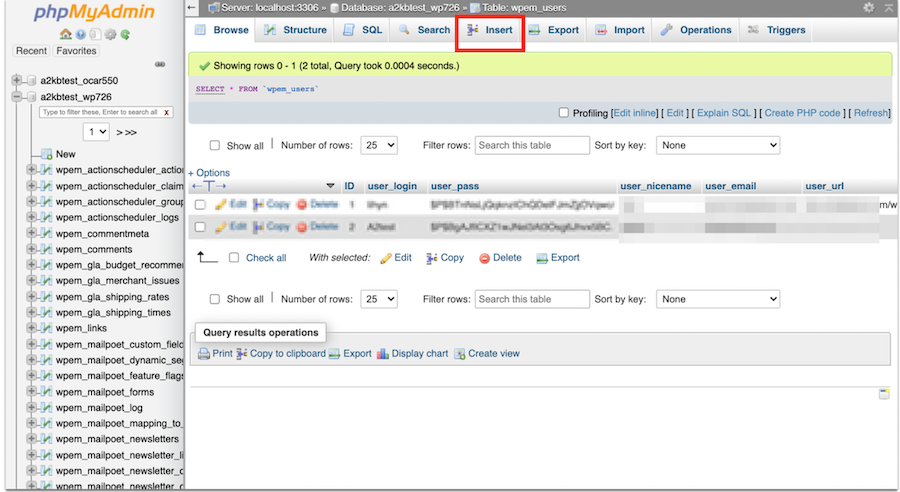
First, open phpMyAdmin and select your WordPress database. Look for the table named wp_users. The prefix wp_ might be different based on your setup. This table stores all user information.
Click on the wp_users table to view its contents. You will see columns like ID, user_login, and user_email. This is where you add new user data.
Adding A New User Record
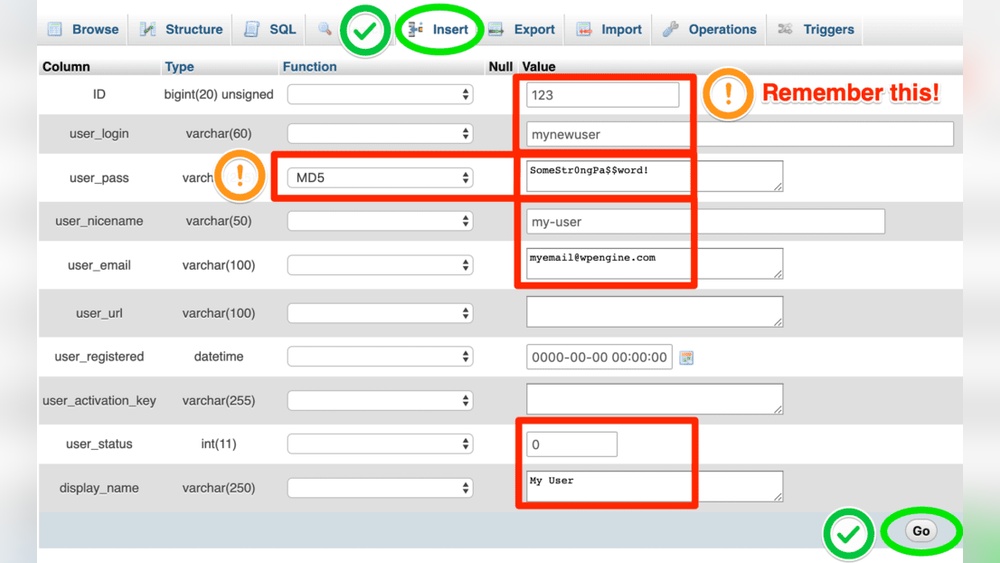
Click the “Insert” tab at the top of the table view. This opens a form to add a new record. Fill in the required fields carefully.
Set user_login as the username. Enter a strong password in user_pass. Select the MD5 function to encrypt the password. Add the user’s email in user_email. Leave ID blank to auto-increment.
Save the new record by clicking “Go.” Next, add user meta data in the wp_usermeta table for roles and capabilities. Match the user_id with the new user’s ID from wp_users.
Setting User Credentials
Setting user credentials is a key step in adding a WordPress user through phpMyAdmin. It defines the new user’s identity and secures their access. This process involves choosing a username, entering an email, and creating a password.
Each of these details must be accurate and secure. They help maintain your site’s safety and make user management easier. Let’s break down these steps.
Choosing A Username And Email
Pick a username that is simple and easy to remember. Avoid spaces or special characters. The username should be unique to prevent conflicts with existing users.
Enter a valid email address. This email is essential for password resets and notifications. Use an email that the user checks regularly.
Generating A Secure Password
Create a strong password to protect the user account. Use a mix of letters, numbers, and symbols. The password should be at least 8 characters long.
Do not use common words or simple patterns. Strong passwords reduce the risk of unauthorized access.
Using Md5 For Password Encryption
WordPress stores passwords in an encrypted form. Use the MD5 function in phpMyAdmin to encrypt the password.
Enter the password in plain text, then apply MD5 to convert it. This step ensures the password is safe in the database.
MD5 is a basic encryption but works well with WordPress. It prevents direct visibility of passwords in phpMyAdmin.
Assigning User Roles
Assigning user roles in phpMyAdmin is important for WordPress security. Roles control what users can do on your website. Setting the right role keeps your site safe and organized.
You can assign roles directly in the database by changing specific values. This method is useful when you cannot access the WordPress dashboard.
Understanding Role Values
WordPress stores user roles as strings in the database. Each role has a unique name like “administrator” or “editor”. These names link to specific abilities in WordPress.
In phpMyAdmin, roles appear in the wp_usermeta table. The meta_key called “wp_capabilities” holds a serialized array of role names. To assign a role, you must insert or update this value correctly.
For example, the administrator role looks like this: a:1:{s:13:"administrator";b:1;}. This code tells WordPress the user is an admin. Use similar syntax for other roles.
Modifying User Capabilities
User capabilities define what actions a role can perform. These capabilities include editing posts, managing plugins, or publishing content. WordPress links capabilities to roles internally.
Changing capabilities requires editing the serialized array in wp_usermeta. You can add or remove capabilities by adjusting this data. Be careful to keep the format correct.
To modify capabilities, find the meta_key “wp_user_level” and “wp_capabilities”. Update these fields to match the desired role and permissions. Incorrect changes may lock users out or grant too many rights.
Credit: kb.hosting.com
Saving Changes And Verifying
Saving changes in phpMyAdmin after adding a WordPress user is a key step. It ensures your new user is properly recorded in the database. Verifying the changes confirms the user has the right access. This process protects your site and keeps things working smoothly.
Submitting The New Record
After filling in the user details in phpMyAdmin, look for the “Go” button. Click it to submit your new record. phpMyAdmin will save this information to the WordPress database. Watch for a success message confirming the action. This step finalizes the addition of the user in the system.
Checking User Access In WordPress
Log in to your WordPress dashboard to check the new user. Go to the “Users” section on the left menu. Find the new user in the list to confirm they appear there. Test the user’s login by signing out and logging back in as them. Verify they have the correct permissions based on their role.
Troubleshooting Common Issues
Troubleshooting common issues while adding a WordPress user in phpMyAdmin helps keep your site running smoothly. Problems can stop you from adding users correctly. Knowing how to fix these issues saves time and frustration.
This section covers two frequent problems: access denied errors and incorrect user roles. Each issue has simple solutions you can try right away.
Fixing Access Denied Errors
Access denied errors happen if your database username or password is wrong. Check your credentials carefully. Make sure the user has permission to access the database.
Sometimes, the database host name is incorrect. Use “localhost” unless your host says otherwise. Also, your MySQL user needs proper privileges. Grant all required rights for user management.
Dealing With Incorrect User Roles
Assigning the wrong role can limit or break user access. Confirm the role ID matches the WordPress role you want.
Roles like “administrator” and “subscriber” have specific IDs in the database. Edit the wp_usermeta table carefully to set the correct role. Avoid typos or wrong meta keys.
Frequently Asked Questions
How Do I Add A WordPress User In Phpmyadmin?
To add a WordPress user in phpMyAdmin, access your database, open the wp_users table, and insert a new row with user details. Then, update the wp_usermeta table with appropriate user roles and capabilities for proper access.
Can I Create Admin Users Via Phpmyadmin Safely?
Yes, you can create admin users safely by adding correct user data in wp_users and assigning ‘administrator’ role in wp_usermeta. Always backup your database before making changes to prevent data loss or corruption.
What Password Format Is Needed For Phpmyadmin WordPress Users?
WordPress stores passwords in hashed format using MD5 or PHPass. When adding users via phpMyAdmin, insert the password as an MD5 hash for compatibility and security.
How Do I Assign Roles When Adding WordPress Users Manually?
Assign roles by inserting meta_key ‘wp_capabilities’ with serialized role data in the wp_usermeta table. This defines the user’s permissions within WordPress.
Conclusion
Adding a WordPress user in phpMyAdmin is simple when you follow clear steps. This method helps manage users directly in the database. Always double-check the information you enter to avoid errors. Keep your database secure by using strong passwords. Regular backups protect your site from data loss.
Practice this process to feel confident next time. Now, you can add users without relying on the WordPress dashboard. Easy, fast, and effective.


