
Are you locked out of your WordPress admin account or need to create a new admin user quickly? Don’t worry, there’s a simple way to add a WordPress admin directly through phpMyAdmin.
This method gives you full control without needing to access your WordPress dashboard. By the end of this guide, you’ll have a new admin user ready to manage your site. Keep reading to discover step-by-step instructions that anyone can follow—even if you’re not a tech expert.

Credit: wpengine.com
Access Phpmyadmin
Accessing PhpMyAdmin is the first step to add a WordPress admin user manually. This tool helps you manage your website database easily. It is included in most hosting control panels. Follow simple steps to reach PhpMyAdmin and start editing your database safely.
Login To Hosting Control Panel
Use your hosting account details to log in to the control panel. This area manages your website files, emails, and databases. Enter your username and password on the hosting login page. After logging in, find the section related to databases or website management.
Open Phpmyadmin Interface
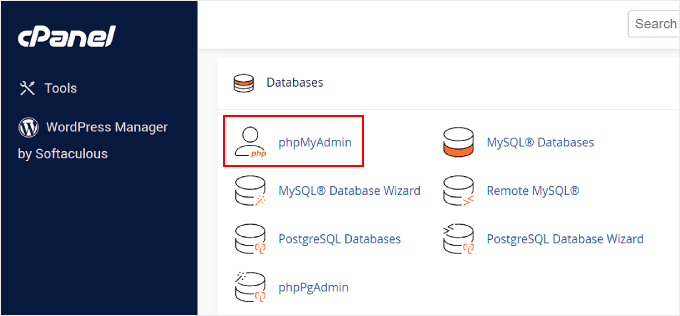
Look for the PhpMyAdmin icon or link in the control panel. Click it to open the database management tool. It may open in a new tab or window. Inside PhpMyAdmin, select your WordPress database from the list on the left. Now you can start adding a new admin user directly to the database.
Credit: www.wpbeginner.com
Locate WordPress Database
To add a WordPress admin via phpMyAdmin, the first step is to find the correct database. WordPress stores all its data in a database. This includes posts, users, and settings. Knowing which database to use is key to making changes safely.
Finding the database is simple. It requires accessing your hosting control panel and opening phpMyAdmin. After that, you need to identify the right database for your WordPress site. This ensures you edit the correct information without errors.
Identify Database Name
Start by logging into your hosting control panel. Look for the File Manager or use FTP to access your WordPress files. Find the file named wp-config.php. This file contains your database details.
Open wp-config.php and find the line that says DB_NAME. This line shows the database name WordPress uses. It looks like this: define('DB_NAME', 'your_database_name');. Note down this name carefully.
Select The Database
Next, go to phpMyAdmin from your hosting control panel. You will see a list of databases on the left side. Find the database name you noted earlier. Click on it to open the database.
Once selected, you will see many tables inside the database. These tables store all your WordPress data. Now, you are ready to add a new admin user safely.
Find Users Table
Finding the users table is the first step to add a WordPress admin via phpMyAdmin. This table holds all user information. It stores usernames, passwords, emails, and roles. Accessing this table allows you to manage users directly in the database.
Working with the users table requires care. Mistakes can affect your site’s login system. Always back up your database before making changes.
Locate Wp_users Table
Open phpMyAdmin and select your WordPress database. The database name often matches your website or hosting account.
Look for the table named wp_users. The prefix wp_ may be different. It depends on your WordPress setup. Some use custom prefixes for security.
The wp_users table stores all user account data. This includes usernames and passwords. Finding this table is key to adding a new admin user.
Browse User Records
Click on the wp_users table to open it. You will see a list of all current users.
Review user records to understand the existing setup. Each row is one user. It shows the user ID, login name, and email.
Browsing records helps avoid duplicate usernames. It also confirms your changes will not disrupt current users.
Insert New Admin User
Inserting a new admin user directly via phpMyAdmin helps regain control of a WordPress site. This method is useful when you lose access to the admin area. It involves adding a new row in the users table and filling in the necessary details carefully. Follow the steps below to create a new admin account safely and quickly.
Add New Row
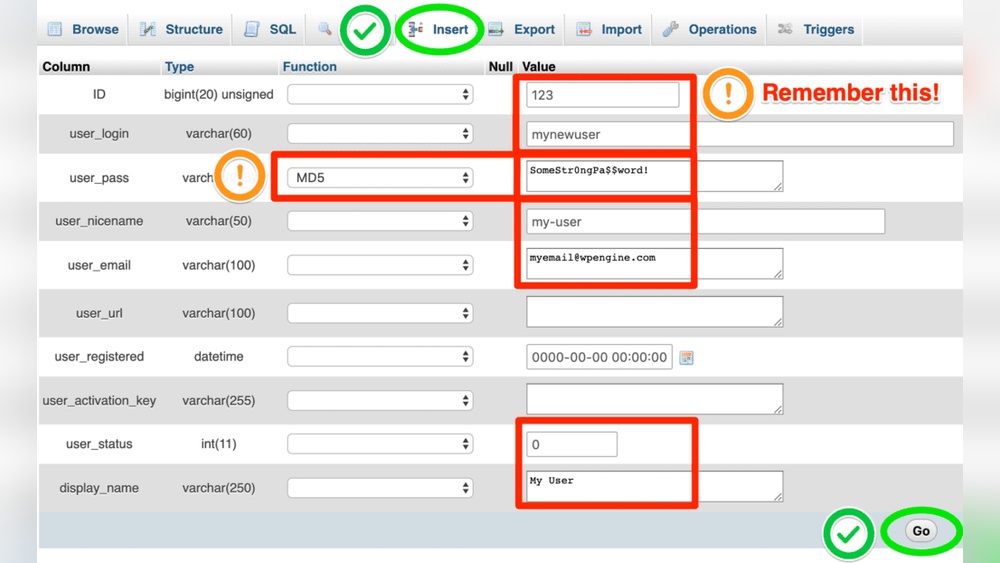
Start by opening phpMyAdmin and selecting your WordPress database. Find the table named wp_users. Click the “Insert” tab to add a new row. This row will hold the new admin user’s basic information. Each field must be filled correctly to avoid errors later.
Fill User Details
Fill the user_login with your chosen username. Use a simple name you will remember. For user_pass, select the MD5 function from the dropdown. Enter a strong password in the value field before applying MD5. Set user_nicename and user_email with appropriate values.
Leave user_url empty or add your website link. Set user_registered with the current date and time in the format YYYY-MM-DD HH:MM:SS. Keep user_activation_key blank. Set user_status to 0 and display_name to your preferred display name.
After saving, note the new user’s ID number. You will need it to assign admin privileges in the next step.
Set User Password
Setting the user password is a key step when adding a WordPress admin via phpMyAdmin. This step protects your site from unauthorized access. You must update the password in the database with the right method. It ensures your new admin account remains secure and functional.
Choose Md5 Encryption
WordPress stores passwords using MD5 encryption in the database. In phpMyAdmin, select the MD5 option from the function dropdown. This encrypts the password before saving it. Without this, the password stays in plain text. That makes it unsafe and useless for login.
Enter Secure Password
Pick a strong password with letters, numbers, and symbols. Avoid simple or common passwords. Type the new password in the value field. After choosing MD5, phpMyAdmin encrypts it automatically. This step completes the process safely. The new admin user can now log in using this password.
Assign Admin Role
Assigning the admin role to a WordPress user via phpMyAdmin is a crucial step. This role grants full access to the WordPress dashboard and site management. The process involves updating user capabilities directly in the database.
Carefully assigning admin rights ensures proper site control and security. Below are the key steps to assign the admin role properly.
Open Wp_usermeta Table
Start by opening the wp_usermeta table in phpMyAdmin. This table stores metadata for all WordPress users. Locate the entries for the user you want to make an admin. Use the user_id to filter the records quickly.
Look for rows with the meta key wp_capabilities. These rows define the user’s role and permissions. You will edit or add new entries to assign the admin role.
Add Capabilities For Admin
To assign the admin role, update the wp_capabilities meta key value. Change it to: a:1:{s:13:"administrator";b:1;}. This code sets the user as an administrator.
Check if the wp_user_level meta key exists for this user. If not, add it with a value of 10. This value confirms the highest user level for admins.
Save the changes and verify by logging into WordPress with the new admin user. The dashboard should show full admin access.
Verify New Admin Account
After creating a new WordPress admin account through phpMyAdmin, confirming the account works is important. This step ensures the new user can access all admin features without issues. Verifying the new admin account helps avoid login problems and permission errors.
Login To WordPress Admin Panel
Start by opening your WordPress login page. Enter the new admin username and password created in phpMyAdmin. Click the login button to access the dashboard. If login fails, double-check the username and password. Successful login means the new admin account is active.
Check User Permissions
Once logged in, go to the Users section in the dashboard menu. Find the new admin account in the user list. Click on the username to view details. Confirm the role is set to “Administrator.” This role grants full access to all site controls. If the role is incorrect, update it to Administrator and save changes.
Troubleshooting Tips
Troubleshooting is important when adding a WordPress admin via phpMyAdmin. Errors can happen during the process. Knowing common problems helps fix them fast.
Permission issues often block access or changes. Understanding these problems saves time and frustration.
Common Errors
One common error is entering wrong database details. Double-check the database name and user. Mistakes here cause failure to add the admin.
Another error is using incorrect SQL commands. Copy commands carefully and run them exactly. Even small typos can stop the process.
Sometimes, the new admin does not appear in WordPress. Clear browser cache and refresh the admin page. This often solves display problems.
Fixing Permission Issues
Permission errors block access to phpMyAdmin or WordPress files. Check file permissions using your hosting control panel. Files should be writable by the server.
Set the correct user roles inside the database. The new admin user must have full rights. Use SQL commands to assign the right role.
If you cannot log in after adding the admin, reset permissions through FTP. Change folder permissions to 755 and files to 644. This ensures WordPress runs smoothly.

Credit: www.youtube.com
Frequently Asked Questions
How To Add A WordPress Admin Using Phpmyadmin?
Log in to phpMyAdmin and select your WordPress database. Go to the wp_users table and insert a new user. Then, add user capabilities in the wp_usermeta table, setting the role as ‘administrator’. This creates a new admin account quickly and securely.
Can I Reset WordPress Admin Password Via Phpmyadmin?
Yes, you can reset the WordPress admin password in phpMyAdmin. Find the user in the wp_users table and edit the user_pass field. Use the MD5 function to encrypt the new password before saving it. This method is fast and effective when you lose access.
Is It Safe To Add WordPress Admin Through Phpmyadmin?
Adding a WordPress admin via phpMyAdmin is safe if done correctly. Always back up your database before making changes. Ensure you input accurate data and assign proper roles. Avoid unauthorized access by securing your phpMyAdmin login credentials.
What User Role Value Is Needed For WordPress Admin?
The user role value for a WordPress admin is ‘administrator’. In the wp_usermeta table, set the meta_key as ‘wp_capabilities’ and meta_value as ‘a:1:{s:13:”administrator”;b:1;}’. This grants full admin rights to the user.
Conclusion
Adding a WordPress admin via phpMyAdmin is simple and quick. You control user roles and access directly in the database. This method helps when you cannot access the WordPress dashboard. Always back up your database before making changes. Small steps prevent big problems later.
Now you can fix admin issues without waiting for support. Practice this carefully and keep your site safe. Easy and effective.



