
Are you looking to add a new user to your WordPress site but don’t know where to start? Whether you want to give a colleague access or let a guest author contribute, adding users is easier than you think.
This step-by-step guide will walk you through the process quickly and clearly. By the end, you’ll feel confident managing your site’s users and keeping everything secure. Ready to take control of your WordPress user list? Let’s dive in!
Create A WordPress Account
Creating a WordPress account is the first step to add new users to your website. This account gives access to your WordPress dashboard. You can manage content, settings, and users from there. Setting up an account is quick and simple. Follow these clear steps to create a WordPress account without trouble.
Create A WordPress Account On The Dashboard
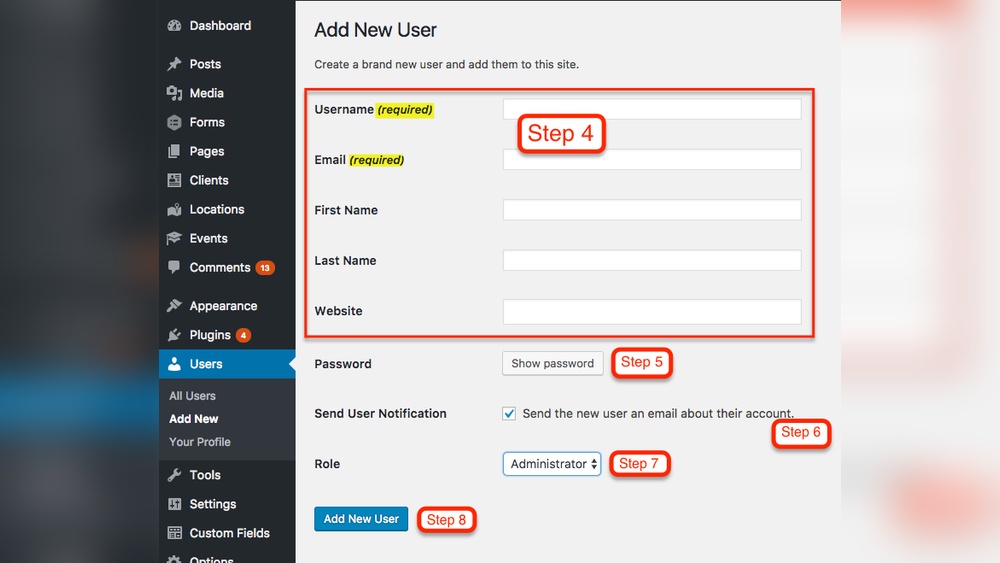
Log in to your WordPress admin panel using your credentials. Find the “Users” menu on the left side. Click on “Add New” to open the user creation form. Enter the new user’s information carefully. Choose a strong password for security. Assign the right role based on what the user needs to do. Click “Add New User” to save the account.
Sign Up For A WordPress.com Account
Visit WordPress.com and click the “Get Started” button. Fill in your email, username, and password. Select a plan or choose the free version. Follow the prompts to complete registration. Verify your email address to activate the account. This account lets you create and manage WordPress.com sites easily.
Set Up User Roles And Permissions
Decide what each user can do on your site. Roles include Administrator, Editor, Author, Contributor, and Subscriber. Administrators have full control. Editors manage content but not settings. Authors write and publish their own posts. Contributors can write but not publish. Subscribers only read content and manage their profile.
Access The Dashboard
Accessing the WordPress dashboard is the first step to add a new user. This dashboard is the control center for your website. It shows all the options and settings you need.
After logging in, you will see the main menu on the left side. This menu helps you navigate through your site’s features easily. Finding the right place to add a user starts here.
Login To Your WordPress Site
Go to your website’s login page. Usually, it is yoursite.com/wp-login.php. Enter your username and password carefully. Then, click the login button to enter the dashboard.
Understand The Dashboard Layout
The dashboard has several sections. The left sidebar contains all the main menu items. The center shows your site’s overview and recent activity. The top bar has quick links and notifications.
Locate The Users Section
In the left menu, find the “Users” option. Click on it to open user management. This area lets you add new users, edit profiles, and manage roles.
Navigate To Users Section
Navigating to the Users section in WordPress is the first step to add a new user. This area controls all user accounts on your site. It is easy to find and use. Follow the steps below to reach the Users section quickly.
Access The WordPress Dashboard
Start by logging into your WordPress admin area. Use your username and password. After login, you will see the Dashboard. This is the main control panel for your website.
Locate The Users Menu
Look at the left side menu in the Dashboard. Find the option labeled “Users.” It is usually below “Posts” and above “Tools.” Click on “Users” to open the user management page.
Open The Users Section
Clicking “Users” shows a list of all current users. Here, you can manage existing accounts. To add a new user, stay on this page and prepare to create one.
Credit: www.greengeeks.com
Add New User
Adding a new user to your WordPress site is simple. It allows others to help manage or contribute content. You control what each user can do by assigning roles. Follow the steps below to add a new user quickly and safely.
Enter User Details
Start by going to the WordPress dashboard. Find the “Users” menu and click “Add New.” Fill in the form with the user’s information. Enter their username, email, first name, and last name. The email must be valid for account notifications. You can also add a website URL if the user has one. Make sure the username is unique and easy to remember.
Choose User Role
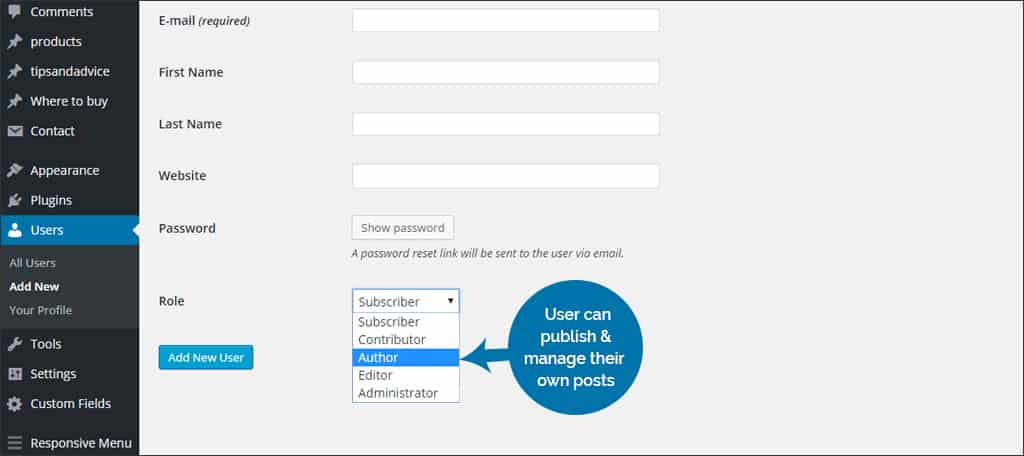
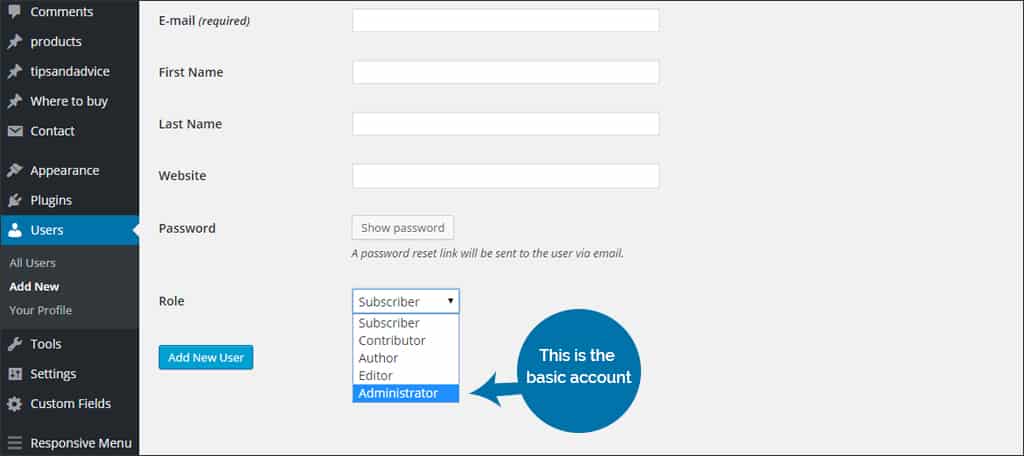
Select the correct role for the new user. WordPress offers roles like Subscriber, Contributor, Author, Editor, and Administrator. Each role has different permissions. Pick a role that fits the user’s tasks. For example, choose “Author” if they will write posts. Avoid giving Administrator rights to users who do not need full control.
Set Password
WordPress will generate a strong password automatically. You can use this or create your own. Ensure the password is strong to keep the account safe. Share the password securely with the new user. Check the box “Send User Notification” to email login details to the user. Finally, click “Add New User” to complete the process.
Send User Notification
Sending a notification to a new user is a key step after adding them to WordPress. It helps users know their account is ready. The notification usually includes their username and a link to set their password. This makes the login process simple and clear. Notifications improve communication and reduce confusion for new users.
Enable User Notification During User Creation
When creating a new user in WordPress, a checkbox allows sending an email. This box is labeled “Send User Notification.” Check this box before saving the new user. WordPress will then send an automatic email to the user. The email contains login details and a password setup link. This step is quick and ensures the user gets needed information immediately.
Resend User Notification After User Creation
Sometimes users do not receive the email. WordPress does not have a built-in button to resend notifications. Use a plugin like “WP Mail SMTP” or “User Management” to resend emails. These plugins add options to send notifications again. You can also manually send login details if needed. Always confirm the user has the correct email address before resending.
Customize The User Notification Email
Default WordPress emails are simple and plain. You can customize the notification email to match your site style. Use plugins like “WP Mail SMTP” or “Better Notifications for WP” for easy editing. Customize the message to welcome users warmly. Clear instructions in the email help users log in without issues. Personalization makes your site feel professional and friendly.
Manage User Permissions
Managing user permissions in WordPress helps control what each user can do. It keeps your site safe and organized. Giving the right access avoids mistakes and security risks.
WordPress has different roles for users. Each role has specific permissions. Choose roles carefully to fit the user’s needs and trust level.
Understanding WordPress User Roles
WordPress has five main user roles. They are Administrator, Editor, Author, Contributor, and Subscriber. Each role has its own set of permissions. Administrators have full control. Editors can manage content. Authors write and publish their own posts. Contributors can write but not publish. Subscribers only read content and manage their profile.
Assigning The Right Role To A User
Assign roles based on tasks the user will do. Avoid giving Administrator access to everyone. Use Editor or Author roles for content creators. Subscribers suit regular readers or customers. Choose carefully to keep your site secure and easy to manage.
Changing User Permissions Manually
To change permissions, install a plugin like User Role Editor. It lets you customize roles and capabilities. You can add or remove permissions. This helps tailor access to your exact needs. Always backup your site before making changes.
Edit Or Delete Users
Managing users on WordPress is simple. You can change user details or remove users anytime. This keeps your site organized and secure. Editing or deleting users helps control who can access your site.
Edit User Details
Go to the WordPress dashboard. Click on “Users” from the menu. Find the user you want to edit. Click “Edit” under their name. Change the information like name, email, or role. Scroll down and click “Update User” to save changes.
Delete A User
Open the “Users” section in the dashboard. Hover over the user you want to delete. Click “Delete” below their name. WordPress asks what to do with their content. Choose to delete content or assign it to another user. Confirm by clicking the “Confirm Deletion” button.
Credit: www.greengeeks.com
Tips For User Management
Managing users well keeps your WordPress site safe and organized. It helps control who can do what on your site. Good user management stops mistakes and protects your data.
Assign Appropriate Roles
Give each user a role that fits their job. WordPress has roles like Administrator, Editor, Author, and Subscriber. Each role has different permissions. Choose roles carefully to limit access to sensitive areas.
Use Strong Passwords
Strong passwords protect your site from hackers. Use a mix of letters, numbers, and symbols. Avoid easy passwords like “123456” or “password.” Encourage users to update passwords often.
Regularly Review Users
Check your user list often. Remove users who no longer need access. Update roles if users’ jobs change. This keeps your site secure and clean.

Credit: www.youtube.com
Frequently Asked Questions
How Do I Add A New User On WordPress?
To add a new user, log in to your WordPress dashboard. Go to Users > Add New. Fill out the user’s details and assign a role. Click “Add New User” to save.
What User Roles Can I Assign In WordPress?
WordPress offers roles like Administrator, Editor, Author, Contributor, and Subscriber. Each role has different permissions, controlling what the user can access and edit on your site.
Can I Add Multiple Users At Once In WordPress?
By default, WordPress does not support adding multiple users at once. You can use plugins like “Import users from CSV” for bulk user uploads efficiently.
How To Set User Permissions On WordPress?
User permissions are controlled by roles. Assign the appropriate role during user creation. To customize permissions, consider using a role management plugin for fine-tuning access.
Conclusion
Adding a user on WordPress is simple and quick. Just follow the steps carefully to avoid mistakes. Assign the right role to keep your site safe. Regularly check user access and update permissions as needed. Managing users helps your website run smoothly.
Now, you can add users with confidence and keep your site organized. Practice these tips to maintain control and security. Your WordPress site will stay efficient and easy to manage.



