
Are you looking to make your WordPress site smarter and easier to manage? Adding Google Tag Manager to your site is a simple way to do just that.
It helps you track visitor behavior, run marketing campaigns, and improve your website without touching code every time. In this guide, you’ll learn exactly how to add Tag Manager to your WordPress site step-by-step. By the end, you’ll have the power to control all your tracking tools in one place and make better decisions for your business.
Keep reading to unlock these benefits quickly and effortlessly.
What Is Tag Manager
Tag Manager is a tool that helps manage website tags easily. Tags are small pieces of code that collect data from your site. This data helps you understand visitor behavior and improve your website.
Instead of editing your website code directly, Tag Manager lets you add and update tags from one place. It saves time and reduces errors. This tool works with many tags, like Google Analytics and advertising pixels.
What Does Tag Manager Do?
Tag Manager stores and controls tags on your website. It fires tags based on your rules. For example, it can send data when someone clicks a button or visits a page.
It also makes tag management simple and faster. No need to change code for every tag update.
Why Use Tag Manager On WordPress?
WordPress users find Tag Manager helpful for adding tracking codes. You don’t need to touch theme files or plugins for every new tag.
It keeps your site clean and organized. Also, it helps avoid conflicts between different codes.
How Tag Manager Helps Your Website
It provides better control over your website data. You can test tags before publishing. This reduces mistakes and improves data accuracy.
Tag Manager makes tracking visitor actions easier. You get insights to improve your site performance and user experience.
Benefits Of Using Tag Manager On WordPress
Using Tag Manager on WordPress offers many benefits. It helps you manage website tags easily. Tags are small pieces of code that track user activity and gather data.
Tag Manager simplifies the process of adding and updating these tags. It saves time and reduces errors. You do not need to change the website code directly.
Improved Website Performance
Tag Manager loads tags asynchronously. This means tags do not slow down your website. Faster websites provide better user experience. Visitors stay longer and engage more.
Easy Tag Management
All tags are managed in one place. You can add, edit, or remove tags without coding. This makes it simple to update tracking tools or marketing scripts.
Better Data Accuracy
Tag Manager reduces errors from manual code changes. Accurate data helps make better business decisions. You get reliable reports from tools like Google Analytics.
Flexible And Scalable
Tag Manager works with many third-party tools. It supports different tag types and triggers. Your setup can grow as your website needs change.
Preparing Your WordPress Site
Preparing your WordPress site is the first step before adding Tag Manager. This ensures smooth integration and avoids errors. Taking a few simple precautions helps keep your site safe and ready. Follow these steps carefully to prepare your site well.
Backup Your Site
Backing up your site protects your data from accidental loss. Use a reliable plugin or your hosting provider’s backup tools. Save both your files and database. Store the backup in a safe place. This step is important before making any changes.
Check WordPress Version
Verify your WordPress version to ensure compatibility with Tag Manager plugins. Go to your dashboard and check the “At a Glance” section. Update WordPress to the latest stable version if needed. An updated site runs smoothly and securely.
Choose The Right Plugin
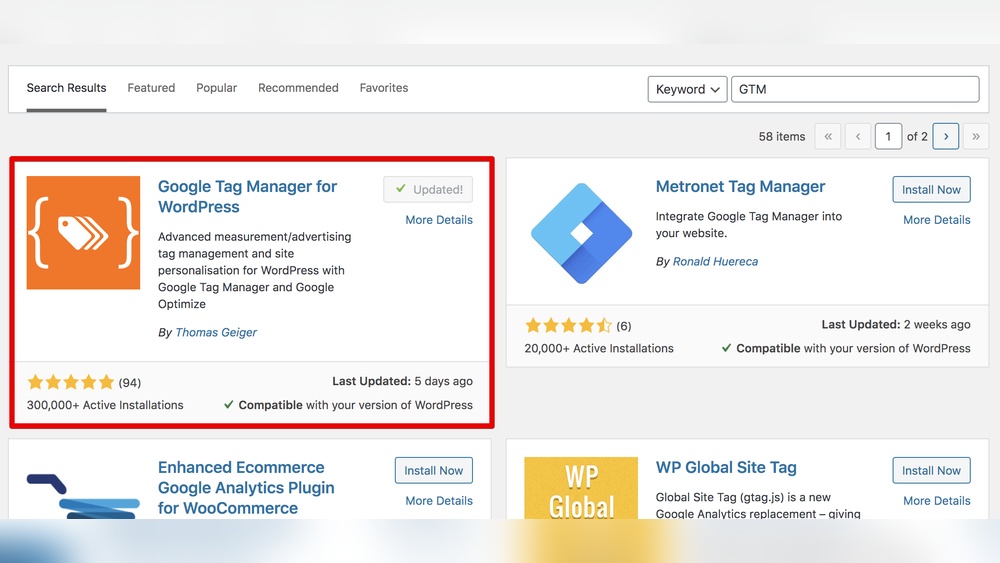
Select a plugin that supports Google Tag Manager efficiently. Look for good user ratings and recent updates. Simple plugins reduce setup time and errors. Read user reviews to find the best fit for your site. A good plugin makes integration easier.
Creating A Tag Manager Account
Creating a Tag Manager account is the first step to manage your website tags easily. It helps organize all tracking codes in one place. This makes your WordPress site faster and easier to update.
Follow simple steps to set up your account and get the tracking code. You will use this code to connect Tag Manager to your WordPress site.
Sign Up For Tag Manager
Go to the Tag Manager website. Click the sign-up button. Use your Google account to log in. Enter your account name. Choose a name that represents your business or site.
Read and accept the terms of service. This allows you to use Tag Manager features legally and safely.
Set Up A Container
Create a container for your website. The container holds all tags and triggers. Name the container with your website’s name. Select “Web” as the target platform. This tells Tag Manager to work with your WordPress site.
Click “Create” to finish this step. You may see some options to configure. Follow the instructions to complete the setup.
Get The Tracking Code
After creating the container, Tag Manager shows the tracking code. This code must be added to your WordPress site. Copy the first code snippet. Paste it into the header section of your website.
Copy the second code snippet. Paste it right after the opening body tag. This helps Tag Manager load quickly and correctly.
Save your changes in WordPress. Your Tag Manager account is now ready to use.
Adding Tag Manager To WordPress
Adding Google Tag Manager to your WordPress site helps track visitor behavior easily. It allows you to manage all your tags in one place without editing code often. This makes website analytics and marketing much simpler.
There are two main ways to add Tag Manager to WordPress. You can use a plugin or insert the code manually. Both methods work well depending on your comfort level with WordPress.
Using A Plugin
Using a plugin is the easiest way to add Tag Manager. Search for a Tag Manager plugin in your WordPress dashboard. Install and activate it.
Once activated, open the plugin settings. Enter your Tag Manager container ID. The plugin will place the code on all your pages automatically.
This method avoids editing theme files. It is safer for beginners and updates do not erase your settings.
Manual Code Insertion
Manual code insertion gives you more control over where the Tag Manager code goes. First, copy your container code from your Google Tag Manager account.
Next, access your WordPress theme editor or use a child theme. Paste the container code into the header.php file just before the closing tag.
Also, add the noscript code after the opening
tag. Save your changes to apply the Tag Manager code to your site.Verifying Installation
Verification ensures Tag Manager works correctly. Use the Tag Manager preview mode to test your setup. It shows if tags fire on your site.
You can also use browser extensions like Tag Assistant. They confirm the container ID is active and working.
Check your Google Analytics or other linked tools to see if data flows in properly. Verification helps avoid tracking errors later.

Credit: www.bluehost.com
Common Tag Manager Tags To Add
Adding tags to Google Tag Manager helps you track important actions on your WordPress site. Tags send data to services that help analyze traffic and user behavior. Here are common tags that many websites use to improve marketing and user insights.
Google Analytics
Google Analytics tracks how visitors use your site. It collects data on page views, sessions, and user interactions. Adding this tag helps you see which pages are popular and how users move through your site. This insight guides better content and design decisions.
Facebook Pixel
Facebook Pixel tracks visitors who come from Facebook ads. It measures ad performance and user actions like purchases or sign-ups. This tag helps you retarget users with relevant ads on Facebook. It also improves ad efficiency by showing ads to interested users.
Adwords Conversion Tracking
AdWords Conversion Tracking measures actions after users click your Google ads. It tracks goals like sales, leads, or sign-ups. This tag helps understand which ads bring valuable visitors. It allows better budget allocation for your ad campaigns.
Troubleshooting Tag Manager Issues
Troubleshooting Tag Manager issues is important for smooth website tracking. Problems can stop tags from firing or data from showing in reports. Fixing these issues helps keep your WordPress site’s analytics accurate and reliable.
Follow simple steps to find and solve common problems fast. Checking your tags, clearing caches, and spotting plugin conflicts can often restore proper function.
Debugging Tags
Use Tag Manager’s Preview mode to test tags before publishing. This tool shows which tags fire and which do not. Look for errors or conditions that block tag activation. Adjust triggers or tag settings as needed. Preview mode helps confirm your tags work as intended.
Clearing Cache
Cached files may prevent recent tag changes from showing. Clear your WordPress cache using your caching plugin or host tools. Also, clear your browser cache to see updates instantly. This step ensures you view the latest tag setup on your site.
Checking Plugin Conflicts
Some plugins can interfere with Tag Manager scripts. Deactivate other plugins one by one to spot conflicts. After disabling a plugin, test if tags fire correctly. If a plugin causes issues, seek alternatives or contact the plugin author for help.
Credit: wpcode.com
Tips For Managing Tags Efficiently
Managing tags efficiently is key to getting the most from Tag Manager on WordPress. Well-organized tags help track user actions clearly. They also keep your site running smoothly without slowdowns. Focus on simple steps to keep tags tidy and effective. This saves time and avoids confusion later.
Organizing Tags
Group tags by purpose or campaign. Use clear names for each tag. Avoid vague labels like “Tag 1” or “Test.” Create folders or categories in Tag Manager for easy access. This helps find and update tags quickly. Keep only active tags to reduce clutter. Remove or archive unused tags regularly.
Using Triggers And Variables
Set triggers to control when tags fire. Use simple triggers like page views or clicks. Combine triggers for more precise tracking. Variables store data that tags need, like URLs or button IDs. Use built-in variables to save time. Create custom variables for specific needs. This makes tags smarter and more flexible.
Regular Audits
Check tags often to ensure they work correctly. Test tags after any site update. Look for errors or duplicate tags. Remove tags that no longer serve a purpose. Update tags to match new marketing goals. Regular audits keep your Tag Manager clean and efficient.

Credit: www.patrickinternet.co.uk
Frequently Asked Questions
What Is Google Tag Manager In WordPress?
Google Tag Manager is a tool that helps you add and manage marketing tags on your WordPress site. It simplifies tracking by allowing easy code updates without editing site files. This improves website performance and helps measure user behavior effectively.
How To Install Tag Manager On WordPress?
To install Tag Manager, create an account on Google Tag Manager. Copy the container code and paste it into your WordPress header or use a plugin for easy integration. This method ensures tags load correctly on all pages.
Can I Use Plugins To Add Tag Manager?
Yes, WordPress plugins like “DuracellTomi’s Google Tag Manager” simplify adding the code. Plugins handle code placement automatically, making it easier for non-technical users to set up and manage tags without editing theme files.
Does Tag Manager Affect WordPress Site Speed?
Properly implemented Tag Manager has minimal impact on site speed. It loads asynchronously, which means it does not block other page elements. Avoid adding too many tags to keep your site fast and responsive.
Conclusion
Adding Tag Manager to WordPress helps track your website easily. It lets you manage tags without touching code each time. This saves time and reduces errors. You can see how visitors use your site. Use the steps shared to add Tag Manager today.
Stay organized and improve your site’s performance. Simple to do and very helpful for growth. Give it a try and watch your data improve.


