
Are you looking for a simple way to organize your WordPress content and make it more user-friendly? Adding tabs to your WordPress site can help you do just that.
Tabs let you display a lot of information in a neat, easy-to-navigate format. This keeps your visitors engaged and makes your site look professional. You’ll discover step-by-step how to add tabs to your WordPress pages or posts—no coding skills needed.
By the end, you’ll have a clear, clickable tab setup that improves your site’s usability and keeps your audience coming back for more. Let’s get started!
Benefits Of Using Tabs
Using tabs on your WordPress site offers many benefits. Tabs help keep your content neat and easy to find. They make your website look organized and professional. Visitors can quickly switch between different sections without scrolling too much. Tabs save space and improve the overall design of your pages.
Improved Navigation
Tabs make it simple for users to move between topics. Visitors can see all options at a glance. This reduces confusion and keeps them on your site longer. Clear navigation helps users find what they want fast. Tabs guide visitors smoothly through your content.
Better Content Organization
Tabs help split large content into smaller parts. Each tab holds related information. This stops your page from looking crowded or messy. Organized content is easier to read and understand. Tabs allow you to group details neatly under different headings.
Enhanced User Experience
Tabs create a clean and interactive website feel. Users enjoy clicking through tabs instead of scrolling endlessly. This interaction makes your site more engaging. Fast access to content keeps visitors happy and interested. Better user experience means visitors return to your site.
Credit: www.wonderplugin.com
Choosing The Right Tab Plugin
Choosing the right tab plugin is important for your WordPress site. It affects how your tabs look and work. The right plugin makes your content easy to organize and find. It also helps keep your site fast and user-friendly. Take time to pick one that fits your needs well.
Popular Tab Plugins
Several tab plugins stand out for WordPress users. Tabs Responsive is simple and mobile-friendly. WP Tab Widget offers easy drag-and-drop features. Tabby Responsive Tabs is lightweight and works well on all devices. These plugins have good reviews and regular updates. They suit different skill levels and needs.
Key Features To Look For
Look for plugins with easy setup and clear controls. Responsive design is a must for mobile users. Customization options let you match tabs to your site style. Fast loading times keep your site smooth. Support and updates are important for long-term use.
Plugin Compatibility
Check if the plugin works with your WordPress version. It should not conflict with your theme or other plugins. Test it on a staging site before using on a live site. Compatibility ensures your site stays stable and safe. Avoid plugins with known bugs or poor reviews.
Installing A Tab Plugin
Adding tabs to your WordPress site makes content easier to navigate. Tabs organize information neatly in one place. You can create tabs using a plugin. Installing a tab plugin is simple and quick. Follow these steps to get started.
Accessing The WordPress Plugin Directory
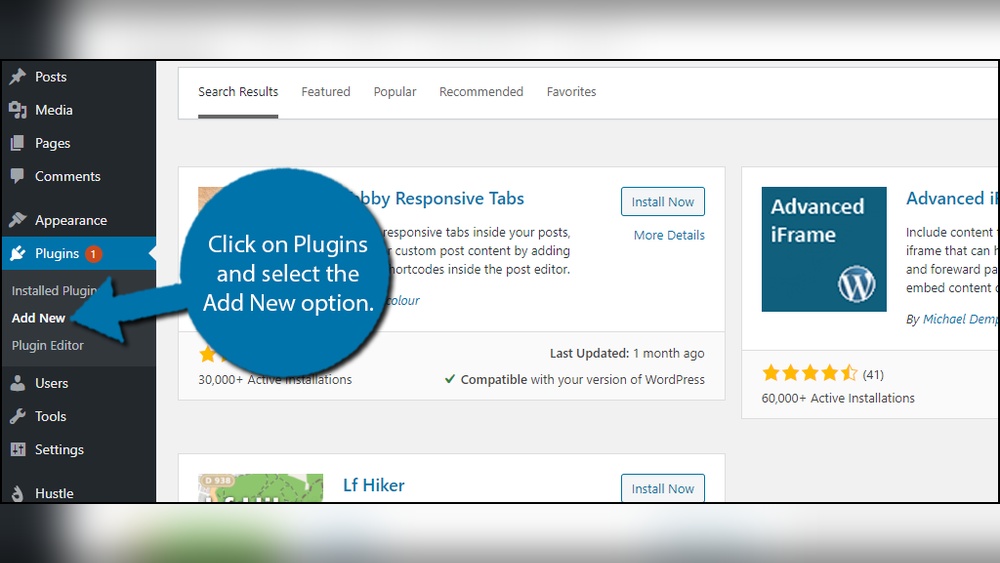
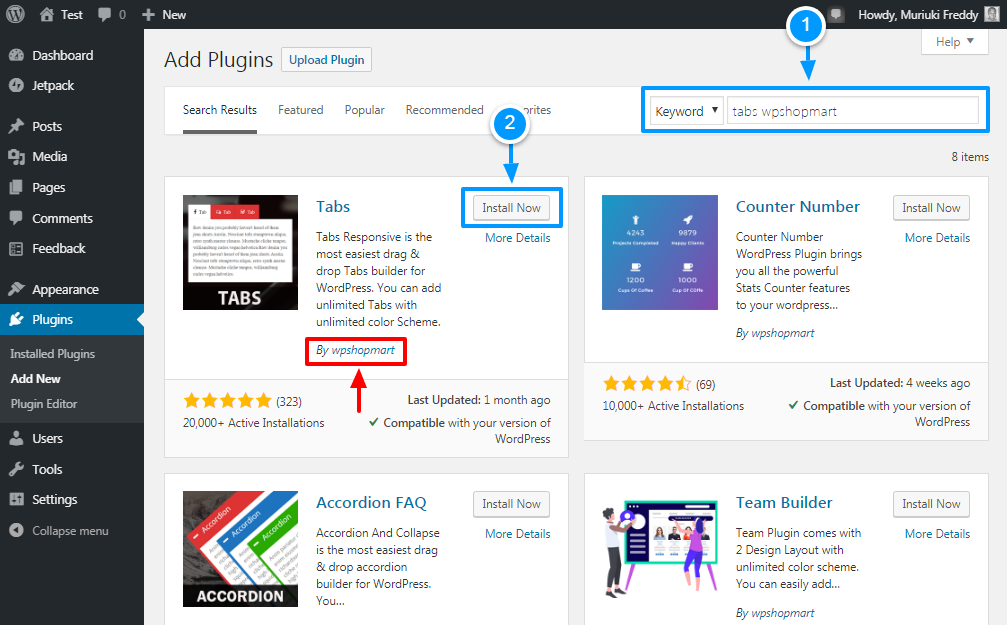
Go to your WordPress dashboard. Find the “Plugins” menu on the left side. Click on “Add New.” This opens the WordPress Plugin Directory. Here, you can search for tab plugins by typing keywords like “tabs” or “tab plugin.” The directory shows many free and paid options.
Steps To Install And Activate
Choose a plugin that fits your needs. Click the “Install Now” button next to it. WordPress will download and install the plugin automatically. After installation, click “Activate.” The plugin is now ready to use on your site.
Initial Plugin Setup
Once activated, look for the plugin’s settings in the dashboard. Some plugins add a new menu item. Others appear under “Settings.” Open the setup page to customize your tabs. Add tab titles and content blocks. Save your changes to apply the tabs on your pages.
Creating Tabs With Plugins
Creating tabs on WordPress becomes simple with the right plugins. Plugins help you build tabs without coding skills. They let you organize content neatly, making pages easier to read. Many plugins offer drag-and-drop tools and ready-made styles.
Using plugins saves time and gives a professional look. You can add tabs for products, FAQs, or services. The following steps explain how to create tabs using plugins.
Adding New Tabs
First, install a tab plugin from the WordPress directory. Activate it and go to the plugin’s tab section. Click the button to create a new tab group. Name your tab group for easy identification.
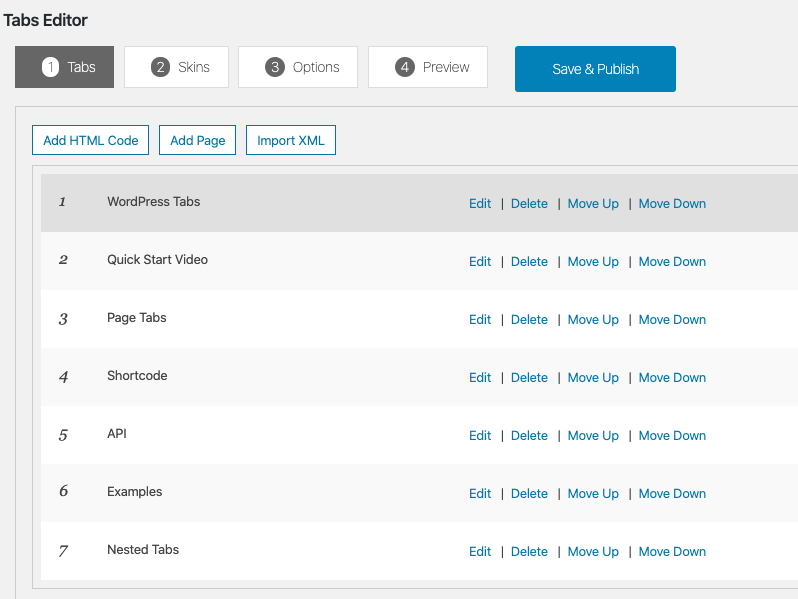
Next, add individual tabs inside this group. Each tab needs a title and content area. Fill the content with text, images, or shortcodes. Save your tab group after adding all tabs you want.
Customizing Tab Appearance
Open the plugin’s settings to change tab styles. Choose colors for tab titles and backgrounds. Select font size and style for better readability. Some plugins let you add icons to tabs.
You can also set how tabs behave on mobile devices. Pick vertical or horizontal tab layouts. Preview changes before saving to ensure the look fits your site.
Organizing Tab Content
Arrange tabs by dragging them in the plugin interface. Place the most important tabs first. Use clear and short titles to guide visitors.
Add images, videos, or lists to make content clear. Avoid too much text inside tabs to keep pages fast. Group related topics together for better user experience.
Adding Tabs Manually With Code
Adding tabs manually with code gives you full control over your WordPress content. It lets you create clean, custom tabs without extra plugins. This method works well for simple tab layouts. You write the code yourself and place it where needed.
Manual coding is a good choice for people with basic web skills. It helps keep your site fast. You avoid plugin bloat and can style tabs exactly as you want. Let’s explore how to do this using HTML, CSS, and JavaScript.
Using Html And Css
Start by creating the tab structure in HTML. Use a list or buttons for the tab headers. Each tab should link to a content section below. Use simple classes to style them.
Next, add CSS to style tabs. Set the active tab’s background and border. Hide inactive content sections by default. Use CSS to show the active content area.
Incorporating Javascript For Interaction
JavaScript makes tabs interactive. Write a small script to switch tabs on click. The script should hide all content sections except the selected one. Change the active tab’s class to update styles.
This script can be placed in your theme’s footer or inside a custom HTML block. Keep it simple to avoid conflicts with other site scripts.
Embedding Tabs Into Pages
Copy your HTML, CSS, and JavaScript code. Paste the HTML into the WordPress page editor using the “Custom HTML” block. Add CSS to the page’s custom CSS area or your theme’s style.css file.
Insert the JavaScript code in the page footer or use a plugin that allows custom scripts. Preview your page to check if tabs work smoothly. Adjust styles or script as needed for better user experience.
Credit: www.wpexplorer.com
Optimizing Tabs For Mobile
Optimizing tabs for mobile is essential for a smooth user experience. Tabs must look good and work well on small screens. Mobile users expect quick access to content without extra scrolling or zooming. Proper optimization helps keep visitors engaged and reduces frustration.
Mobile devices have less space than desktops. Tabs should adapt and stay easy to read and navigate. Simple layouts and clear labels improve usability on phones and tablets. Speed and touch friendliness also matter for mobile tabs.
Responsive Design Tips
Use flexible widths for tab containers. This lets tabs resize based on screen size. Avoid fixed pixel widths that break on small screens. Stack tabs vertically if horizontal space is tight. Choose readable font sizes and enough spacing for fingers. Hide less important tabs or use dropdown menus on mobile.
Testing Tab Functionality On Devices
Check tabs on multiple devices and screen sizes. Test on both Android and iOS phones. Make sure tabs open quickly and content loads correctly. Test touch interactions like tapping and swiping. Verify keyboard navigation and screen reader support. Fix any layout or functionality issues found during testing.
Common Issues And Fixes
Adding tabs to WordPress can sometimes cause issues. These problems can stop your tabs from working well. Knowing common problems helps fix them fast. This saves time and keeps your site looking good.
Tabs Not Displaying Correctly
Tabs may not show properly due to theme or code conflicts. Sometimes, missing CSS styles cause tabs to look broken. Clear your browser cache and refresh the page. Check if your theme supports the tab plugin. Switching to a default theme can help find the problem.
Plugin Conflicts
Other plugins might stop your tab plugin from working. Some plugins use the same scripts or styles, causing conflicts. Deactivate other plugins one by one. See if the tabs start working again. Update all plugins to their latest versions. This often fixes compatibility problems.
Performance Considerations
Too many tabs or heavy content can slow your site. Slow loading hurts user experience and SEO. Keep tab content simple and light. Avoid adding large images or videos inside tabs. Use caching plugins to speed up your site. Test page speed after adding tabs to ensure smooth performance.
Tips To Maximize Tab Use
Using tabs on your WordPress site helps organize information clearly. Tabs break content into smaller parts. Visitors find what they want faster. Tabs also make pages look neat and professional. To get the best results, use a few smart tips.
Strategic Content Placement
Place the most important content in the first tab. Visitors see this tab first. Keep content short and focused. Avoid putting too much text in one tab. Use clear titles for each tab. This helps users know what to expect. Group related information together. This keeps the page tidy and easy to read.
Using Tabs To Boost Seo
Tabs can improve your site’s SEO if used well. Search engines read tab content like normal text. Add keywords naturally inside each tab. Use unique titles for tabs to target different keywords. Avoid duplicate content across tabs. This helps search engines understand your page better. Also, include links inside tabs to other pages on your site. This builds a strong internal link structure.
Maintaining Tab Accessibility
Make sure all users can access your tabs. Use keyboard-friendly navigation for people who cannot use a mouse. Add proper labels to each tab. This helps screen readers describe the content. Test tabs on different devices and browsers. Check if tabs work well on phones and tablets. Clear focus styles on tabs improve visibility. Accessibility helps more visitors use your site easily.
Credit: www.seedprod.com
Frequently Asked Questions
How Do I Add Tabs To WordPress Pages?
To add tabs in WordPress, use a tab plugin like WP Tabs. Install, activate, then create tabs via the plugin interface. Finally, embed tabs using shortcodes or Gutenberg blocks on your page or post.
Which Is The Best Plugin For WordPress Tabs?
Popular tab plugins include WP Tabs, Tabby Responsive Tabs, and Ultimate Tabs. Choose one with good reviews, frequent updates, and easy customization for best results.
Can I Add Tabs Without A Plugin In WordPress?
Yes, by using custom HTML, CSS, and JavaScript code. However, this requires coding knowledge and is less user-friendly compared to plugins.
Are WordPress Tabs Mobile-friendly?
Most modern tab plugins are responsive and mobile-friendly. Always test your tabs on different devices to ensure proper display and usability.
Conclusion
Adding tabs to your WordPress site makes content neat and easy to find. You can organize information clearly for your visitors. This helps users spend more time on your pages. Using simple plugins or code works well for most sites.
Try adding tabs today and see how it improves your site’s look. Keep your content clean and user-friendly. Small steps like this create a better experience for everyone.



