
Are you looking to make your WordPress site more connected and engaging? Adding social icons to your WordPress menu is a simple way to boost your online presence and make it easy for visitors to find and follow your social profiles.
In this guide, you’ll discover clear, step-by-step instructions to add those icons quickly—no tech skills needed. By the end, your website will not only look more professional but also encourage more interaction. Ready to give your menu that extra edge?
Let’s dive in!
Credit: www.8theme.com
Choose Social Icons
Choosing the right social icons is an important step. These icons show visitors where to find you on social media. They make your WordPress menu more useful and attractive. Pick icons that match your brand and website style.
Popular Social Networks
Start with the most popular social networks. Facebook, Twitter, Instagram, and LinkedIn are common choices. Pinterest and YouTube also attract many users. Choose networks where your audience is active. This helps visitors connect with you easily.
Icon Styles And Sizes
Icons come in different styles like flat, colored, or outline. Flat icons are simple and clean. Colored icons stand out with brand colors. Outline icons look modern and minimal. Pick a style that fits your website design.
Size matters too. Small icons keep the menu neat. Larger icons catch more attention. Test different sizes to see what looks best. Make sure icons are clear and easy to tap on all devices.
Credit: www.greengeeks.com
Add Icons Using Plugins
Adding social icons to your WordPress menu helps visitors find your social profiles quickly. Using plugins makes this process simple and fast. Plugins offer ready-made icons and easy setup steps. No coding skills needed. This method suits beginners and saves time.
Selecting The Right Plugin
Choose a plugin that fits your needs. Check if it supports popular social networks. Look for plugins with good reviews and frequent updates. Lightweight plugins load faster and keep your site quick. Some popular options include “Menu Social Icons” and “WP Social Icons.”
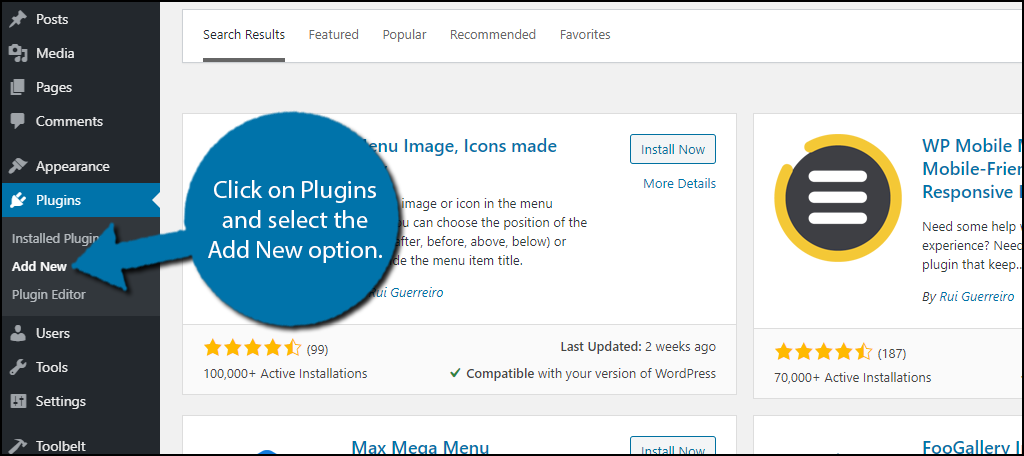
Installing And Activating
Go to your WordPress dashboard. Click “Plugins” then “Add New.” Type the plugin name in the search box. Click “Install Now” and wait a few seconds. After installation, click “Activate” to enable the plugin on your site.
Configuring Social Icons
Open the plugin’s settings page. Add your social profile links one by one. Choose the icon style and size that fits your menu. Decide where the icons should appear in your menu. Save the settings and check your site to see the icons in action.
Add Icons Manually
Adding social icons manually to your WordPress menu gives you full control. You can customize each icon to match your site style. This method works well for simple menus and small icon sets. It needs some basic knowledge of WordPress menus and a bit of HTML or CSS. Follow the steps below to add icons by hand.
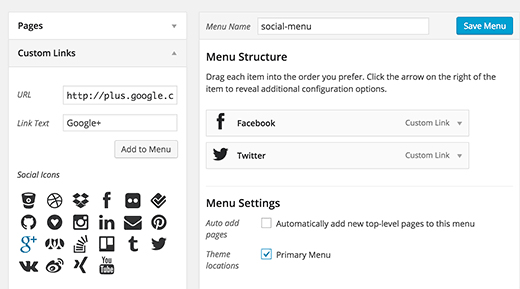
Using Custom Links
Start by opening your WordPress dashboard. Go to the Appearance menu and select Menus. Choose the menu where you want to add social icons. Click on Custom Links on the left side. Enter your social media URL in the URL box.
In the Link Text box, write the name of the social network. This text will show in the menu unless you replace it with an icon. Click Add to Menu. The link appears in the menu structure on the right.
Repeat this for each social media platform you want to add. Save the menu after adding all your links.
Adding Icon Html Or Css
To show icons instead of text, add HTML or CSS code to your menu items. Open the menu item settings by clicking the arrow next to the link. In the Navigation Label field, replace the text with icon code.
You can use icon fonts like Font Awesome. For example, add for a Facebook icon. Make sure your theme supports icon fonts or load them in your site.
Alternatively, add CSS classes to style icons. Enable CSS Classes in screen options if hidden. Add a class name like menu-facebook. Then add CSS rules in your theme’s customizer or style file to show background images or icons.
Positioning Icons In The Menu
Position icons properly for a neat menu. Use CSS to align icons with menu text or hide text completely. For example, set icon size, padding, and margin with CSS. This keeps your menu balanced and easy to read.
Try display: inline-block; and vertical-align: middle; for icon alignment. Adjust spacing between icons and text for a clean look. Test your menu on desktop and mobile to ensure icons look good everywhere.
Manual icon addition takes effort but offers full design control. You can tweak icons exactly how you want them.
Credit: www.wpbeginner.com
Customize Icon Appearance
Customizing the look of social icons in your WordPress menu makes your site unique. Small changes to colors, spacing, and alignment can create a clean, attractive style. These tweaks improve user experience and keep your design consistent. Let’s explore simple ways to adjust these details.
Changing Colors And Hover Effects
Colors set the mood of your social icons. Choose shades that match your website’s theme. Use your WordPress customizer or CSS to change icon colors easily. Make sure icons stand out but do not clash with the background.
Hover effects add interactivity. Change the icon color or add a subtle animation when users place their cursor on an icon. These effects draw attention and encourage clicks. Use simple color shifts or brightness changes for a smooth effect.
Adjusting Spacing And Alignment
Proper spacing keeps your menu tidy. Add space between social icons and menu items to avoid crowding. Use padding or margin settings in your theme or CSS. Balanced spacing makes icons easier to see and click.
Alignment matters for a polished look. Align icons horizontally or vertically, depending on your menu style. Center or right-align icons if your menu is left-aligned. Consistent alignment creates a neat, professional appearance.
Test And Optimize
Testing and optimizing your social icons in the WordPress menu helps improve user experience. It ensures your icons look good and work well on all devices. This step is crucial to keep visitors engaged and make your site accessible to everyone.
Checking Mobile Responsiveness
Mobile users make up a large part of website traffic. Check how your social icons appear on different screen sizes. Use tools or your phone to see if icons fit well and are easy to tap. Adjust icon size or spacing to prevent clutter. A clean, functional mobile menu keeps visitors on your site longer.
Ensuring Accessibility
Accessibility means everyone can use your website, including people with disabilities. Make sure your social icons have clear labels for screen readers. Use proper contrast colors so icons stand out. Test keyboard navigation to see if users can tab through icons easily. Accessible icons improve usability and widen your audience reach.
Frequently Asked Questions
How Do I Add Social Icons To A WordPress Menu?
To add social icons, use a plugin or custom code. Go to Appearance > Menus, add custom links with your social URLs, and assign icon classes via a plugin or theme settings.
Which Plugins Are Best For Social Icons In Menus?
Popular plugins include “Menu Icons by ThemeIsle” and “WP Social Icons. ” They simplify adding icons and customizing styles directly in the WordPress menu editor.
Can I Add Social Icons Without A Plugin?
Yes, by manually adding custom links and using icon fonts like Font Awesome. This requires editing your theme’s CSS and menu structure carefully.
Where Should Social Icons Be Placed In WordPress Menus?
Place social icons at the menu’s start or end for best visibility. Consistency in placement improves user experience and social engagement.
Conclusion
Adding social icons to your WordPress menu helps visitors find your profiles quickly. It improves your site’s look and makes sharing easy. You can do this using plugins or manual methods. Both ways are simple and fast. Keep your icons clear and easy to spot.
Test on different devices to ensure they work well. Now, your site connects better with your audience. Try adding social icons today and see the difference.


