
Are you looking to organize your WordPress blog better? Adding post categories is one of the easiest ways to keep your content neat and help your readers find what they want quickly.
But if you’re not sure how to add post categories or why they matter, you’re in the right place. You’ll learn simple steps to create and assign categories that make your site more user-friendly and boost your SEO. Keep reading, and you’ll have your posts perfectly organized in no time!
Credit: make.wordpress.org
Post Categories In WordPress
Post categories in WordPress help organize your content. They group similar posts together. This makes your site easier to navigate. Visitors find related content quickly. Categories also help search engines understand your site structure. This improves SEO and user experience.
Role Of Categories
Categories act as broad topics for your posts. They create a hierarchy for your content. Each post can belong to one or more categories. Categories help group posts by subject or theme. This makes your blog clear and orderly.
Benefits Of Categorizing Posts
Categorizing posts improves site navigation. Visitors find topics they like faster. Categories also boost SEO by organizing keywords. They help search engines index your content better. Organized posts keep readers on your site longer. This reduces bounce rates and increases engagement.

Credit: docs.themeisle.com
Creating Categories In WordPress
Creating categories in WordPress helps organize your posts. It makes your website easy to navigate. Visitors find related content quickly. Categories also improve your site’s SEO by grouping topics clearly.
Here is how to create categories in WordPress step by step.
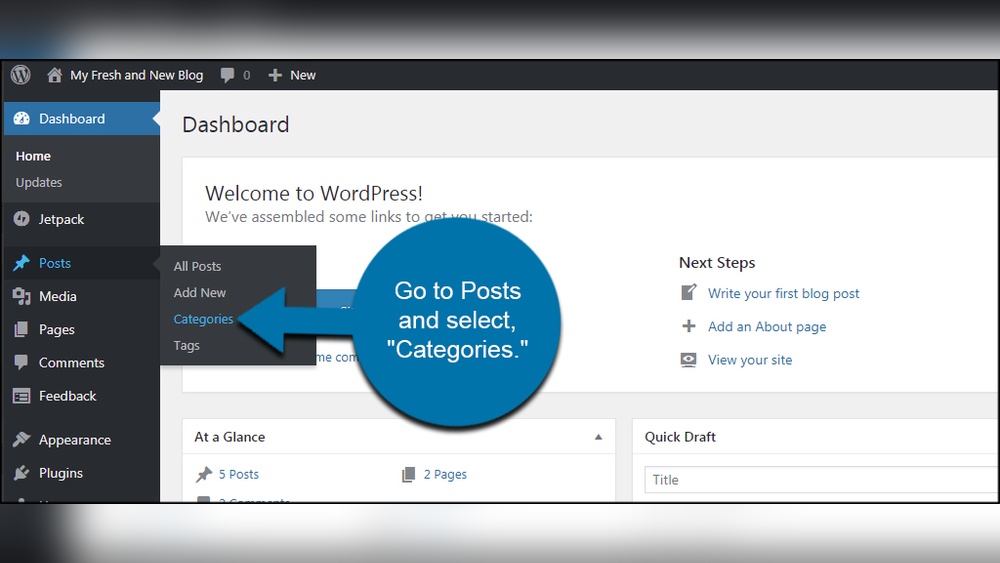
Accessing The Categories Menu
Log in to your WordPress dashboard first. On the left sidebar, find the “Posts” section. Click on “Categories” under “Posts.” This opens the categories management page. Here, you see existing categories and options to add new ones.
Adding A New Category
On the categories page, look for the “Add New Category” form. Enter the name of your new category in the first field. You can also add a slug, which is the URL-friendly version of the name. Optionally, write a short description to explain the category. Finally, click the “Add New Category” button below the form. Your new category appears in the list on the right.
Setting Parent Categories
Parent categories help create a hierarchy. This groups related categories under a main topic. When adding a new category, find the “Parent Category” dropdown in the form. Select a parent category if this one is a subcategory. Leave it as “None” if it stands alone. This structure helps organize content clearly for visitors.
Assigning Categories To Posts
Assigning categories to posts helps organize your content clearly. Categories make it easier for visitors to find related posts. They also improve your site’s structure for search engines.
In WordPress, you can assign categories quickly using the post editor or by bulk editing multiple posts. Both methods save time and keep your site neat.
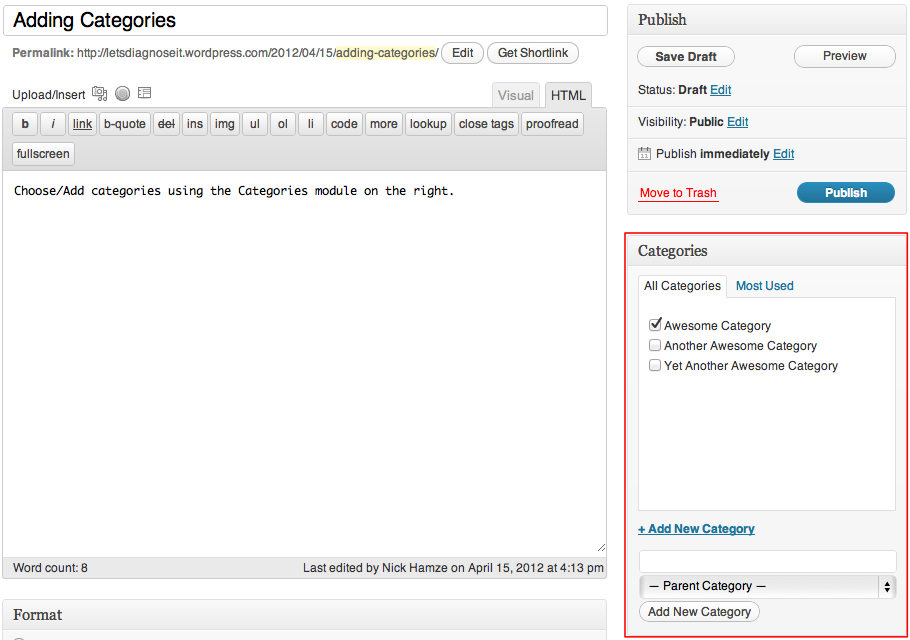
Using The Post Editor
Open the post you want to categorize in the WordPress editor. Look for the “Categories” box on the right side. You will see a list of available categories.
Select the category or categories that fit your post by clicking the checkboxes. You can also create a new category by clicking “Add New Category.” After selecting, update or publish your post. Your post now belongs to the chosen categories.
Bulk Assigning Categories
Go to the Posts list in your WordPress dashboard. Select multiple posts by checking the boxes next to them. Click on “Bulk Actions” at the top and choose “Edit,” then click “Apply.”
A bulk edit panel appears. Find the “Categories” section. Check the categories you want to assign to all selected posts. Finally, click “Update” to save changes. This method saves time when categorizing many posts.

Credit: wordpress.com
Managing Existing Categories
Managing existing categories in WordPress keeps your site organized. It helps visitors find related posts easily. Categories can be edited, deleted, or merged based on your needs. Each action improves your site’s navigation and content structure.
Editing Categories
To edit a category, go to your WordPress dashboard. Click on “Posts” and then “Categories.” Find the category you want to change. Click “Edit” under its name. You can change the category name, slug, or description here. Save changes by clicking the “Update” button. Editing categories keeps your site clear and user-friendly.
Deleting Categories
Deleting unused or irrelevant categories removes clutter. In the categories list, hover over the category name. Click the “Delete” option that appears. WordPress will ask for confirmation before deleting. Posts in deleted categories will move to the default category. This process keeps your categories relevant and tidy.
Merging Categories
Merging categories combines similar topics under one label. WordPress does not offer a direct merge option. Use a plugin or bulk edit posts to change their categories. Assign all posts from one category to another. After moving posts, delete the empty category. Merging simplifies your category list and improves site structure.
Displaying Categories On Your Site
Displaying categories on your WordPress site helps visitors find related posts easily. It organizes content and improves site navigation. Categories guide users to topics they care about. Showing categories clearly boosts user experience and site structure.
Adding Category Widgets
Widgets are simple tools to show categories in sidebars or footers. Go to Appearance > Widgets in your WordPress dashboard. Drag the “Categories” widget to your chosen widget area. Customize the widget title and display options. Visitors will see a list or dropdown of your post categories instantly.
Using Menus For Categories
Menus let you add category links to your main site navigation. Go to Appearance > Menus in WordPress. Choose the categories you want to add from the left panel. Click “Add to Menu” and arrange them as needed. Save the menu. Now visitors can click categories directly from your menu bar.
Customizing Category Pages
Category pages show posts grouped by topic. Customize these pages to match your site’s style. Use a theme that supports category page layouts or install page builder plugins. Add banners, descriptions, or custom widgets to category pages. This makes categories more engaging and easier to explore.
Tips For Organizing Categories
Organizing categories in WordPress helps readers find content quickly. Clear categories improve site navigation and user experience. Proper organization also helps search engines understand your site better.
Here are simple tips to keep your categories neat and useful.
Choosing Clear Names
Pick names that describe your content well. Avoid vague or complex words. Short and simple names work best. Readers should guess the topic by category name alone. This makes browsing easier and faster.
Limiting Number Of Categories
Too many categories can confuse visitors. Keep your list short and focused. Around five to ten main categories work well. Group similar posts together to avoid clutter. Fewer categories keep your site clean and organized.
Using Tags Alongside Categories
Tags add detail beyond categories. Use tags for specific topics within a category. They help users find related posts quickly. Tags also improve internal linking and SEO. Combine categories and tags for better content structure.
Frequently Asked Questions
How Do I Create A New Post Category In WordPress?
To create a new post category, go to your WordPress dashboard. Navigate to Posts > Categories. Enter the category name, slug, and description. Click “Add New Category” to save it. Your new category will be available to assign to posts immediately.
Can I Edit Post Categories After Creating Them?
Yes, you can edit post categories anytime. Go to Posts > Categories, find the category, and click “Edit. ” Change the name, slug, or description as needed. Save the changes by clicking “Update. ” The updates will reflect across all posts using that category.
How Do I Assign Categories To A WordPress Post?
While editing a post, look for the “Categories” box on the right side. Check the boxes next to relevant categories. You can add new categories here too. After selecting categories, save or update the post to apply the changes.
Why Should I Use Categories For WordPress Posts?
Categories organize your content for better user navigation and SEO. They help visitors find related posts quickly. Search engines use categories to understand your site structure. Using categories improves user experience and boosts search rankings.
Conclusion
Adding post categories in WordPress helps organize your content better. It makes your site easier to navigate for visitors. Categories also improve your SEO by grouping similar posts together. You can create and assign categories in just a few simple steps.
Keep your categories clear and relevant to your content. This practice helps both readers and search engines understand your site. Start adding categories today to keep your blog neat and user-friendly.


