
Are you looking to make it easy for your visitors to pay you online? Adding a PayPal button to your WordPress site can be the perfect solution.
It lets your customers quickly and securely send payments without any hassle. In this guide, you’ll learn exactly how to add a PayPal button step-by-step, even if you’re not tech-savvy. By the end, you’ll have a powerful tool ready to boost your sales and grow your business.
Keep reading—you’re just minutes away from turning your WordPress site into a payment-friendly platform.
Why Add A Paypal Button
Adding a PayPal button to your WordPress site makes accepting payments simple. It helps visitors pay quickly without leaving your website. This can boost sales and improve user trust.
PayPal is a popular and trusted payment option worldwide. Many people already have PayPal accounts, so paying is easy and familiar.
Secure Transactions
PayPal offers strong security for buyers and sellers. It protects your customers’ payment details from theft. This builds trust and encourages more purchases.
Easy Setup
Adding a PayPal button does not require coding skills. WordPress plugins and PayPal tools guide you step-by-step. You can start accepting payments fast.
Mobile Friendly
PayPal buttons work well on phones and tablets. Mobile shoppers can pay with just a few taps. This helps capture sales from mobile users.
Wide Customer Reach
PayPal is accepted in many countries. This lets you sell to international customers easily. You get paid in multiple currencies too.
Low Cost
Setting up PayPal is free. You only pay a small fee per transaction. This keeps costs low for small businesses and startups.
Preparing Your Paypal Account
Before adding a PayPal button to your WordPress site, prepare your PayPal account. This step ensures smooth payments and fewer issues.
Setting up your account correctly helps you accept money easily. It also protects your business and customers.
Creating A Business Account
Start with a PayPal Business account. Personal accounts do not support payment buttons.
Visit the PayPal website and sign up as a business. You will need your email and business details.
Adding your business name and contact info is important. This shows professionalism to your customers.
Verify your email to activate the account. This process is quick and secures your profile.
Setting Up Payment Preferences
Next, adjust your payment settings. This controls how you receive money and handle transactions.
Choose the currency you want to accept. This avoids confusion with international payments.
Set up your payment receiving preferences. Decide if you want to accept credit cards or PayPal balance.
Review security options like fraud protection. These settings keep your account safe.
Save all changes before leaving the page. This ensures your preferences are active for all payments.
Generating A Paypal Button
Generating a PayPal button is the first step to accept payments on your WordPress site. PayPal offers simple tools to create buttons that fit your needs. You can design buttons for selling products, donations, or subscriptions. Each button is easy to customize and add to your website. This section explains how to create a PayPal button step-by-step.
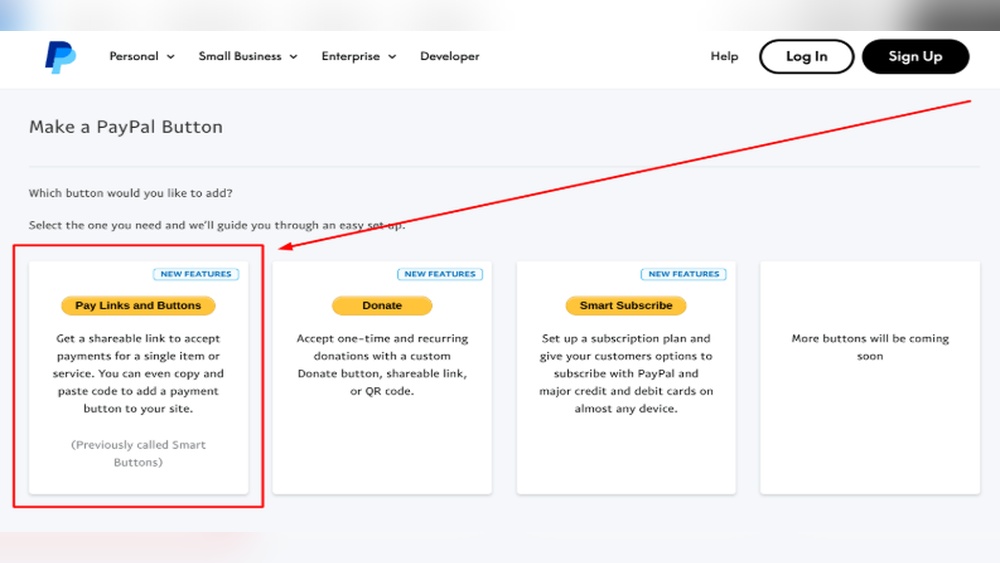
Choosing Button Type
Start by logging into your PayPal business account. Find the option to create a new button in the tools or merchant services menu. PayPal offers several button types. The most common are “Buy Now,” “Add to Cart,” “Donate,” and “Subscribe.” Select the button that matches your goal. For example, use “Buy Now” to sell a single product. Choose “Donate” if you want to collect donations. This choice sets the button’s function and style.
Customizing Button Options
After selecting the button type, customize its settings. Enter the item name and price. Set the currency to match your target audience. Choose shipping and tax options if needed. You can also add dropdown menus or text fields for extra options. Pick the button size and color that fits your website design. PayPal lets you preview the button before finalizing. This step ensures your button looks right and works correctly.

Credit: www.youtube.com
Adding Paypal Button To WordPress
Adding a PayPal button to WordPress lets visitors pay you easily. This feature works well for shops, donations, or services. It saves time and avoids complex checkout setups. The process fits different WordPress editors and skill levels. Below are simple ways to add a PayPal button to your site.
Using The Classic Editor
The Classic Editor is the old WordPress editor with a simple text box. To add a PayPal button here, switch to the “Text” tab in the editor. Paste the PayPal button HTML code directly into the content area. This code comes from PayPal’s button creation tool. After pasting, switch back to the “Visual” tab to see the button. Save or update your post to publish the button live.
Using The Block Editor
The Block Editor uses blocks for different content types. To add a PayPal button, use a “Custom HTML” block. Open your page or post in the Block Editor. Click the plus (+) icon and select “Custom HTML.” Paste your PayPal button code inside this block. Preview the page to make sure the button looks right. Publish or update the post to add the button to your site.
Embedding With Shortcodes
Shortcodes are small codes that WordPress reads as special content. Some PayPal plugins offer shortcodes for buttons. Install a PayPal plugin that supports shortcodes first. Copy the shortcode provided by the plugin. Paste the shortcode anywhere in your post or page editor. WordPress replaces the shortcode with the PayPal button automatically. This method works for both Classic and Block editors.
Using Plugins For Paypal Integration
Using plugins for PayPal integration makes the process simple and fast. Plugins help add PayPal buttons without coding. They offer ready-made features to accept payments securely. This method suits beginners and those who want quick setup. Plugins also work well with most WordPress themes and page builders.
Popular Paypal Plugins
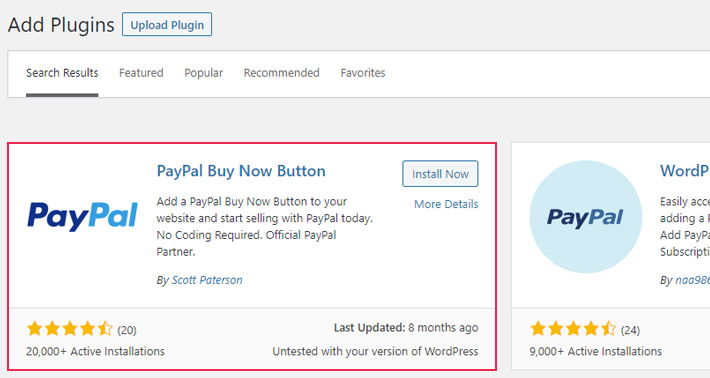
Several plugins let you add PayPal buttons easily. “PayPal Buy Now Button” is great for single products. “Easy PayPal Button” supports multiple buttons and customization. “WP PayPal” allows donations and simple sales. Most plugins offer free versions with basic functions. You can upgrade for more options like subscriptions and invoices.
Plugin Installation And Setup
Start by opening your WordPress dashboard. Go to Plugins > Add New and search for PayPal. Choose a plugin based on ratings and reviews. Click “Install Now” and then “Activate.” After activation, find the plugin settings in the dashboard menu.
Enter your PayPal email or merchant ID to connect your account. Customize button style, text, and currency to fit your site. Save changes and copy the shortcode provided. Paste the shortcode into pages or posts where you want the button. Preview the page to test the button’s functionality.

Credit: www.youtube.com
Testing Your Paypal Button
Testing your PayPal button is a key step before going live. It helps ensure payments work smoothly. You avoid issues that might confuse customers. Testing builds trust and protects your site’s reputation.
Sandbox Mode Setup
Sandbox mode lets you test payments without real money. Create a PayPal developer account first. Then, generate sandbox buyer and seller accounts. Use these accounts to simulate transactions on your site. This process checks if the button works correctly. It also helps spot errors early. Enable sandbox mode in your PayPal plugin or button settings.
Verifying Transactions
After testing, check if transactions appear in your PayPal sandbox dashboard. Confirm payment details match your test purchases. Verify email notifications and payment confirmations. This step ensures your system records payments properly. Repeat tests to catch any issues. Correct errors before your site goes live.
Troubleshooting Common Issues
Troubleshooting is key when adding a PayPal button to WordPress. Common issues can stop the button from showing or working. Knowing how to fix these problems saves time and frustration.
Button Not Displaying
Check if the PayPal button code is correctly pasted. Missing or extra characters can cause display issues. Clear your browser cache and reload the page. Sometimes caching stops new changes from showing. Confirm your theme supports custom HTML or shortcodes. Some themes block external buttons by default.
Payment Failures
Verify your PayPal account settings match your website details. Incorrect email or currency settings cause payment errors. Test payments in sandbox mode before going live. Make sure your site uses HTTPS for secure transactions. Unsecured sites may block payment processing.
Plugin Conflicts
Deactivate other plugins one by one to spot conflicts. Some plugins interfere with PayPal button scripts. Update all plugins and your WordPress version to the latest. Outdated software often causes compatibility issues. Use only trusted plugins from official sources.
Credit: qodeinteractive.com
Tips For Enhancing Payment Experience
Improving the payment experience on your WordPress site helps keep customers happy. A smooth, secure checkout builds trust and encourages repeat business. Small changes can make a big difference in how people pay.
Focus on mobile users and security. These two areas often decide if a customer completes the purchase.
Mobile Optimization
Many customers shop on phones or tablets. Ensure your PayPal button works well on all screen sizes. Use responsive design to fit the button neatly on any device. Avoid small buttons that are hard to tap.
Test the payment process on different devices. Fast loading times and clear layouts improve the mobile experience. Keep forms simple and easy to fill out on touchscreens.
Security Best Practices
Protect your customers’ data during payment. Use HTTPS to encrypt all transactions. This keeps information safe from hackers.
Keep your WordPress and PayPal plugins updated. Updates fix security issues and improve performance. Use strong passwords and two-factor authentication for your admin accounts.
Display trust badges or secure payment icons near the PayPal button. This reassures buyers their payment is safe. Clear communication about security boosts confidence and sales.
Frequently Asked Questions
How Do I Add A Paypal Button To WordPress?
To add a PayPal button, use the PayPal plugin or generate button code from PayPal. Then, paste the code into your WordPress page or post using the HTML block or shortcode.
Can I Customize The Paypal Button On WordPress?
Yes, you can customize the button’s style, size, and text within PayPal’s button generator or plugin settings. This helps match your website’s design and improve user experience.
Is It Free To Add A Paypal Button On WordPress?
Adding a PayPal button is free. PayPal charges fees only when you receive payments. WordPress plugins for PayPal buttons often have free basic versions.
What Are The Best Plugins For Paypal Buttons On WordPress?
Popular plugins include “PayPal Buy Now Button,” “Easy PayPal Button,” and “WP PayPal. ” They simplify adding buttons and managing payments without coding.
Conclusion
Adding a PayPal button to your WordPress site is simple and fast. It helps visitors pay easily and safely. You only need a few steps to set it up. This can improve your site’s user experience and boost trust. Keep your payment process clear and smooth.
Try adding the button today and see the difference it makes.


