

Are you looking to expand your WordPress website but don’t know where to start? Adding new pages is one of the easiest ways to make your site more useful and professional.
Whether you want to share more information about your business, showcase your portfolio, or create a blog, knowing how to add pages quickly can save you time and frustration. In this guide, you’ll learn simple, step-by-step instructions that anyone can follow—even if you’re new to WordPress.
By the end, you’ll feel confident building your website exactly the way you want it. Let’s dive in and make your site stand out!
Creating A New Page
Creating a new page on WordPress is simple and fast. It helps you share more information on your website. New pages can display services, contacts, or blog posts.
Follow these steps to add a fresh page and make your site more useful.
Accessing The WordPress Dashboard
First, log in to your WordPress site. Use your username and password to enter the dashboard. The dashboard is the control center of your website. Here, you manage all parts of your site.
Navigating To The Pages Section
After logging in, look at the left menu. Find the “Pages” option and click it. This section shows all the pages on your site. You can edit or delete existing pages here.
Starting A New Page
Click the “Add New” button near the top of the Pages screen. This opens a blank page editor. Enter a title for your page first. Then add text, images, or other content. Use the tools to format and style your page. When ready, click “Publish” to make it live. Your new page is now part of your website.

Credit: www.omnisend.com
Adding Content To Your Page
Adding content to your WordPress page is the key to sharing your message. Clear content helps visitors understand your purpose. WordPress offers easy tools to create and arrange your text and media. Focus on using simple steps to build your page. This section explains how to add and format your content efficiently.
Using The Block Editor
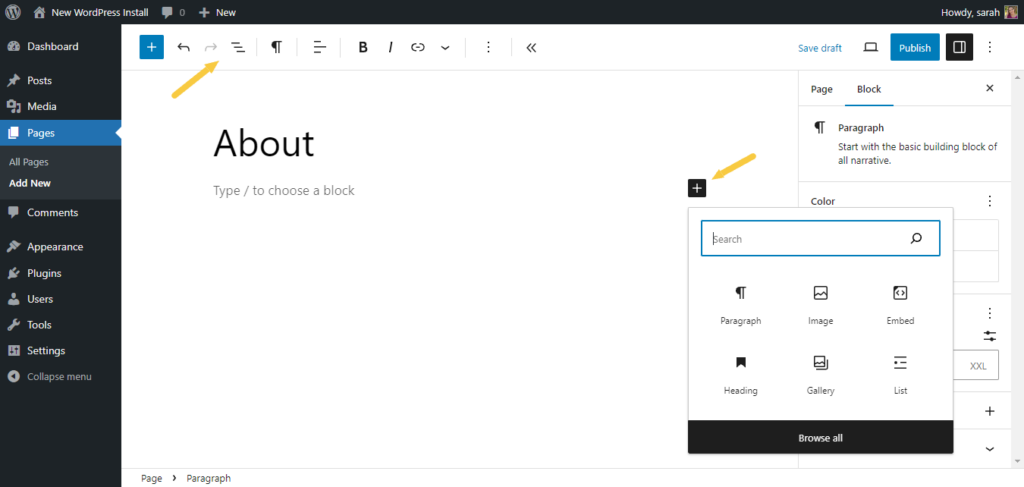
The Block Editor is WordPress’s main tool for creating pages. It works with blocks, each holding a piece of your content. Blocks can be text, images, videos, or other elements. This system keeps your page clean and easy to edit. You can add new blocks by clicking the plus (+) icon. Move blocks up or down to change the layout. Each block is independent, making changes simple and fast.
Inserting Text And Media
Start by adding text blocks for your main ideas. Click the paragraph block to type or paste your text. For images, use the image block to upload files from your computer. You can also insert media from your WordPress library. Videos and galleries have special blocks too. Place media near related text to keep your content engaging. This mix of text and media keeps visitors interested.
Formatting Your Content
Formatting improves the look and readability of your page. Use headings to break sections clearly. Bold or italicize important words to highlight them. Add lists for easy-to-read points. Adjust alignment to position text left, center, or right. Use links to connect to other pages or sites. Keep formatting simple for a clean, professional style.
Customizing Page Settings
Customizing page settings in WordPress helps you control how your pages look and behave. You can set titles, URLs, and decide where pages fit in your site’s structure. These settings also let you manage who sees your pages and when they go live.
Setting The Page Title And Url
The page title is what visitors see first. It should clearly describe the page content. WordPress automatically creates a URL based on this title.
You can change the URL to make it shorter or easier to remember. Just click the “Edit” button under the page title. Use simple words and avoid spaces or special characters.
Choosing A Parent Page
Parent pages help organize your site. You can place a new page under an existing one. This creates a hierarchy, making navigation easier.
In the “Page Attributes” box, select the parent page from the dropdown menu. Leave it as “(no parent)” if the page stands alone. This keeps your site structure clear and tidy.
Adjusting Visibility And Publishing Options
You control who sees your page by setting its visibility. Choose “Public” for everyone, “Private” for site admins only, or “Password Protected” for select visitors.
Publishing options let you schedule pages. Pick a date and time to publish later or publish immediately. This helps manage content flow on your site.

Credit: wordpress.org
Publishing And Managing Pages
Publishing and managing pages in WordPress is simple and essential for your website. Proper handling ensures your content looks great and stays organized. This section covers key steps to control your pages effectively.
Previewing Your Page
Before making a page live, preview it. The preview shows how visitors will see your content. Click the “Preview” button in the editor. Check text, images, and layout. Fix any errors or formatting issues before publishing. This step saves time and improves quality.
Publishing Immediately Or Scheduling
WordPress lets you publish pages right away or schedule them for later. To publish now, click the “Publish” button. Your page appears live instantly. To schedule, select the date and time in the “Publish” settings. This option helps you plan content in advance. Scheduled pages go live automatically at the set time.
Editing And Deleting Pages
Edit pages anytime to update or improve content. Go to the “Pages” section in the dashboard. Find the page and click “Edit.” Make your changes and save by clicking “Update.” To delete a page, select it and click “Trash.” Deleted pages go to the trash folder. You can restore or permanently delete them later.
Adding Pages To Navigation Menus
Adding pages to navigation menus is an important step in organizing your WordPress site. Menus help visitors find content easily. You can control which pages appear and their order. This makes your website clear and user-friendly.
Accessing The Menu Editor
Start by logging into your WordPress dashboard. Look for the “Appearance” tab in the left sidebar. Click on “Menus” to open the menu editor. This is where you create and change menus. If no menu exists, you can create a new one here.
Including New Pages In Menus
On the menu editor page, find the list of your pages. Select the new pages you want to add. Use the checkboxes to pick them. Then click “Add to Menu.” The pages will appear at the bottom of the menu structure. You can add posts, categories, or custom links too.
Organizing Menu Items
After adding pages, arrange them by dragging items up or down. This changes their order in the menu. You can also create sub-menu items by dragging a page slightly right under another. This shows a dropdown menu on your site. Save the menu to apply changes.
Using Page Templates And Plugins
Using page templates and plugins makes your WordPress pages look and work better. Templates give your pages a ready design. Plugins add new features without coding. Both help create unique pages that fit your needs.
Selecting Page Templates
Page templates control how your page looks and feels. WordPress offers many default templates. You find them in the page editor under “Page Attributes”. Choose templates like full-width, sidebar, or blank. Pick one that matches your content style. Templates save time by setting layout automatically.
Enhancing Pages With Plugins
Plugins add tools and features to pages. Use plugins for contact forms, galleries, or sliders. Install plugins from the WordPress plugin directory. Activate and configure them to fit your page. Plugins work without coding and improve user experience. They help pages do more than just show text.
Tips For Advanced Customization
Combine templates with plugins for better results. Use page builder plugins for drag-and-drop design. Customize templates with simple CSS for unique looks. Test changes on a draft page before publishing. Keep plugins updated for security and speed. Advanced tweaks help pages stand out and engage visitors.
Credit: solidwp.com
Frequently Asked Questions
How Do I Add A New Page In WordPress?
To add a new page, go to your WordPress dashboard. Click on “Pages” then “Add New. ” Enter your content and click “Publish. “
Can I Customize The Layout Of WordPress Pages?
Yes, you can customize layouts using WordPress themes or page builder plugins. This allows unique designs without coding.
How Do I Set A Homepage In WordPress?
Navigate to “Settings” > “Reading. ” Choose “A static page” under homepage displays. Then select your desired page as homepage.
Are WordPress Pages Seo Friendly By Default?
Yes, WordPress pages are SEO friendly by default. Use SEO plugins to optimize titles, meta descriptions, and content further.
Conclusion
Adding pages to WordPress is simple and quick. You just create a new page, add your content, and publish it. Organize pages to help visitors find information easily. Keep your site updated by adding or editing pages regularly. This improves user experience and helps your site grow.
Practice often to get comfortable with the process. Soon, managing your WordPress pages will feel natural and easy. Start building your website step by step and watch it improve.


