
Are you ready to make it easier for your customers to find your physical stores? Adding a store locator to your WordPress website can boost your sales and improve customer experience instantly.
Imagine your visitors quickly seeing where your nearest store is, right from your site. Sounds powerful, right? In this guide, you’ll discover simple, step-by-step ways to add a store locator that works smoothly and looks great. Keep reading, and you’ll have your store locator up and running before you know it!
Benefits Of A Store Locator
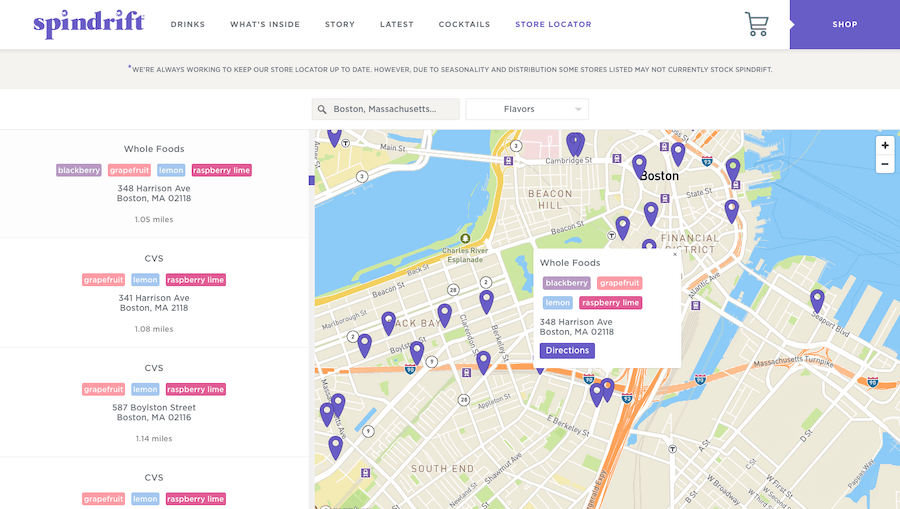
Adding a store locator to your WordPress website brings several important benefits. It helps your customers find your physical stores quickly. This feature improves how people interact with your site and supports your business growth. Below are key advantages of using a store locator.
Increase Customer Engagement
A store locator keeps visitors on your site longer. It invites them to explore nearby store options. This interaction builds trust and interest. Customers feel more connected to your brand. Engaged users are more likely to return and buy.
Drive In-store Traffic
Showing exact store locations encourages visits to your shops. People can find the closest store easily. This convenience boosts foot traffic. More visitors often lead to more sales. A store locator turns online visitors into real customers.
Enhance User Experience
A store locator makes your website user-friendly. It offers simple navigation for finding stores. Customers save time and avoid frustration. Clear, easy information improves satisfaction. Happy users are likely to recommend your site and stores.
Credit: storepoint.co
Choosing The Right Plugin
Choosing the right plugin is important for your store locator. The plugin decides how easy it is to add and manage locations. It also affects how your customers find your stores. Picking the best plugin saves time and avoids technical problems.
Free Vs Premium Options
Free plugins offer basic features at no cost. They work well for small websites with few locations. Premium plugins have more tools and support. They often include advanced maps, search filters, and analytics. Paid options suit larger businesses or complex needs.
Key Features To Look For
Search functionality helps users find stores quickly. Customizable maps match your website style. Mobile-friendly design ensures good use on phones. Import and export options save time with many locations. Support and updates keep the plugin secure and working well.
Compatibility With Themes
Check if the plugin works with your WordPress theme. Some plugins may not display correctly on all themes. Test the plugin before adding it live. A compatible plugin keeps your site looking professional. Avoid plugins that cause slow loading or errors.
Installing The Store Locator Plugin
Installing a store locator plugin on your WordPress site is the first step to help visitors find your physical stores easily. This process is simple and does not require coding skills. It allows you to display store locations clearly and professionally.
The plugin adds a map and search function to your site. Visitors can enter their location and see the nearest stores. Follow the steps below to install and configure the plugin correctly.
Plugin Installation Steps
Start by logging into your WordPress dashboard. Go to the “Plugins” menu and select “Add New.” Type “store locator” in the search bar. Choose a well-rated store locator plugin from the list.
Click the “Install Now” button next to the plugin name. Wait a few seconds for the installation to complete. Then, click “Activate” to enable the plugin on your site. The plugin is now ready for setup.
Initial Setup And Configuration
After activation, find the new store locator menu in your dashboard. Click on it to start setup. Enter your store locations by filling in address details. Add store names, phone numbers, and hours if needed.
Configure the map settings next. Choose the map style and zoom level. Decide if you want visitors to search by city, zip code, or radius. Save your settings before leaving the page.
Test the store locator on your website front end. Make sure the map loads and locations appear correctly. Adjust settings if necessary to improve user experience.
Adding Store Locations
Adding store locations to your WordPress website is a key step in creating a useful store locator. It helps visitors find your physical stores easily. There are two main ways to add these locations. You can enter them manually one by one. Or, you can import many locations at once using a file. Both methods are simple and effective.
Manual Entry Of Locations
Manual entry lets you add each store location by hand. This method works well if you have only a few stores. Open your store locator plugin or tool in WordPress. Find the option to add a new location. Enter the store name, address, phone number, and other details. Save each location as you go. This way, you control every detail and ensure accuracy.
Importing Locations In Bulk
Importing locations in bulk saves time for many stores. Prepare a spreadsheet with all store details. Common formats are CSV or Excel files. Upload the file through your store locator plugin. The plugin will read the file and add all stores at once. Check the import settings carefully. Fix any errors before completing the process. Bulk import is fast and reduces manual work.
Customizing The Store Locator
Customizing the store locator on your WordPress website helps improve user experience. It makes the map easier to read and use. Adjusting settings lets you match the locator to your site’s look. This keeps your brand consistent and professional. Each feature you tweak adds value and clarity to your store finder.
Map Appearance Settings
Change the map’s colors to fit your website theme. Select marker icons that clearly show store locations. Control zoom levels to display the best view of your stores. Enable or disable labels to keep the map clean. These tweaks make the map visually appealing and easy to understand.
Search And Filter Options
Allow visitors to search by city, ZIP code, or address. Add filters for store types, services, or hours. Use simple dropdown menus or checkboxes for easy selection. Search options help users find the closest or best store quickly. Clear filters improve navigation and user satisfaction.
Mobile Responsiveness
Ensure the store locator works well on all mobile devices. Use responsive design so maps resize automatically. Buttons and search fields should be easy to tap. Fast loading times keep mobile users engaged. Mobile-friendly locators reach more customers on the go.
Credit: wpgeodirectory.com
Embedding The Store Locator On Your Site
Embedding a store locator on your WordPress site helps visitors find your stores easily. It improves user experience and increases store visits. You can display the locator in many places on your site. Two common methods are using shortcodes and adding it to pages or widgets.
Using Shortcodes
Most store locator plugins provide shortcodes for easy embedding. Shortcodes are small codes you place in posts, pages, or widgets. They load the store locator wherever you insert them. Copy the shortcode from the plugin settings. Paste it into the WordPress editor where you want the locator to appear. Update or publish your page. The store locator will show up instantly.
Adding To Pages And Widgets
Adding the store locator to pages helps keep your site organized. Use the WordPress block editor to add a shortcode block. Paste the shortcode inside this block. For sidebars or footers, use the widget area. Go to Appearance > Widgets in your dashboard. Add a “Text” or “Custom HTML” widget. Paste the shortcode there. Save the widget settings. The locator will appear in your chosen widget area.
Optimizing For Better Results
Optimizing your store locator ensures it works fast and helps visitors find stores easily. A well-optimized locator improves user experience and boosts your site’s performance. Focus on key areas like speed, tracking, and SEO to get better results.
Improving Load Speed
Fast loading keeps visitors engaged. Use lightweight plugins and avoid heavy scripts. Compress images and use caching to reduce loading times. Test your store locator on different devices to ensure quick response.
Tracking User Interactions
Track how visitors use your store locator. Use tools like Google Analytics to see search patterns and popular store locations. This data helps improve your locator and meet visitor needs better.
Seo Tips For Store Locator Pages
Optimize your locator pages for search engines. Use clear titles with location keywords. Add unique descriptions for each store. Include structured data to help search engines understand your content.

Credit: www.youtube.com
Frequently Asked Questions
What Is A Store Locator Plugin For WordPress?
A store locator plugin helps add a map with your store locations to your WordPress site. It improves user experience by making stores easy to find. Many plugins offer features like search filters, directions, and customizable maps to fit your brand.
How Do I Install A Store Locator On WordPress?
To install, go to your WordPress dashboard, navigate to Plugins > Add New, then search for a store locator plugin. Click “Install” and “Activate. ” After activation, configure the plugin settings to add your store locations and customize the map display.
Can I Customize The Store Locator Map Design?
Yes, most WordPress store locator plugins allow map customization. You can change colors, map styles, marker icons, and layout to match your website’s branding. Customization helps create a seamless user experience and makes your locator visually appealing.
Are Store Locator Plugins Seo Friendly?
Yes, store locator plugins improve SEO by adding local business information to your site. They help search engines understand your store locations better. This can boost local search rankings and drive more traffic to your physical stores.
Conclusion
Adding a store locator helps visitors find your locations fast. It improves user experience and boosts trust in your site. Many WordPress plugins make setup simple and quick. Keep your store details clear and up to date. Test the locator on different devices for best results.
A good store locator can grow your local business. Start today to make your website more helpful and user-friendly.



