

Are you looking to make your WordPress site easier to navigate? Adding clear, simple navigation can keep visitors on your site longer and help them find exactly what they need.
But if you’re unsure how to create menus or organize links, don’t worry—you’re in the right place. This guide will walk you through step-by-step how to add navigation in WordPress, so your site feels professional and user-friendly. By the end, you’ll have a navigation setup that guides your visitors smoothly from one page to the next.
Keep reading to unlock the secret to better website navigation!

Credit: learn.wordpress.org
Choosing The Right Menu Location
Choosing the right menu location is key for your WordPress site. It helps visitors find what they need fast. The menu must fit your website’s style and goals. You want menus that are easy to use on all devices. Think about where people expect to see navigation. This makes your site feel natural and clear.
Primary Menu Options
The primary menu usually shows at the top of your site. It holds the most important links. Home, About, Services, and Contact often go here. Choose a location that stays visible as users scroll. Many WordPress themes offer a main menu spot. This keeps your site organized and user-friendly.
Footer And Sidebar Menus
Menus in the footer or sidebar add extra navigation choices. These spots work well for less important links. Terms of Service or Privacy Policy fit nicely here. Sidebars can hold quick links or categories. Footers provide a place for secondary menus without crowding the top.
Mobile Navigation Settings
Mobile users need menus that are simple to open and close. Many themes use a “hamburger” icon to hide the menu. This saves space and keeps the screen tidy. Check your theme settings for mobile menu options. Making menus easy on phones improves user experience and site performance.
Creating A New Menu
Creating a new menu in WordPress is simple and essential for easy site navigation. Menus help visitors find pages, posts, and other content quickly. Start by opening the menu editor to build your menu from scratch. You can name your menu for easy management. Then, add menu items such as pages, posts, or custom links. This process improves your site’s usability and keeps visitors engaged.
Accessing The Menu Editor
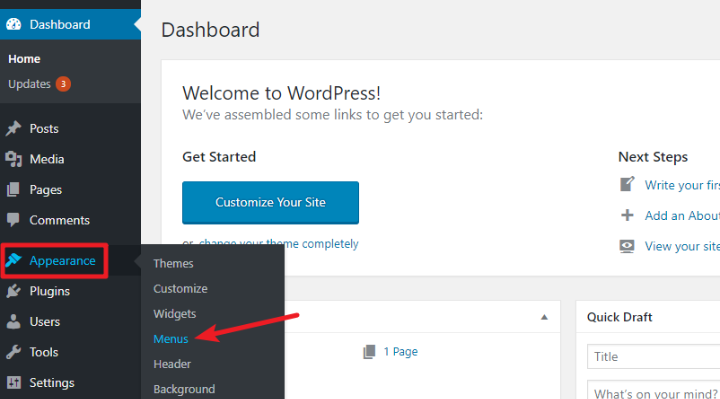
Log in to your WordPress dashboard. Go to the Appearance section in the sidebar. Click on the Menus option. This opens the menu editor where you create and manage menus. You can view existing menus or start a new one here.
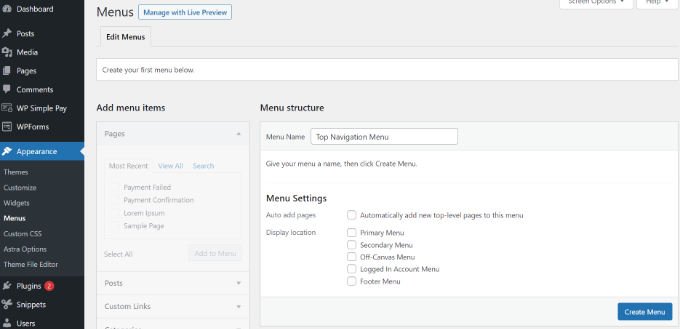
Naming Your Menu
At the top of the menu editor, find the Menu Name field. Enter a clear and simple name. Use names like “Main Menu” or “Footer Menu” for easy identification. Naming helps you select the correct menu later.
Adding Menu Items
Look at the left side of the menu editor. You will see boxes for Pages, Posts, Custom Links, and Categories. Select the items you want to add by checking their boxes. Click the Add to Menu button. Your selected items appear in the menu structure on the right. Drag and drop items to arrange their order. Save the menu when done.
Customizing Menu Items
Customizing menu items is key to making your WordPress navigation clear and user-friendly. You can change the order of menu items, create dropdowns for better organization, and add custom links to direct visitors anywhere you want. These options help visitors find important pages easily and improve the overall website experience.
Rearranging Menu Order
Rearranging menu items is simple. Just drag and drop items to change their order. This lets you highlight the most important pages at the top. A well-ordered menu guides visitors smoothly through your site. You can rearrange anytime to keep your navigation fresh.
Creating Dropdown Menus
Dropdown menus keep your navigation neat and organized. Place related pages under a main menu item by dragging them slightly to the right. This creates a submenu that appears when visitors hover over the main item. Dropdowns save space and group content logically.
Adding Custom Links
Custom links let you add URLs outside your website. Use this to link to social media, partner sites, or special pages. Simply enter the link and label it in the menu editor. Custom links expand your navigation’s reach beyond your WordPress content.
Credit: www.wpbeginner.com
Using Widgets For Navigation
Using widgets for navigation in WordPress offers a simple way to improve site usability. Widgets let you place menus in sidebars, footers, or other widget-ready areas. This method helps visitors find pages without cluttering your main menu. Widgets are easy to manage and customize, making navigation flexible and user-friendly.
Adding Menu Widgets
Start by going to the WordPress dashboard. Navigate to Appearance > Widgets. Find the “Navigation Menu” widget in the list. Drag and drop it into the desired widget area, such as a sidebar or footer. Select the menu you want to display from the dropdown list. Click “Save” to apply the changes. The menu will now appear on your site where you placed the widget.
Customizing Widget Appearance
Customize the widget to match your site’s style. Many themes allow you to change colors, fonts, and spacing. Use the Customizer tool under Appearance > Customize to adjust widget styles. You can also add custom CSS for more control. Keep navigation clear and easy to read. Avoid too many colors or fonts to keep the look clean and professional.
Enhancing Navigation With Plugins
Navigation plugins help improve how visitors move through your WordPress site. They make menus easier to use and more attractive. Plugins add extra features that default menus may lack. This helps users find information faster and stay longer on your site.
Many plugins offer custom styles, dropdown menus, and mobile-friendly options. Some allow you to create mega menus or sticky navigation bars. These tools improve user experience and make your website look professional.
Popular Navigation Plugins
Several navigation plugins stand out for their ease of use and features. Max Mega Menu lets you build large dropdown menus with images and widgets. WP Mega Menu offers drag-and-drop menu building and multiple themes. Responsive Menu creates menus that work well on phones and tablets. These plugins fit different needs and skill levels.
Installing And Activating Plugins
Go to your WordPress dashboard. Click on “Plugins” and then “Add New.” Use the search bar to find your chosen navigation plugin. Click “Install Now” and wait a few seconds. After installation, click “Activate” to enable the plugin on your site. The plugin is now ready for configuration.
Configuring Plugin Settings
Find the plugin’s settings menu in your dashboard. Each plugin has unique options to customize menus. Set menu styles, animation effects, and layout preferences. Test changes on your site to see how they look. Adjust settings until the navigation fits your website’s style and needs. Save your changes before leaving the settings page.
Testing And Troubleshooting Menus
Testing and troubleshooting menus is a key step after adding navigation in WordPress. It helps ensure visitors can easily find what they need. Sometimes, menus may not show or work correctly. Checking and fixing these issues keeps your site user-friendly.
Previewing Menu Changes
Use the WordPress Customizer to preview menu updates. It shows how menus look on different devices. This step helps catch errors before publishing. Check every menu link to confirm it leads to the right page. Make sure dropdown menus open smoothly on both desktop and mobile.
Fixing Common Issues
Menus not appearing often means a theme or plugin conflict. Switch to a default theme to test if the menu shows. Deactivate plugins one by one to find the cause. Clear your browser cache to see recent changes. Ensure menu items are correctly assigned to the right menu location. Fix broken links by editing menu items carefully. Keep menu names simple and avoid special characters that cause errors.
Credit: www.wpkube.com
Frequently Asked Questions
How Do I Create A Navigation Menu In WordPress?
To create a navigation menu, go to Appearance > Menus in your WordPress dashboard. Add pages or custom links. Save and assign the menu to a location.
Can I Customize WordPress Navigation Menus Easily?
Yes, WordPress offers an intuitive menu editor. You can drag and drop items, rename links, and reorder menu structure quickly without coding.
What Are The Best Practices For WordPress Navigation?
Keep menus simple and organized. Use clear labels and limit menu items. Ensure mobile responsiveness for better user experience and SEO.
How To Add Dropdown Menus In WordPress Navigation?
Drag a menu item slightly to the right under a parent item in the menu editor. This creates a nested dropdown submenu.
Conclusion
Adding navigation to WordPress helps visitors find your content fast. Use menus to organize pages and links clearly. Choose simple names for menu items to avoid confusion. Place the menu where it is easy to see, like the top or side.
Test the navigation on different devices to ensure it works well. Keep your menu updated as you add new pages. Good navigation improves user experience and site structure. Try these steps to make your WordPress site easier to explore. Simple changes can make a big difference.


