
Are you looking to add a map to your WordPress site but don’t know where to start? You’re in the right place.
Adding a map can boost your site’s usability, helping visitors find your location quickly and easily. Whether you run a local business, organize events, or simply want to share directions, a map makes your site more engaging and trustworthy. In this guide, you’ll discover simple, step-by-step methods to add a map to your WordPress site—no tech skills required.
Keep reading, and you’ll have your map up and running in no time!
Credit: wpmet.com
Choosing The Right Map Plugin
Choosing the right map plugin is key to adding maps to your WordPress site. The right plugin makes your site easy to use and looks great. It also works well with your theme and other plugins. This guide helps you pick a plugin that fits your needs and skill level.
Popular Map Plugins For WordPress
Several map plugins are popular among WordPress users. Google Maps Widget is simple and fast. WP Google Maps offers many customization options. MapPress helps you add maps with just a few clicks. Leaflet Maps Marker is good for detailed maps. These plugins have strong user support and regular updates.
Features To Look For
Look for easy setup and clear instructions. Check if the plugin supports different map types like road, satellite, or terrain. Responsive design is important for mobile users. Search and filter options enhance user experience. Ability to add markers, pop-ups, and custom icons is useful. Also, consider if the plugin allows map embedding on posts and pages.
Free Vs Premium Options
Free plugins offer basic features and are good for simple maps. Premium plugins provide advanced tools like multiple maps, custom styles, and better support. Some premium plugins also include analytics and integration with other services. Choose premium if you need more features or professional support. Free plugins are fine for small projects or testing.
Credit: docs.presscustomizr.com
Setting Up Google Maps Api
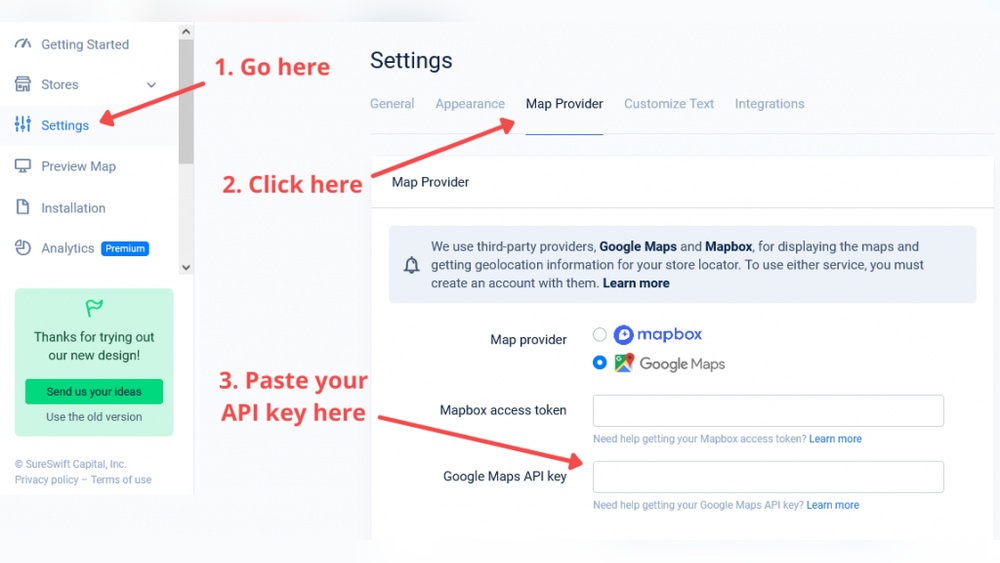
Setting up the Google Maps API is the first step to add a map to your WordPress site. It allows your website to display interactive maps with ease. The API connects your site to Google’s mapping services. This section explains how to create an account, generate an API key, and set restrictions.
Creating A Google Cloud Account
Start by visiting the Google Cloud Platform website. Click “Get started” to create a new account. Use a valid email address for registration. Google may ask for billing information, but you get a free trial credit. This account lets you access Google Maps services securely.
Generating Api Key
Once logged in, go to the Google Cloud Console dashboard. Select “APIs & Services” then “Credentials.” Click “Create Credentials” and choose “API key.” The system generates a unique key for your site. This key is essential for linking your WordPress site to Google Maps.
Configuring Api Restrictions
Protect your API key by setting restrictions. Click on your created key to open settings. Choose “HTTP referrers” to limit usage to your website only. Enter your domain name to avoid misuse. These restrictions keep your key safe and prevent extra charges.
Installing And Activating The Plugin
Installing and activating a map plugin in WordPress is the first step to show maps on your site. It is simple and takes only a few minutes. This guide explains how to find, upload, and activate the plugin easily.
Finding The Plugin In WordPress Repository
Start by logging into your WordPress dashboard. Go to the “Plugins” menu on the left side. Click on “Add New” to open the plugin repository. Use the search box and type keywords like “map” or “Google Maps.” A list of map plugins appears. Choose one with good reviews and many installations. Click “Install Now” next to your chosen plugin. Wait for the installation to finish.
Manual Upload Method
Some map plugins come as zip files from third-party sites. Save the plugin zip file on your computer. In the WordPress dashboard, go to “Plugins” and click “Add New.” Choose the “Upload Plugin” button at the top. Click “Choose File” and find the zip file on your computer. Select it and click “Install Now.” Wait until WordPress uploads and installs the plugin.
Activating And Initial Setup
After installation, click the “Activate” button. The plugin is now ready to use. Most map plugins add a new menu item in the dashboard. Go there to set up your map. Enter your API key if needed. Customize the map size and location settings. Save your changes. Your map will now be ready to add to posts or pages.
Adding A Map To Your Page Or Post
Adding a map to your WordPress page or post helps visitors find your location easily. It also makes your site more interactive and useful. There are simple ways to include maps without coding. You can use shortcodes, Gutenberg blocks, or customize the map’s look. Each method fits different needs and skill levels.
Using Shortcodes
Shortcodes are small pieces of code that add features quickly. Many map plugins provide shortcodes to place maps anywhere. Copy the shortcode from the plugin settings. Paste it directly into your post or page editor. The map appears where you place the shortcode. This method works well for classic editors and quick map insertion.
Embedding With Gutenberg Blocks
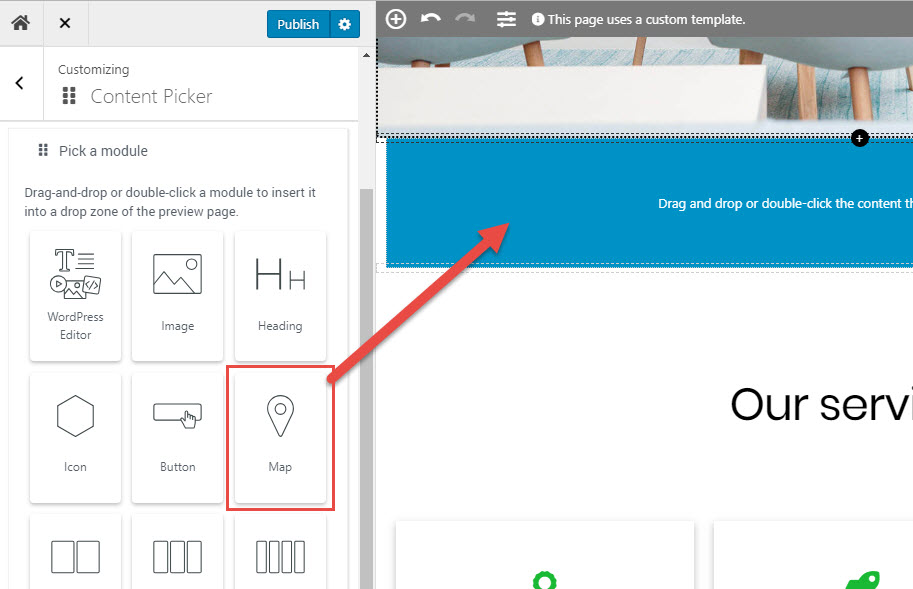
Gutenberg blocks make adding maps easy without code. Use a map block from your plugin or the default block library. Simply click the “+” icon and search for “map.” Insert the block into your content. Then, enter the address or coordinates. The map shows up instantly on your page or post.
Customizing Map Appearance
Customize your map to match your site’s style. Change zoom levels to show more or less area. Pick marker styles and colors that fit your brand. Adjust map size for the best display on all devices. Many plugins offer simple settings to control these features. A well-designed map improves user experience and site look.
Enhancing Maps With Advanced Features
Enhancing maps with advanced features makes your WordPress site more useful. Visitors can find locations easily and enjoy a better experience. Adding extra details to maps helps guide users and keeps them engaged. These features also give your site a professional look.
Adding Multiple Markers
Multiple markers show several locations on one map. This is helpful for businesses with many stores or points of interest. You can place markers for each location and label them clearly. Users can click each marker to learn more. This keeps all important places visible at once.
Custom Marker Icons
Custom marker icons make your map unique. Replace the default pin with your own images or logos. This helps match the map to your website’s style. Icons can show different types of locations, like restaurants or hotels. Unique markers make the map easier to understand.
Interactive Elements And Popups
Interactive elements let users engage with the map. Popups appear when users click or hover over markers. You can show details like address, hours, or photos. This gives quick information without leaving the page. Interactive maps keep visitors interested and informed.
Optimizing Map Performance
Optimizing map performance is key to improving your website’s speed and user experience. A slow map can frustrate visitors and increase your bounce rate. Proper techniques ensure your map loads quickly and works smoothly on all devices.
Lazy Loading Maps
Lazy loading delays the map loading until the user scrolls near it. This reduces the initial page load time. You can use plugins or code to enable lazy loading for your maps. It saves bandwidth and improves site speed.
Reducing Api Calls
Each API call uses resources and can slow your site. Limit the number of calls by combining map requests or caching results. Use static maps when interactive features are not needed. This lowers server load and speeds up the map display.
Ensuring Mobile Responsiveness
Many users access sites on phones and tablets. Make sure your map resizes to fit different screen sizes. Use responsive design techniques or plugins that support mobile-friendly maps. A responsive map offers a better experience on all devices.
Troubleshooting Common Issues
Adding a map to WordPress is useful but sometimes causes issues. Troubleshooting helps fix common problems fast. This saves time and keeps your site working well.
Api Key Errors
API keys connect your map to the map service. Errors happen if the key is missing or wrong. Check the key in your plugin settings. Make sure the key is active and allowed for your website. Also, verify billing is set up in the map service account.
Map Not Displaying
Maps may not show if the code is placed incorrectly. Confirm you added the map shortcode or block in the right spot. Clear your browser cache and reload the page. Check your internet connection and try different browsers. Sometimes, slow connections block maps from loading.
Plugin Conflicts
Some plugins clash and stop maps from working. Disable other plugins one by one to find conflicts. If the map shows after disabling a plugin, that plugin causes the problem. Update all plugins to their latest versions. Contact plugin support if conflicts continue.
Credit: www.wpbeginner.com
Frequently Asked Questions
How Do I Add A Google Map To WordPress?
To add a Google Map, install a map plugin or embed the map using Google Maps’ embed code. Customize location, size, and settings easily in your WordPress editor or plugin dashboard.
What Are The Best Plugins For WordPress Maps?
Popular plugins include WP Google Maps, MapPress, and Leaflet Maps Marker. They offer easy map embedding, customization, and responsive designs suitable for all WordPress sites.
Can I Customize The Map’s Appearance On WordPress?
Yes, most plugins and embed options let you change map styles, colors, markers, and zoom levels. Customization helps match your website’s design and improves user experience.
Is Adding A Map To WordPress Free?
Yes, many map plugins and Google Maps embeds are free. However, advanced features or high usage may require paid plans or API keys.
Conclusion
Adding a map to your WordPress site makes it easy for visitors to find you. The steps are simple and clear. Use plugins or embed codes to place your map quickly. Customize the map to match your site’s style. This small change can improve user experience and trust.
Keep your map updated to ensure accuracy. Try adding a map today and see the difference it makes.



