

Are you looking to make your WordPress site more interactive and engaging? Adding a link to an image is one of the easiest ways to do that.
Imagine your visitors clicking on a picture and instantly being taken to another page, product, or resource you want to highlight. It’s simple, effective, and can boost your website’s performance. In this post, you’ll learn exactly how to add a link to an image in WordPress—step by step.
By the end, you’ll have the skills to make your images work harder for you and keep your audience clicking. Let’s get started!

Credit: www.greengeeks.com
Prepare Your Image
Preparing your image is the first step to adding a link to it in WordPress. A well-prepared image looks good and loads fast. This part helps your site stay attractive and user-friendly.
Choose The Right Image
Select an image that fits your content and message. Use clear and relevant pictures. Avoid images that are blurry or unrelated. The right image keeps visitors interested and engaged.
Optimize Image Size
Large images slow down your website. Resize images to a smaller width and height. Use tools to compress images without losing quality. Fast-loading images improve user experience and SEO.
Upload Image To WordPress
Go to your WordPress dashboard and open the Media Library. Click “Add New” and select your optimized image. Uploading images here makes them easy to find later. Now your image is ready to be linked.
Credit: www.wpbeginner.com
Insert Image Into Post Or Page
Adding an image to a WordPress post or page makes content more appealing. Images help explain ideas quickly and catch readers’ attention. WordPress offers simple tools to insert images into your content. This section shows how to do it using two popular editors: the Block Editor and the Classic Editor.
Using The Block Editor
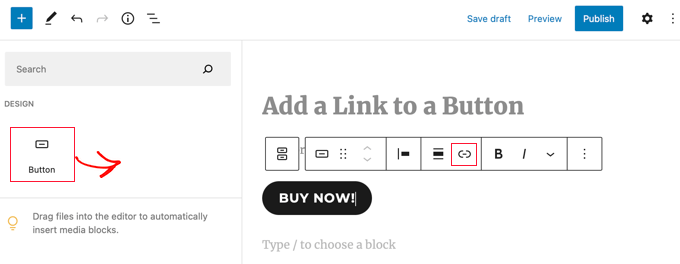
The Block Editor, also called Gutenberg, uses blocks to build content. To insert an image, click the plus (+) icon. Select the “Image” block from the menu. You can upload a new image or choose one from your Media Library.
After adding the image, you can resize it or add alt text for SEO. The Block Editor makes it easy to move the image by dragging the block. This method keeps your post clean and organized.
Using The Classic Editor
The Classic Editor looks like a simple text box with editing tools. To add an image, click the “Add Media” button above the toolbar. Upload a new image or pick one from the Media Library.
After inserting, you can adjust size and alignment using the toolbar options. The Classic Editor allows you to place the image inside the text easily. It’s a straightforward way for beginners to add images.
Add Link To The Image
Adding a link to an image in WordPress helps users navigate your site easily. It also makes images clickable, which can boost user engagement. You can link images in two main editors: the Block Editor and the Classic Editor. Each editor has a simple way to add links to images.
Linking In The Block Editor
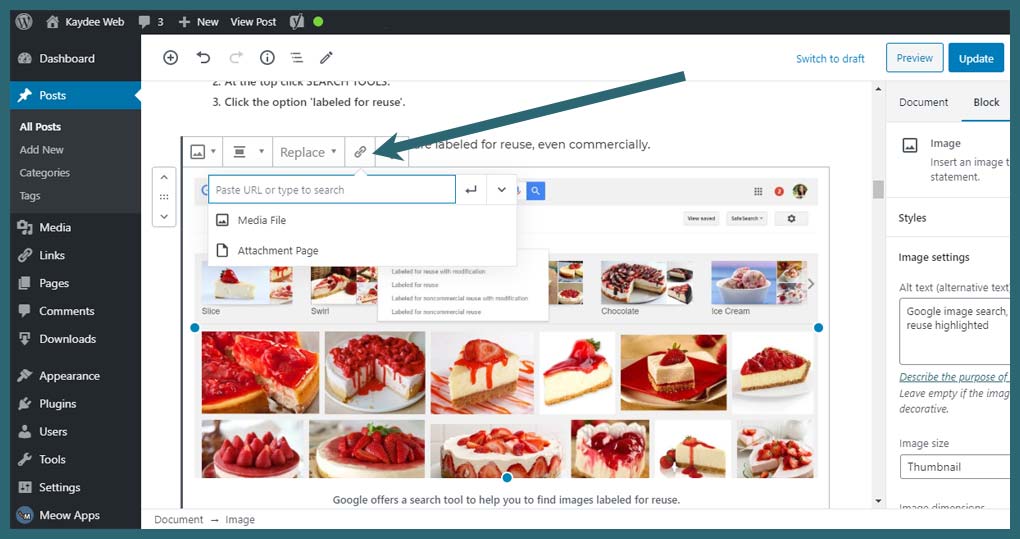
Start by selecting the image block in the Block Editor. You will see a toolbar above or near the image. Click the link icon, which looks like a chain.
Type or paste the URL you want to link to in the box that appears. Press Enter or click the apply button to set the link.
You can choose if the link opens in a new tab by toggling the option below the URL box. This keeps visitors on your site while opening the link separately.
Linking In The Classic Editor
In the Classic Editor, click on the image you want to link. Then, click the pencil icon that appears to edit the image.
In the popup window, find the “Link To” dropdown menu. Select “Custom URL” from the list.
Enter the URL in the field that shows up. Click the “Update” button to save your changes.
Your image is now clickable and will direct users to the link you added.
Credit: kaydee.net
Customize Link Settings
Customizing link settings for images in WordPress helps improve user experience and SEO. It gives control over how the link behaves and how search engines read it. Small tweaks can make a big difference in site navigation and ranking.
Open Link In New Tab
Opening a link in a new tab keeps visitors on your site longer. This setting lets users explore linked content without leaving your page. To enable this, check the option “Open link in a new tab” in the link settings. It helps reduce bounce rates and improves site engagement.
Add Link Title For Seo
Adding a link title boosts SEO and accessibility. This title describes the linked page or content clearly. Search engines use it to understand link context. Screen readers also read the title aloud, helping users with disabilities. Use simple, clear words that match the linked page’s topic.
Test Your Linked Image
Testing your linked image is a key step in the WordPress editing process. It ensures your visitors can click the image and reach the correct destination. This step helps avoid broken links or user confusion.
After adding a link to an image, spend time to check how it works on your site. This helps improve user experience and keeps your content professional.
Preview The Post
Use the WordPress preview feature to see your post before publishing. This shows your linked image exactly as visitors will see it. Check if the image looks right and the link appears active. Previewing helps catch mistakes early.
Check Link Functionality
Click the image in preview mode to test the link. Confirm it opens the correct page or file. If the link does not work, go back and edit it. Fixing broken links avoids frustrating your readers. Always double-check link targets and spelling.
Troubleshoot Common Issues
Troubleshooting common issues helps fix problems fast. It saves time and reduces frustration. Fixing errors keeps your WordPress site working smoothly.
Below are common problems users face when adding links to images. Learn simple ways to solve them.
Link Not Working
Check the URL you added to the image. Make sure it is correct and complete. A missing “http://” or “https://” can break the link.
Clear your browser cache. Sometimes old data blocks the new link.
Disable plugins that might block links, like security or caching tools. Test the link after turning off these plugins.
Try using a different browser or device. This helps find if the problem is local to one system.
Image Not Clickable
Ensure the image is inside the link tag properly. The code should wrap the image, not be separate.
Check your theme’s CSS. Some styles can disable clicks on images.
Look for overlapping elements that cover the image. They stop clicks from reaching the image.
Turn off JavaScript temporarily. Sometimes scripts block image clicks.
Frequently Asked Questions
How Do I Add A Link To An Image In WordPress?
To add a link, select the image in the WordPress editor. Click the link icon, enter the URL, and apply it. This makes the image clickable, directing visitors to your chosen webpage.
Can I Link Images To External Websites In WordPress?
Yes, you can link images to any external website. Just enter the full URL of the external site when adding the link to your image in WordPress.
Is It Possible To Open Linked Images In A New Tab?
Yes, WordPress allows you to set links to open in a new tab. When adding the link, check the option “Open link in a new tab” for better user experience.
How To Remove A Link From An Image In WordPress?
Select the linked image in the editor and click the unlink icon. This will remove the hyperlink, making the image non-clickable again.
Conclusion
Adding links to images in WordPress is simple and useful. It helps visitors find more information quickly. Use the built-in tools to link images without coding. Always check your links work well on all devices. Practice these steps to improve your website’s navigation.
Keep your site user-friendly and clear. This small change can make a big difference for your readers. Try it today and see how easy it is.



