
Are you struggling to make your WordPress posts look organized and easy to read? Adding headings is the secret to transforming plain text into clear sections that grab your reader’s attention.
When you use headings the right way, your content becomes more inviting and easier to navigate—keeping visitors on your site longer. You’ll learn simple, step-by-step methods to add headings in WordPress that will improve your blog’s readability and boost your SEO.
Let’s dive in and make your content stand out!
Credit: yoast.com
Why Headings Matter
Headings play a crucial role in organizing content on your WordPress site. They help break text into sections, making it easier to read and understand. Clear headings guide readers through your posts smoothly. They also help search engines grasp the main topics of your page. Using headings properly can improve both user experience and SEO.
Improving Readability
Headings divide content into smaller parts. This makes the page less overwhelming. Readers can scan and find important points quickly. Clear headings also give a preview of the content below. This helps readers decide what to read first.
Boosting Seo
Search engines use headings to understand page structure. Proper headings highlight key topics and keywords. This improves your site’s chances of ranking higher. Using relevant headings helps search engines match your page to user queries.
Enhancing User Experience
Well-structured headings make navigation easier. Visitors can jump to sections they want. This keeps them engaged longer on your site. Good headings show that your content is organized and professional. This builds trust with your audience.
Types Of Headings In WordPress
Headings help organize content in WordPress. They show the structure of your page or post clearly. Using the right headings makes content easier to read and understand. WordPress offers six heading levels. Each has a specific role in your content.
Knowing the types of headings helps you create better content. It improves your SEO and user experience. Let’s explore each heading type and when to use it.
Heading 1 To Heading 6
WordPress headings range from H1 to H6. H1 is the most important and largest heading. H6 is the smallest and least important. You should use one H1 per page. It usually is the title of the page or post.
H2 and H3 are common for main sections and subsections. H4 to H6 are for deeper sub-sections or small details. These headings keep content organized and easy to follow.
When To Use Each Heading
Use H1 for your main page title only. It tells search engines what your page is about. Use H2 for main sections in your content. These headings break content into big parts.
Use H3 for smaller sections inside H2 parts. It helps readers scan through details easily. H4 to H6 are for even smaller points or notes. They help keep complex content well-structured.
Keep headings clear and short. This helps both readers and search engines. Proper heading use improves SEO and page readability.
Adding Headings Using Gutenberg Editor
The Gutenberg editor in WordPress makes adding headings simple and clear. Headings help organize content and improve reading flow. They also boost your page’s SEO by structuring information well. This section explains how to add headings using the Gutenberg editor step by step.
Inserting A Heading Block
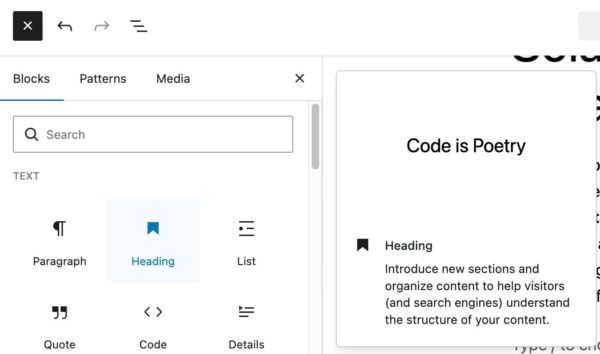
Start by opening the Gutenberg editor on your post or page. Click the plus (+) icon to add a new block. Search for “Heading” and select it. A heading block appears where you can type your heading text directly. It supports different heading levels, from H1 to H6.
Choose the right heading level for your content. Usually, H1 is for the main title, and H2 or H3 for subheadings. This helps readers and search engines understand your content structure.
Customizing Heading Styles
After adding a heading, customize its look using the block settings on the right. Change the text size to make headings stand out. You can select from preset sizes or enter a custom size. Adjust the color to match your site’s design and improve readability.
Use bold or italic styles for emphasis. Keep the style consistent across your headings. This consistency helps readers quickly scan the content and find key points.
Rearranging Headings
Gutenberg allows easy rearranging of blocks, including headings. Hover over the heading block to see the move arrows on the left. Click the up or down arrow to shift the heading block to a new position. You can also drag the block to reorder it manually.
Rearranging helps keep your content logical and clear. It also improves the user experience by guiding readers through your ideas smoothly.
Adding Headings With Classic Editor
Adding headings in the Classic Editor of WordPress helps organize your content clearly. Headings break text into sections, making it easier to read. They also improve SEO by showing search engines the structure of your content. The Classic Editor offers simple ways to add headings with just a few clicks or manual coding.
Using The Toolbar Dropdown
The easiest way to add headings in the Classic Editor is by using the toolbar dropdown. Select the text you want to turn into a heading. Then, click the dropdown menu labeled “Paragraph” on the toolbar. Choose the heading level you want, such as Heading 1, Heading 2, or Heading 3. The selected text will change to the heading style you picked. This method is quick and does not require any coding knowledge.
Applying Heading Tags Manually
You can also add headings by typing HTML tags directly in the editor. Switch to the “Text” tab in the Classic Editor to see the HTML code. Wrap your heading text with the correct tags. For example, type Your Heading
Tips For Effective Heading Structure
Effective headings help readers and search engines understand your content better. They organize information and guide users through your post. Clear and well-structured headings improve readability and SEO. Follow these simple tips to create a strong heading structure in WordPress.
Maintaining Hierarchy
Use headings in order from H1 to H6 without skipping levels. Start with one H1 for the main title. Use H2 for main sections and H3 for subsections. This order keeps the content organized and easy to follow. A proper hierarchy helps search engines understand your page better.
Using Keywords Strategically
Include important keywords in your headings naturally. Keywords show search engines what your content is about. Place them at the beginning of headings if possible. Avoid stuffing keywords; keep it natural and readable. This boosts your SEO and helps readers find your content.
Keeping Headings Clear And Concise
Write short and simple headings that explain the section clearly. Avoid long or complex phrases. Clear headings let readers scan the content fast. Make each heading a quick summary of the section below it. This improves user experience and keeps readers engaged.

Credit: wordpress.com
Troubleshooting Common Heading Issues
Headings help organize your WordPress content clearly. Sometimes, issues appear that make headings look wrong or confusing. Troubleshooting these problems improves your site’s readability and SEO. Let’s explore common heading issues and how to fix them quickly.
Fixing Incorrect Heading Levels
Headings must follow a logical order. Start with
for the main title. Use for major sections and for subsections. Skipping levels confuses readers and search engines. Edit your headings to keep the right sequence. This helps your content stay clear and structured.
for subsections. Skipping levels confuses readers and search engines. Edit your headings to keep the right sequence. This helps your content stay clear and structured.
Resolving Style Conflicts
Different themes may change heading styles. Sometimes, headings look too big or small. Custom CSS can fix style conflicts. Check your theme settings or use the WordPress Customizer. Adjust font size, color, and spacing for consistent heading appearance across pages.
Ensuring Mobile Compatibility
Headings must look good on small screens. Text that is too large or small hurts readability. Use responsive design to adapt heading size on mobile devices. Test your site on phones and tablets. This ensures a smooth reading experience for all visitors.
Credit: wordpress.org
Frequently Asked Questions
How Do I Add Headings In WordPress Editor?
To add headings, select the block where you want a heading. Click the “+” icon, choose “Heading,” then pick the level (H1-H6). Type your heading text, and it will format accordingly.
What Heading Levels Should I Use In WordPress?
Use H1 for the main title, H2 for major sections, and H3-H6 for subsections. Proper heading hierarchy improves SEO and readability.
Can I Customize WordPress Heading Styles?
Yes, you can customize heading fonts, colors, and sizes via your theme settings or by using custom CSS for unique styles.
Why Are Headings Important For Seo In WordPress?
Headings structure your content, making it easier for search engines to understand page hierarchy. They improve user experience and SEO rankings.
Conclusion
Adding headings in WordPress helps organize your content clearly. It makes your posts easier to read and understand. Use headings to break text into small parts. This also helps search engines find your content. Remember to choose the right heading levels.
Keep your headings short and relevant. Practice this simple step to improve your website’s look and SEO. Start adding headings today and see the difference it makes.



