

Are you looking to get more control over your website’s tracking and marketing tools? Adding Google Tag Manager to your WordPress site is one of the smartest moves you can make.
It lets you manage all your tags in one place without needing to touch your site’s code every time. In this guide, you’ll learn exactly how to add Google Tag Manager code to your WordPress site quickly and easily. By the end, you’ll have the power to track user behavior, improve your marketing efforts, and boost your site’s performance—all without stress or confusion.
Keep reading to unlock these benefits step by step!
Google Tag Manager Basics
Google Tag Manager (GTM) is a tool that helps manage website tags without changing code often. It simplifies adding and updating tags on your WordPress site. Understanding the basics of GTM makes it easier to use.
What Is Google Tag Manager
Google Tag Manager is a free tool from Google. It lets you add and manage marketing tags on your website. Tags are small pieces of code that collect data. They help track visitor actions like clicks and form submissions.
Instead of editing website code every time, GTM lets you do it from one place. It works with many marketing and analytics tools. This makes website tracking easier and faster.
Benefits Of Using Google Tag Manager
GTM saves time by reducing the need to code manually. You can add or change tags without touching your website files. This lowers the risk of errors.
The tool offers better control over which tags run and when. You can test tags before publishing them. It helps keep your site fast by managing tag loading.
GTM also improves data accuracy. It tracks user actions more precisely. This helps you understand your visitors and improve your site’s performance.

Credit: www.hostinger.com
Preparing WordPress For Gtm
Preparing your WordPress site for Google Tag Manager (GTM) is an important first step. This preparation helps avoid errors during the code installation process. It also ensures a smooth and safe update to your website. Taking time here saves effort later.
Start by securing your WordPress site. This step protects your content and settings. Then, access the WordPress dashboard. This is where you will add the GTM code.
Backup Your WordPress Site
Backing up your site is essential before any change. It creates a copy of your files and database. This copy can restore your site if something goes wrong. Use a reliable backup plugin or your hosting provider’s tools. Save the backup in a safe place, like your computer or cloud storage.
Regular backups prevent data loss and reduce risk. Make a backup before adding GTM code.
Accessing Your WordPress Dashboard
The WordPress dashboard is the control center for your site. Log in using your admin username and password. The URL usually looks like yourwebsite.com/wp-admin.
Once logged in, you see the menu on the left. This menu lets you manage posts, pages, and settings. You will use this area to add the GTM code later.
Creating A Gtm Account
Creating a Google Tag Manager (GTM) account is the first step to managing tags on your WordPress site easily. GTM helps you add and update website tags without changing the code repeatedly. This guide walks you through setting up your GTM account and finding your container ID.
Setting Up A New Account
Go to the Google Tag Manager website and click “Create Account.”
Enter your account name. This can be your company or website name.
Select your country from the dropdown menu.
Next, add your container name. Use your website’s domain name for clarity.
Choose “Web” as the target platform for your container.
Click “Create” and accept the terms of service to proceed.
Getting Your Gtm Container Id
After setting up the account, GTM shows your container installation code.
Look for the container ID at the top right. It starts with “GTM-” followed by letters and numbers.
Copy this ID carefully. You will need it to connect GTM with your WordPress site.
Keep this ID handy for the next steps in your GTM setup process.
Credit: marketlytics.com
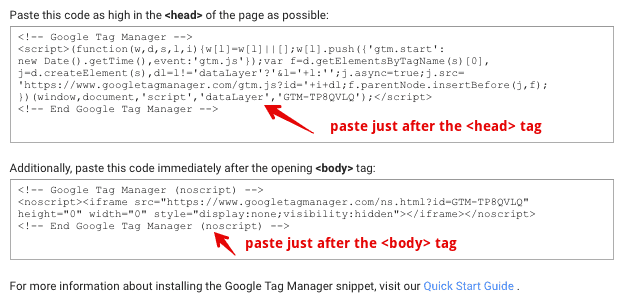
Adding Gtm Code Manually
Verifying your Google Tag Manager (GTM) installation is a key step after adding the code to WordPress. It ensures your tags work correctly and track data as expected. Without verification, you cannot be sure if GTM is set up properly.
Two simple methods help confirm your GTM setup. One uses a browser tool. The other uses GTM’s built-in features. Both are easy and quick to use.
Using Tag Assistant Chrome Extension
The Tag Assistant Chrome Extension helps check GTM on your site. Install it from the Chrome Web Store. Open your WordPress site in Chrome. Click the Tag Assistant icon in the browser.
The extension shows active tags on the page. Look for the Google Tag Manager tag. If it appears green, GTM works fine. Red or yellow means errors or warnings. Fix these to ensure proper tracking.
Preview Mode In Google Tag Manager
Preview Mode inside GTM lets you test tags before publishing. Log in to your GTM account. Click the Preview button in the top right corner. Enter your WordPress site’s URL.
A new window opens with debug info at the bottom. It shows which tags fire and when. Check if your tags trigger as expected on page load and other actions. Exit Preview Mode to stop testing.
Using Plugins To Add Gtm
Troubleshooting common issues with Google Tag Manager (GTM) on WordPress helps keep your site running smoothly. Problems can stop GTM from working right. Identifying and fixing these issues is key. This section guides you through simple fixes for common problems.
Fixing Code Placement Errors
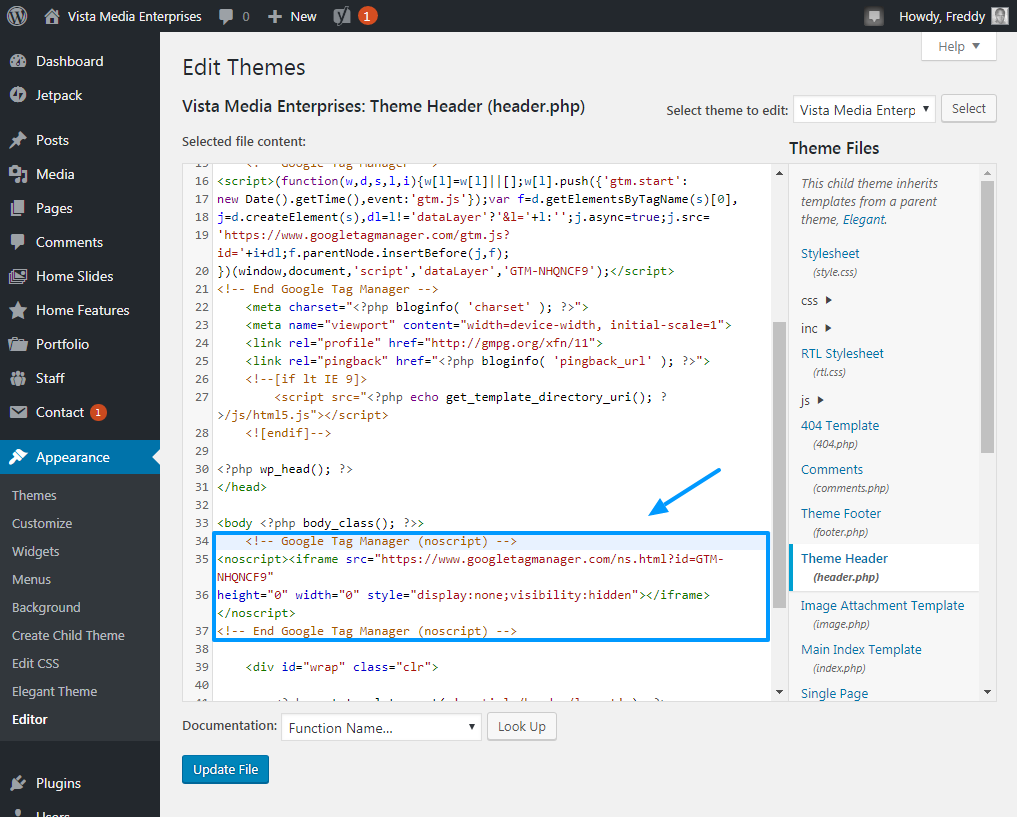
Placing the GTM code in the wrong spot is a common problem. The code must go in the right part of your WordPress theme. Usually, the section is the best place for the GTM code. Check your theme files or use a plugin that inserts code correctly.
Sometimes, placing the code in the footer causes tracking to fail. Avoid this by adding the code in the header. Also, ensure the code appears only once. Duplicate codes can cause errors and confuse tracking data.
Resolving Plugin Conflicts
Some WordPress plugins can block or interfere with GTM. This stops tags from firing properly. Disable plugins one by one to find conflicts. Common culprits include caching, security, and optimization plugins.
Clear cache after disabling a plugin. Caching plugins may store old versions of your site. This prevents new GTM code from loading. Use plugin support forums or documentation for help with conflicts.
Credit: www.wpexplorer.com
Frequently Asked Questions
What Is Google Tag Manager In WordPress?
Google Tag Manager is a free tool that helps manage website tags easily. It allows adding and updating tracking codes without editing site code directly. This simplifies analytics, marketing, and conversion tracking on WordPress sites.
How Do I Install Google Tag Manager On WordPress?
To install, copy your GTM container code from your account. Paste the code into your WordPress theme header or use a plugin. Verify installation with Google Tag Manager’s preview mode to ensure tags fire correctly.
Can I Add Google Tag Manager Without Coding?
Yes, you can add GTM using WordPress plugins like “Insert Headers and Footers. ” These plugins let you insert code snippets without editing theme files, making it beginner-friendly and safe for updates.
Why Use Google Tag Manager Instead Of Direct Code?
Google Tag Manager simplifies tag management by centralizing scripts in one interface. It reduces errors and speeds up updates without modifying website code. This improves site performance and tracking accuracy on WordPress.
Conclusion
Adding Google Tag Manager to WordPress helps track your website easily. It lets you manage tags without changing code all the time. Follow the steps carefully to avoid mistakes. Test your setup to make sure everything works well. Keep your tags organized for better website control.
This simple tool can save time and improve data accuracy. Start using it today to see how it helps your site grow.


