

Are you looking to track your website’s success and boost your online sales? Adding Google conversion code to your WordPress site is one of the smartest moves you can make.
It helps you see exactly which actions visitors take, so you can focus on what really works. But if you’re not sure how to do it, don’t worry—you’re in the right place. You’ll get simple, step-by-step instructions to add Google conversion tracking without any hassle.
Ready to turn your website into a powerful tool for growth? Let’s dive in!

Credit: kinsta.com
Google Conversion Code Basics
Understanding the basics of Google Conversion Code helps you track website actions. This code tells Google when a user completes a goal, like buying a product or signing up. It helps measure how well your ads and website perform. Knowing these basics makes it easier to add the code to your WordPress site correctly.
What Is Google Conversion Code
Google Conversion Code is a small snippet of JavaScript. It tracks user actions on your website after clicking an ad. This code sends data back to Google Ads. It shows which ads lead to sales, sign-ups, or other goals. This helps measure ad effectiveness and improve campaigns.
Why Add It To WordPress
Adding Google Conversion Code to WordPress lets you track important actions. You learn which ads bring visitors that buy or register. This data helps save money by focusing on good ads. WordPress makes it easy to place the code on your site. Tracking conversions helps grow your business by improving marketing.
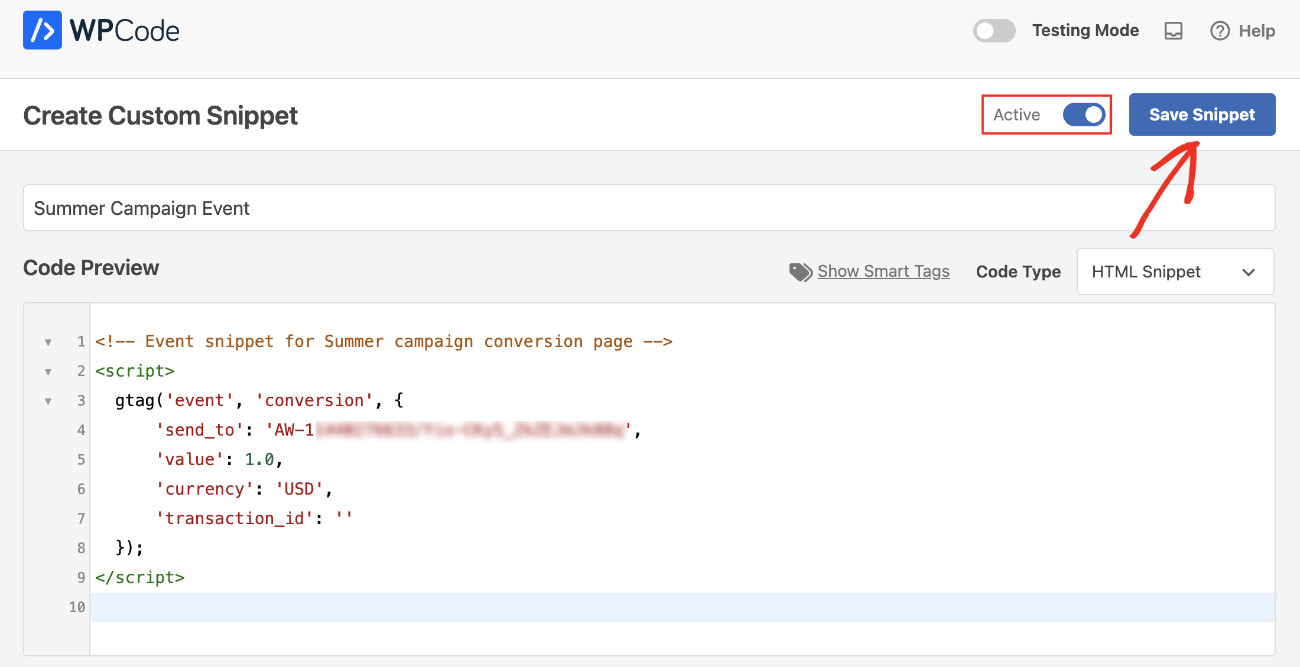
Credit: wpcode.com
Preparing Your Google Ads Account
Before adding Google conversion code to your WordPress site, you must prepare your Google Ads account. This step ensures accurate tracking of your ad performance. It lets you measure actions like purchases, sign-ups, or downloads from your ads. Proper setup helps you understand which ads bring real results. This guide focuses on creating a conversion action and getting the conversion code snippet.
Creating A Conversion Action
Sign in to your Google Ads account. Click on the “Tools and Settings” menu. Find and select “Conversions” under the Measurement section. Click the plus button to create a new conversion action. Choose the type of conversion you want to track, such as website, app, or phone calls. Enter details like the conversion name and value. Set how to count conversions and the conversion window time. Save your new conversion action to generate the tracking code.
Getting The Conversion Code Snippet
After saving the conversion action, Google shows the conversion tag code. This code tracks user actions on your website. Copy the global site tag and the event snippet provided. The global site tag goes in the header of your WordPress site. The event snippet goes on the page where the conversion happens. Keep this code ready for the next step of adding it to WordPress.
Adding Code Using WordPress Plugins
Adding Google conversion code to WordPress can seem tricky. Using plugins simplifies this task. Plugins help insert the code without editing theme files. This reduces errors and keeps your site safe. The process involves choosing a plugin, installing it, and adding the code properly.
Choosing The Right Plugin
Select a plugin that fits your needs. Look for plugins designed for header and footer scripts. Popular options include “Insert Headers and Footers” and “Header Footer Code Manager.” Check user reviews and update frequency. A well-maintained plugin ensures compatibility and security.
Installing And Activating The Plugin
Go to your WordPress dashboard. Navigate to Plugins > Add New. Search for the plugin by name. Click “Install Now” and then “Activate.” The plugin is now ready to use. Most plugins add a new menu item or settings page.
Inserting The Conversion Code
Open the plugin’s settings or menu. Find the section for header or footer scripts. Paste your Google conversion code exactly as given. Save or publish the changes. Clear your site cache if you use caching plugins. Your Google conversion tracking is now active.

Credit: www.youtube.com
Manual Code Insertion Methods
Manual code insertion lets you place Google conversion tracking code directly into your WordPress site. This method gives you full control over where and how the code runs. It works well for simple setups and specific tracking needs. You can insert the code in your theme files or on certain pages. Follow the steps carefully to avoid site errors.
Editing The Theme Header
The theme header is a common place for conversion code. It loads on every page, so tracking is consistent. To edit it, go to your WordPress dashboard. Click “Appearance” then “Theme Editor.” Find the header.php file. Paste the Google conversion code right before the closing tag. Save changes. Clear your cache to see the update.
Using A Child Theme
Using a child theme prevents losing changes during updates. First, create a child theme if you don’t have one. Copy the header.php file to the child theme folder. Insert the conversion code in the copied file before . Activate the child theme. This keeps your code safe and your site updated.
Adding Code To Specific Pages
Sometimes, you want to track only certain pages. Edit the page template file or use the WordPress editor for that page. Insert the conversion code in the HTML view. For templates, place the code in the right section, often near or before . Save and test the page to confirm the code runs correctly.
Testing And Verifying The Code
After adding the Google conversion code to your WordPress site, testing and verifying it is key. This step ensures the code works correctly and tracks conversions without errors. Confirming proper setup helps you avoid missing important data.
Testing also lets you catch mistakes early. Fixing issues fast saves time and improves ad performance. Use simple tools to check your code before going live.
Using Google Tag Assistant
Google Tag Assistant is a free Chrome extension. It helps check if your Google tags work well on your site. Install the extension and open your WordPress page with the conversion code.
Click the Tag Assistant icon in your browser. It shows a list of all detected tags. Look for your Google conversion tag. The tool highlights any errors or warnings.
Green means your tag works fine. Yellow or red means there is a problem. Fix the issues shown and test again. Repeat until you get a green status.
Checking Conversion Tracking In Google Ads
Log in to your Google Ads account to check conversion tracking. Go to the “Conversions” section under “Tools & Settings.” You will see a list of your conversion actions.
Look for the status of your new conversion action. It should say “Recording conversions.” This means Google is tracking data from your WordPress site.
Test a real conversion, like making a purchase or signing up. Then check your Google Ads report after a few hours. You should see the conversion appear in your account.
If no data shows, review your code and Tag Assistant results again. Make sure your WordPress caching does not block the code.
Common Issues And Fixes
Adding Google conversion code to WordPress can sometimes bring common issues. These problems stop your conversion tracking from working right. Understanding these issues helps fix them fast. Below are common problems and easy ways to solve them.
Code Not Firing Correctly
The conversion code might not work if placed in the wrong spot. It should go in the header or footer area of your site. Make sure you copy the entire code without changes. Clear your site cache after adding the code. Use tools like Google Tag Assistant to check if the code fires.
Plugin Conflicts
Some plugins can block or break the conversion code. Security or caching plugins often cause this. Disable plugins one by one to find the conflict. After finding the problem plugin, change its settings or replace it. Keep your WordPress and plugins updated for best results.
Delayed Conversion Data
Conversion data may not show right away in your Google Ads account. It can take several hours or a day to appear. This delay happens due to processing time on Google’s side. Be patient and check your conversion data after some time. Use real-time reports to see immediate tracking on your site.
Frequently Asked Questions
How Do I Find My Google Conversion Code?
Log in to your Google Ads account. Navigate to the “Conversions” section. Create or select a conversion action. Copy the provided conversion tracking code snippet for use on your WordPress site.
Where Should I Place Google Conversion Code In WordPress?
Insert the Google conversion code in the header or footer of your WordPress site. Use a plugin like “Insert Headers and Footers” or add it directly to your theme’s header. php file for accurate tracking.
Can I Add Google Conversion Code Without Plugins?
Yes, you can manually add the conversion code by editing your theme’s header.php file. Place the code just before the closing tag for proper loading and tracking on your site.
How Long Does Google Conversion Tracking Take To Activate?
Google conversion tracking typically activates within a few hours. However, data may take up to 24 hours to appear in your Google Ads reports after code implementation.
Conclusion
Adding Google conversion code to WordPress helps track website actions clearly. It shows which ads bring visitors and sales. Place the code carefully in your site’s header or use a plugin. Test to make sure it works well. Tracking conversions helps improve marketing and grow your business.
Stay patient and check results often. Small steps lead to better website success. Keep learning and adjusting your setup for best outcomes.



