

Are you looking to boost your website’s earnings by adding Google Ads to your WordPress site? You’re in the right place.
Setting up Google Ads doesn’t have to be complicated or time-consuming. In fact, with the right steps, you can start showing ads and earning revenue quickly. This guide will walk you through simple, clear steps to get your ads live and working for you.
Keep reading to discover how easy it is to turn your WordPress site into a money-making tool.
Credit: www.wpbeginner.com
Set Up A Google Ads Account
Setting up a Google Ads account is the first step to show ads on your WordPress site. This process lets you create ads and manage your campaigns. Google Ads helps you reach more visitors and earn revenue from your website. Follow the simple steps below to get started.
Create Your Account
Go to the Google Ads website and click on “Start Now.” Use a Google account to sign in or create a new one. Enter your business details like country and time zone. Choose your main advertising goal, such as getting website visits or calls. Google will guide you through basic settings to set up your account.
Configure Billing Information
Next, enter your billing details to pay for your ads. Choose your country and preferred payment method. Add your credit card or bank information securely. Set your billing threshold to control spending limits. Double-check all information to avoid payment issues later.
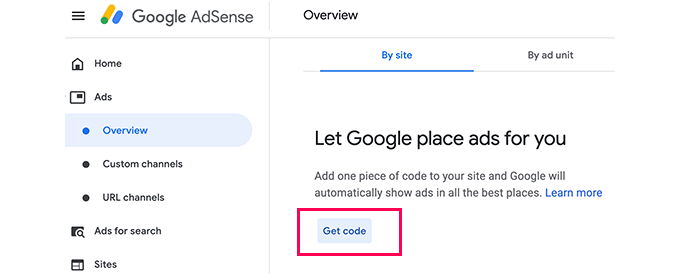
Generate Ad Code
After account setup, create your first ad campaign in Google Ads. Choose your campaign type and ad format. Write clear and simple ad text to attract visitors. Once ready, Google provides an ad code snippet. Copy this code to insert it into your WordPress site’s ad areas.
Credit: www.namecheap.com
Prepare Your WordPress Site
Preparing your WordPress site before adding Google Ads is essential. A well-set site ensures ads display correctly and your visitors have a good experience. Proper preparation helps avoid technical problems and keeps your site fast and user-friendly.
Choose The Right Theme
Select a WordPress theme that supports ad placements easily. A clean and responsive theme works best. It adapts to all screen sizes, making ads visible on phones and tablets. Choose themes that load quickly. Slow themes can hurt your site speed and ad performance. Also, check if the theme allows custom widgets or ad areas. This feature helps place ads without coding.
Install Essential Plugins
Plugins make managing Google Ads simpler. Install a plugin that supports ad insertion like Ad Inserter or Advanced Ads. These plugins allow you to place ads anywhere on your site. They offer control over ad display and frequency. Also, install caching plugins to keep your site fast. Fast loading sites improve user experience and ad visibility. Security plugins protect your site from threats. A secure site keeps your ads safe and running smoothly.
Add Google Ads Manually
Adding Google Ads manually to your WordPress site gives you full control over where ads appear. It helps you place ads in spots that get the most attention. This method works well for those who want to customize ad locations beyond automatic placements.
Manual addition requires copying the Google Ads code and pasting it into your site’s files or widgets. It may need basic knowledge of WordPress and some care to avoid breaking your site’s design. Below are simple ways to add ads manually.
Insert Code In Header Or Footer
Google Ads code can go into the header or footer of your site. This placement ensures ads load on every page. Use a plugin like “Insert Headers and Footers” or edit your theme’s header.php or footer.php file. Paste the ad code between the tags or before the closing tag.
Be sure to save changes and check your site to see if ads appear correctly. This method is great for site-wide ad placement.
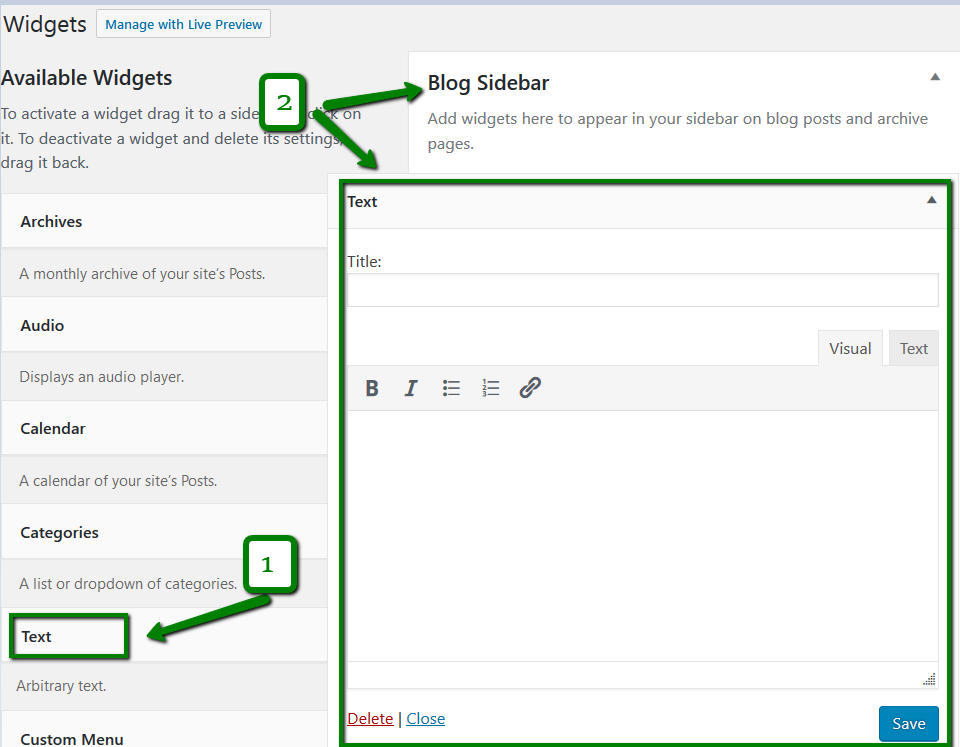
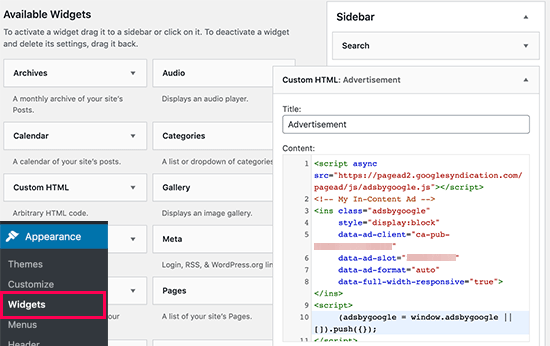
Use Widgets For Sidebar Ads
WordPress widgets allow easy ad placement in sidebars or footers. Go to Appearance > Widgets in your dashboard. Add a “Custom HTML” or “Text” widget to your sidebar area. Paste the Google Ads code inside the widget box and save.
Sidebar ads stay visible while visitors read your content. This method is user-friendly and does not require editing theme files.
Place Ads Within Content
Inserting ads inside posts or pages can boost clicks. Edit the post or page where you want the ad. Switch to the HTML editor and paste the Google Ads code where you want the ad to show.
Another way is using a shortcode or block that supports custom HTML. This method places ads exactly in content flow, making them more visible.
Use Plugins To Manage Ads
Using plugins to manage Google Ads on your WordPress site makes the process simple. Plugins help place ads without touching code. They also let you control where and when ads show. This saves time and keeps your site organized.
Top Plugins For Google Ads
Several plugins work well for Google Ads. Ad Inserter is popular. It supports many ad types and easy placement. Another good option is Advanced Ads. It offers detailed control and scheduling. WP Quads is simple and fast to set up. These plugins fit different needs and skill levels.
How To Configure Plugins
Start by installing the chosen plugin from your WordPress dashboard. Activate it and find its settings page. Enter your Google AdSense or Ads Manager code. Choose where the ads should appear, like posts or sidebars. Save changes and check your site. Make sure ads show correctly without breaking layout.
Automate Ad Placement
Plugins often include automatic ad placement. Pick options to insert ads before or after content. Set rules for showing ads on certain pages. This reduces manual work and keeps ads consistent. You can also limit ad frequency to avoid annoying visitors. Automation helps keep your site clean and user-friendly.
Optimize Ad Performance
Optimizing ad performance is key to earning more from Google Ads on your WordPress site. Ads must fit your site and audience well. This improves user experience and increases revenue. Testing, analyzing, and adjusting ads are important steps to get the best results.
Test Different Ad Formats
Try various ad formats like text, display, and video. Different formats attract different users. Some may click more on images, others on text. Experiment with sizes and styles to see what works best. Place ads in different spots on your pages. Testing helps find the most effective ads for your visitors.
Analyze Ad Metrics
Check your ad reports regularly. Look at clicks, impressions, and earnings. These numbers show how well ads perform. Notice patterns in user interaction. Use Google Ads and WordPress tools to track data. Good analysis helps you understand what attracts users and what does not.
Adjust Based On User Behavior
Change your ads based on how users act on your site. Move ads to better locations if users ignore them. Change ad types if some formats get low clicks. Keep your ads fresh and relevant to your content. Small adjustments can lead to better engagement and higher earnings.
Troubleshoot Common Issues
Troubleshooting common issues with Google Ads on your WordPress site helps keep ads running smoothly. Problems can stop ads from showing or slow down your website. Fixing these issues improves user experience and ad performance. Below are some simple solutions to frequent problems.
Ads Not Showing Up
Check your ad code carefully. Make sure you copied it exactly from Google Ads. Clear your website cache and browser cache. Sometimes, cached pages block new ads from appearing. Confirm your ad unit is active in your Google Ads account. Also, check if your website is approved for ads. Disabled or unapproved sites will not show ads.
Slow Website Loading
Google Ads can slow your website if not set properly. Use asynchronous ad code to load ads without blocking your page. Limit the number of ads per page to avoid clutter. Use a caching plugin to speed up your site. Optimize images and reduce unnecessary scripts. A faster site keeps visitors happy and improves SEO.
Policy Compliance Tips
Follow Google Ads policies strictly to avoid penalties. Avoid placing ads near inappropriate content or on restricted pages. Do not click your own ads or encourage others to do so. Keep your content original and family-friendly. Regularly review Google’s policy updates. Compliance keeps your ads live and your account safe.
Credit: aioseo.com
Frequently Asked Questions
How Do I Create A Google Ads Account For WordPress?
To create a Google Ads account, visit ads. google. com and sign up with your Google credentials. Follow the setup prompts to link billing and campaign details. This account is essential for generating ad codes to display ads on your WordPress site.
What Is The Best Plugin To Add Google Ads In WordPress?
Ad Inserter is a popular plugin for adding Google Ads in WordPress. It supports multiple ad placements and offers easy code insertion. The plugin is SEO-friendly and helps optimize ad display without slowing down your website.
How Can I Manually Add Google Ads To WordPress?
To add Google Ads manually, copy your ad code from Google Ads. Paste the code into your WordPress theme’s header, footer, or widget area using the Custom HTML block or Appearance > Widgets. This method requires basic knowledge of WordPress editing.
Can Google Adsense Work With Any WordPress Theme?
Yes, Google AdSense works with most WordPress themes. Ensure your theme supports widget areas or custom code insertion. Responsive themes help ads display properly on all devices, improving user experience and ad revenue potential.
Conclusion
Adding Google Ads to your WordPress site is simple and quick. Follow the steps carefully to place ads in the right spots. This helps you earn money while sharing your content. Keep checking your ad performance to improve results. Stay patient and update your site often for best outcomes.
Start today and watch your website grow steadily.


