
Are you looking to add a form to your WordPress site but don’t know where to start? Adding a form is one of the best ways to connect with your visitors, collect important information, and grow your business.
Whether you want a simple contact form or something more complex, this guide will walk you through easy steps to get it done quickly. By the end, you’ll have the confidence to create forms that work perfectly for your needs—no technical skills required.
Let’s dive in and make your website more powerful and user-friendly!

Credit: formidableforms.com
Choosing The Right Form Plugin
Choosing the right form plugin is key to creating effective forms on WordPress. The plugin you select affects ease of use, design, and functionality. A good plugin helps you collect data smoothly and improve user experience.
WordPress offers many form plugins. Each has unique features and uses. Picking the best one depends on your specific needs and skill level. Let’s explore popular plugins and factors to consider.
Popular Form Plugins For WordPress
Contact Form 7 is a simple and free plugin. It suits basic contact forms and quick setup. WPForms offers a drag-and-drop builder, making form creation easy for beginners. Gravity Forms is a paid option with advanced features for complex forms. Ninja Forms combines ease of use with customization options. Formidable Forms supports form building with visual editing and powerful data management.
Factors To Consider When Selecting A Plugin
Check if the plugin is user-friendly. You want to create forms without coding skills. Look for customization options to match your site’s style. Ensure the plugin supports mobile devices and loads fast. Security is vital. Pick a plugin that protects your data and user information. Consider integration with email marketing or payment systems if needed. Also, read reviews and check support availability.
Installing And Activating The Plugin
Installing and activating a plugin is the first step to add a form in WordPress. This process is simple and takes only a few minutes. Plugins extend the functionality of your website without coding. Follow the steps below to install and activate your chosen form plugin.
Step-by-step Installation Guide
Log in to your WordPress dashboard. Go to the left menu and click on “Plugins.”
Select “Add New” at the top of the page. Use the search bar to find the form plugin you want.
Once you find the plugin, click “Install Now.” Wait for the installation to finish. Do not refresh the page.
After installation, the “Install Now” button changes to “Activate.”
Activating The Plugin In WordPress
Click the “Activate” button to start using the plugin. Activation makes the plugin ready to work on your site.
Once activated, the plugin usually adds a menu item in your dashboard. This helps you access the form settings quickly.
Check the plugin’s documentation for any setup tips. Proper activation ensures your forms work smoothly.
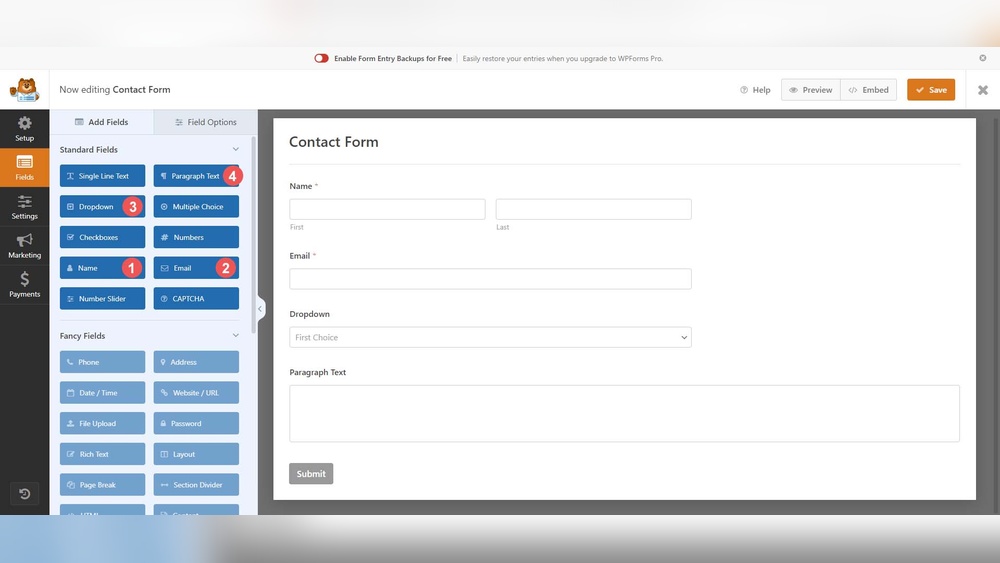
Creating Your First Form
Creating your first form in WordPress is simple and quick. Forms help collect information from visitors. This guide shows you how to start with ease.
Selecting A Form Template
Start by choosing a form template. Templates save time and give structure to your form. WordPress offers many ready-to-use templates. Pick one that fits your needs. For example, contact forms, surveys, or feedback forms. Templates include the basic fields you need. This lets you focus on customizing rather than building from scratch.
Customizing Form Fields
Next, customize the form fields to match your requirements. You can add, remove, or edit fields easily. Common fields include name, email, and message boxes. Make fields required to ensure users fill them out. Change labels and placeholders for clarity. Adjust the order of fields to improve user flow. Personalizing fields creates a better user experience. This step helps collect the exact information you want.
Configuring Form Settings
Configuring form settings is a key step to make your WordPress form work well. This process helps ensure you get the right information and your visitors have a smooth experience. Focus on notifications and appearance to improve your form’s function and look.
Setting Up Notifications
Notifications alert you when someone submits a form. Set up email alerts to stay updated. Use a clear subject line so emails don’t get lost. Include all important form data in the notification. Test the notification to make sure it works right.
You can send confirmation emails to users too. This reassures them their submission was successful. Personalize these emails with their name or other details. Keep messages short and polite to maintain professionalism.
Adjusting Form Appearance
The form’s look affects how visitors interact with it. Choose simple colors that match your website theme. Use clear labels for each field to avoid confusion. Space out fields evenly to make the form easy to read.
Make buttons stand out with a bright color. Avoid clutter by removing unnecessary fields. Add a thank you message that shows after submission. This improves user experience and trust in your site.
Adding The Form To Your Website
Adding a form to your WordPress website makes it easy for visitors to contact you. It also helps collect important information. WordPress offers simple ways to place forms on your pages or posts. This section explains how to add forms clearly and quickly.
Using Shortcodes
Shortcodes are small codes that show forms anywhere on your site. After creating a form with a plugin, copy its shortcode. Then, paste this code into the editor where you want the form to appear. WordPress will display the form automatically.
This method is fast and works well for all pages and posts. No need for special coding skills. Just copy and paste the shortcode, and the form shows up immediately.
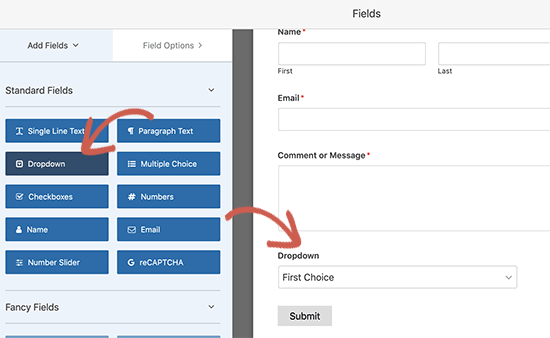
Embedding Forms In Pages Or Posts
Embedding forms directly into pages or posts gives you control over placement. Open the page or post editor in WordPress. Click the “Add Block” button, then select the form block from the plugin options. Choose your form from the list.
The form appears right in the editor. You can move it up or down as needed. This way, the form fits perfectly within your content. Visitors see the form clearly and can use it easily.

Credit: www.monsterinsights.com
Testing Your Form
Testing your form is a key step after creating it in WordPress. It ensures the form works as expected. A well-tested form prevents errors and improves user experience. Testing helps catch problems early before visitors use the form.
Focus on submitting test entries and fixing common issues. This approach makes your form reliable and smooth.
Submitting Test Entries
Start by filling out the form like a visitor would. Enter sample data in every field. Use real-like information to see how the form handles it.
Submit the form and check if it sends the entry correctly. Watch for confirmation messages or emails. Confirm the data arrives in your database or email inbox.
Try testing on different devices and browsers. This shows if the form works everywhere. Test required fields by leaving them empty. See if error messages appear as needed.
Troubleshooting Common Issues
Check if the form does not send entries. This may mean email settings are wrong. Verify SMTP settings or contact your hosting provider.
If the form shows errors, read the messages carefully. Fix missing fields or invalid inputs. Clear your site cache to avoid old data.
Slow loading forms may need fewer plugins or smaller images. Test plugins for conflicts by disabling one at a time. Update your form plugin to the latest version.
Enhancing Your Form
Enhancing your form makes it more useful and effective. A well-enhanced form captures more leads and protects against spam. Small improvements can boost user experience and trust. Focus on tools that add value and security to your form.
Integrating With Email Marketing
Connect your form to email marketing services. This lets you send newsletters or updates automatically. Popular tools like Mailchimp or Constant Contact work well. Integration saves time and keeps your audience engaged. Capture emails directly from your form and build your list.
Adding Captcha For Security
Captcha stops bots from submitting fake entries. It adds a simple test users must pass. Use Google reCAPTCHA or similar plugins for easy setup. Captcha keeps your form clean and your data safe. It reduces spam and protects your website’s credibility.
Credit: www.pushengage.com
Frequently Asked Questions
How Do I Add A Form In WordPress?
To add a form, install a form builder plugin like WPForms or Contact Form 7. Create a new form, customize fields, and embed it using a shortcode or block in your posts or pages.
Which Plugin Is Best For WordPress Forms?
WPForms, Contact Form 7, and Gravity Forms are popular. WPForms is beginner-friendly with drag-and-drop features. Choose based on your needs and ease of use.
Can I Customize WordPress Form Fields Easily?
Yes, most form plugins offer drag-and-drop editors. You can add, remove, or rearrange fields without coding to match your requirements.
How Do I Embed A Form On A WordPress Page?
After creating a form, copy its shortcode. Paste this shortcode into the WordPress page or post editor where you want the form to appear.
Conclusion
Adding a form to your WordPress site is simple and useful. It helps visitors contact you or share information easily. Plugins make the process fast and clear. Choose the right plugin and follow steps carefully. Test your form to ensure it works well.
Keep your site interactive and user-friendly. Small efforts bring better engagement and trust. Start adding forms today to improve your website’s function.


