
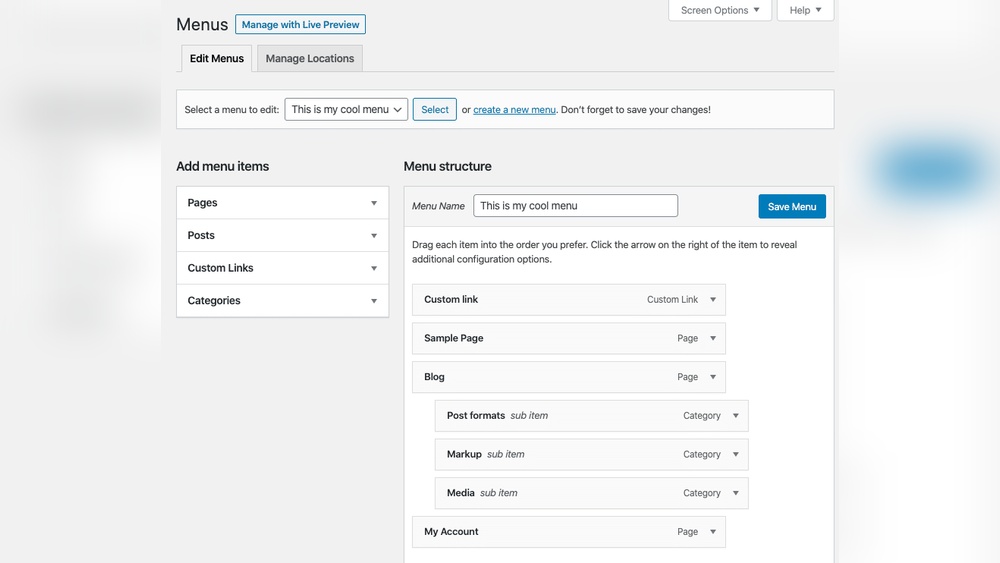
Are you looking to make your WordPress site easier to navigate? Adding a drop-down menu can help you organize your pages neatly and give your visitors a smooth browsing experience.
If you want your website to look professional and user-friendly, knowing how to add a drop-down menu is a must. You’ll discover simple, step-by-step instructions that anyone can follow—even if you’re not tech-savvy. Keep reading to transform your menu and keep your visitors coming back for more.

Credit: www.youtube.com
Choose A Suitable Theme
Choosing the right theme is key to adding a drop-down menu on WordPress. The theme controls the look and function of your site. Some themes come ready with menu features. Others may require extra plugins or coding. Picking a theme with built-in support makes the process smoother.
Also, your theme should work well on all devices. Visitors use phones, tablets, and desktops. Your menu must look good and work well everywhere. A responsive design helps your site adjust to any screen size. This keeps visitors happy and improves user experience.
Themes With Built-in Menus
Many WordPress themes include drop-down menu options. These menus are easy to set up without coding. You can organize pages and categories under main menu items. This helps visitors find information fast. Themes like Astra, OceanWP, and GeneratePress offer this feature. They provide simple menu controls in the WordPress customizer.
Responsive Design Considerations
Responsive themes change menu styles for different devices. On desktops, menus may appear across the top. On mobiles, they often collapse into a hamburger icon. This saves space on small screens. Choose a theme that adapts menus automatically. Test your menu on phones and tablets to ensure easy use. A responsive menu keeps navigation smooth on any device.
Access The Menu Editor
To create a drop-down menu in WordPress, start by accessing the Menu Editor. This tool lets you manage the menus on your site. You can add, remove, or rearrange menu items easily. The Menu Editor is found in the WordPress dashboard under Appearance settings. It gives you full control over your website’s navigation structure.
Using the Menu Editor helps organize your links clearly. Drop-down menus improve user experience by grouping related pages. Follow these steps to find the Menu Editor and create a new menu for your site.
Navigating To Appearance Settings
Log in to your WordPress dashboard. On the left side, find the “Appearance” tab. Click on it to open a drop-down list. Select “Menus” from this list. This opens the Menu Editor screen where you can manage all menus. It shows existing menus or lets you create new ones.
Creating A New Menu
In the Menu Editor, find the option to create a new menu. Click the link or button named “Create a new menu.” Enter a name for your menu to identify it easily. After naming, click the “Create Menu” button. Your new menu is now ready for adding items and organizing drop-downs.
Add Menu Items
Adding items to your WordPress menu is simple. This step builds the structure of your dropdown menu. You can include different content types like pages, posts, custom links, and categories. Each item you add will appear as a clickable option in your menu.
Including Pages And Posts
Pages and posts are the main parts of your website. To add them, go to the menu editor in WordPress. Find the list of your pages and posts on the left side. Check the boxes of the items you want to add. Click the “Add to Menu” button. These items will appear in your menu structure on the right. You can drag and drop them to arrange the order.
Adding Custom Links
Custom links let you add any URL to your menu. This is useful for linking to external sites or specific pages not in your list. Enter the URL in the custom link box. Then, type the name you want to show in the menu. Click “Add to Menu” to include it. You can move the link to the right to make it a dropdown item under a parent menu.
Using Categories
Categories group your blog posts by topic. Adding categories to your menu helps visitors find related posts. In the menu editor, look for the categories section. Select the categories you want to add. Click “Add to Menu.” Arrange them like other items. Categories will show all posts under that topic when clicked.
Create Drop Down Structure
Creating a drop down structure helps visitors find pages quickly. It organizes your menu items clearly. This makes your website easier to use. Drop down menus group related links under one heading. This section explains how to build this structure in WordPress.
Organizing Parent And Child Items
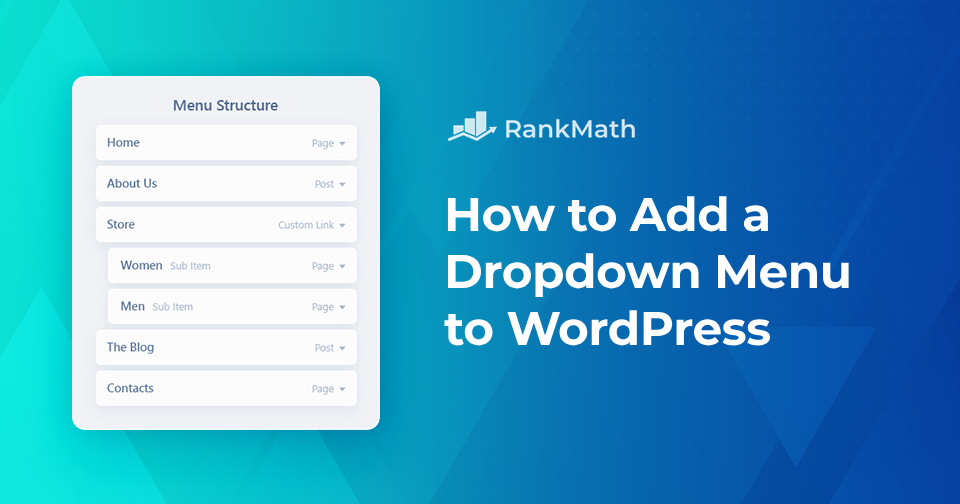
Start by deciding which pages are main topics. These become parent items in your menu. Next, select pages that relate to each parent. These will be child items. Child items appear under their parent in the drop down. This hierarchy shows the connection between pages. It helps visitors understand your site’s layout at a glance.
Drag And Drop Method
Go to the WordPress menu editor to arrange items. Click and hold a menu item to move it. Drag it slightly to the right to make it a child. Drop it under the chosen parent item. You will see it nest under the parent. This simple method builds your drop down structure visually. It requires no coding and updates instantly.
Assign Menu To Location
Assigning your menu to the right location on WordPress helps visitors find your content easily. After creating a menu, you need to tell WordPress where to display it. This step ensures your drop-down menu appears exactly where you want on your website.
Primary Menu Placement
The primary menu is the main navigation bar on your site. It usually appears at the top of the page. To assign your menu here, go to the WordPress dashboard. Click on Appearance, then Menus. Under “Menu Settings,” find “Display location” or “Theme locations.” Select “Primary Menu” from the list. Save your changes. Now, your drop-down menu will show in the main spot visitors expect.
Other Menu Locations
Some WordPress themes offer multiple menu locations. These can include footer menus, social menus, or secondary menus. You can assign your drop-down menu to any available location. Just follow the same steps: Appearance > Menus > Display location. Choose the spot that fits your site layout. This flexibility helps you organize your content better and improve user experience.
Customize Menu Appearance
Customizing your drop-down menu’s look helps match your website’s style. It improves user experience and keeps visitors engaged. WordPress offers simple tools to change your menu’s colors, fonts, and spacing. These changes make your menu clear and easy to use.
Using Theme Customizer
The Theme Customizer lets you change menu styles without coding. Go to Appearance > Customize in your WordPress dashboard. Find the Menu or Header section to see style options. Adjust colors, font size, and background to suit your site. Preview changes live to see how they look. Save your settings once you are happy with the design.
Adding Css For Styling
For more control, add custom CSS to style your menu. Go to Appearance > Customize > Additional CSS. Write simple CSS rules to change menu colors, fonts, or spacing. For example, use background-color to change the menu’s background. Use font-family to pick a readable font style. Add hover effects to make the menu interactive. Save your changes and check the front end for results.
Test Drop Down Functionality
Testing your drop down menu after adding it to WordPress is important. It ensures the menu works well for all visitors. You can check if the links open correctly and if the menu looks good on different devices. This step helps avoid user frustration and makes navigation smooth.
Desktop View
Start by opening your website on a desktop browser. Hover your mouse over the main menu items that have drop downs. The sub-menu should appear quickly and clearly. Click each link to confirm it directs to the right page. Check the menu’s style and alignment. Make sure the text is readable and the background fits your site’s design.
Mobile Responsiveness
Next, open your site on a smartphone or use a responsive testing tool. Tap the menu icon to expand the navigation. The drop down options should open smoothly with a tap. Verify that the text is easy to read and buttons are large enough. Test the links to ensure they work without issues. Confirm the menu closes properly after selection or when tapping outside.
Credit: rankmath.com
Use Plugins For Advanced Menus
Using plugins for advanced menus in WordPress makes your site easier to navigate. Plugins offer more options than the default menu settings. They help create drop-down menus that look clean and work smoothly. This method is perfect for users who want extra control without coding. Plugins also save time and reduce errors.
Popular Menu Plugins
Several plugins stand out for creating advanced menus. “Max Mega Menu” is a favorite. It lets you build large, multi-column drop-downs. “WP Mega Menu” offers drag-and-drop features for easy setup. “UberMenu” provides many style options and mobile-friendly design. These plugins fit most WordPress themes and are beginner-friendly.
Enhanced Features
Advanced menu plugins come with useful features. You can add icons and images to menu items. Some plugins support animations for smooth drop-down effects. Mobile responsiveness ensures menus work well on phones. Many allow custom colors and fonts for branding. User-friendly interfaces make menu editing simple.

Credit: developer.wordpress.org
Frequently Asked Questions
How Do I Create A Drop Down Menu In WordPress?
To create a drop down menu, go to Appearance > Menus in your WordPress dashboard. Add menu items and drag them slightly right under a parent item to nest them as a drop down. Save the menu and assign it to a theme location.
Can I Add Multiple Levels In WordPress Drop Down Menus?
Yes, WordPress supports multi-level drop down menus. You can nest menu items under sub-items by dragging them further right. This creates hierarchical menus with multiple levels, enhancing navigation and user experience on your site.
Which WordPress Themes Support Drop Down Menus?
Most modern WordPress themes support drop down menus. Check your theme’s documentation or demo to confirm. If not supported, consider using a plugin or switching to a theme with built-in drop down menu functionality.
How Do I Customize The Drop Down Menu Appearance?
Customize drop down menus via Appearance > Customize > Menu or with custom CSS. Many themes offer color, font, and layout options. Plugins can also enhance styling without coding, allowing you to match your site’s design.
Conclusion
Adding a drop-down menu on WordPress makes your site easier to use. It helps visitors find pages quickly and keeps your menu neat. You only need a few simple steps to set it up. Customizing the menu fits your site’s style and needs.
Regular updates keep it working well and looking good. Start adding drop-down menus today to improve your WordPress site’s navigation and user experience.



