
Are you looking to share important documents on your WordPress site but aren’t sure how to do it? Adding files like PDFs, Word docs, or spreadsheets can seem tricky at first.
But once you know the right steps, it’s quick and simple. Imagine giving your visitors easy access to guides, contracts, or resources without any hassle. You’ll discover exactly how to add documents to WordPress, so your site becomes more useful and professional.
Keep reading—you’re just minutes away from making your content more powerful and accessible.
Preparing Documents For Upload
Preparing your documents before uploading them to WordPress is important. It helps your site run smoothly and keeps files easy to find. Taking time to prepare also improves user experience. Here are some key steps to get your documents ready.
Supported File Formats
WordPress allows many file types for upload. Common document formats include PDF, DOC, DOCX, PPT, PPTX, and XLS. PDFs are popular because they keep formatting consistent. Check your WordPress version or hosting rules for any restrictions. Avoid unusual file types to prevent upload errors.
Optimizing File Size
Large files can slow down your website. Aim to keep documents small without losing quality. Use compression tools for PDFs and images inside documents. Smaller files upload faster and use less bandwidth. This helps visitors access your content quickly and easily.
Naming Files Properly
Use clear and simple names for your files. Avoid spaces, special characters, and long names. Use hyphens or underscores to separate words. Example: project-report-2024.pdf is better than Project Report Final Version.pdf. Good file names improve SEO and make files easier to manage.
Uploading Documents Via Media Library
Uploading documents via the Media Library in WordPress is simple and fast. This tool helps you manage all your files in one place. You can upload, organize, and reuse documents easily. This method keeps your site neat and your files ready for use anytime.
Accessing The Media Library
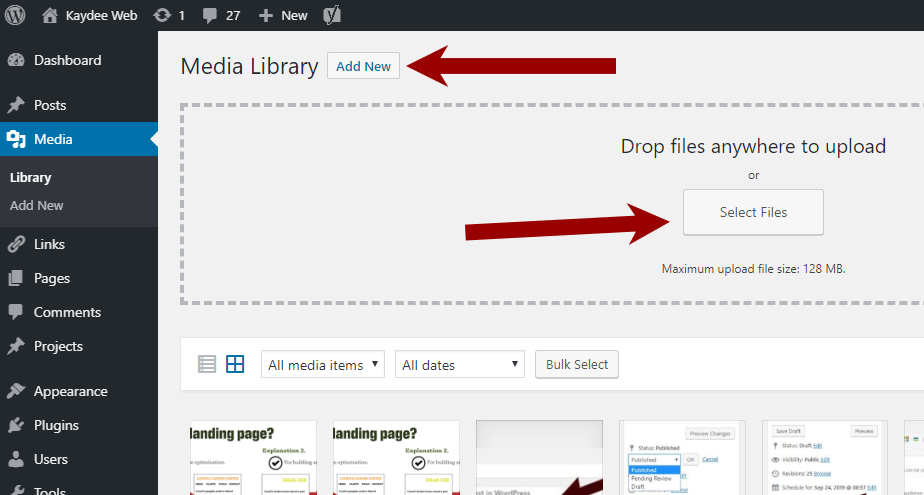
First, log in to your WordPress dashboard. On the left menu, find and click on “Media.” This opens the Media Library. Here, you see all the files you uploaded. You can view images, PDFs, and other documents.
Use the “Add New” button at the top to start uploading files. The Media Library is your hub for managing all site files.
Uploading Files Directly
Click “Add New” to upload documents. You can drag files from your computer or select them manually. WordPress supports PDFs, Word files, and more.
Once uploaded, files appear in the Media Library. Each file gets a unique URL. Use this URL to link documents in your posts or pages.
Organizing Media Files
Keep your files tidy by organizing them. WordPress does not have built-in folders but uses filters and search tools. You can add titles and descriptions to find files quickly.
Use consistent naming for files. This helps you locate documents fast. Regularly clean unused files to save space and improve site speed.
Adding Documents To Posts And Pages
Adding documents to your WordPress posts and pages helps share files easily. Documents like PDFs, Word files, or spreadsheets can support your content. This makes your posts more useful and professional. WordPress offers simple ways to add these documents without coding.
Below are easy steps to add documents using the block editor. You can create download links or embed documents directly in your content.
Using The Block Editor
The WordPress block editor lets you add documents quickly. First, open the post or page you want to edit. Click the plus icon to add a new block. Choose the “File” block from the list. This block is designed for uploading documents.
Next, upload your document from your computer or select one from the media library. The block will show the file name and a download button. You can change the text to make it clear for visitors. This method works well for most document types.
Inserting Download Links
You can also add download links inside text or buttons. Upload your document to the media library first. Copy the file URL after upload. Highlight the text or button where you want to add the link. Click the link icon and paste the document URL.
Visitors can click the link to download the file. This keeps your page clean and easy to read. Use simple phrases like “Download PDF” or “Get the file” for clarity.
Embedding Documents
Embedding documents lets visitors view files without leaving the page. Use plugins like “Google Docs Embedder” or “PDF Embedder” for this. Upload your document to the media library first. Then, follow the plugin instructions to add the embed code.
Embedded files appear inside your post or page. Visitors can scroll and read the document directly. This improves user experience and keeps visitors engaged longer.

Credit: kaydee.net
Using Plugins For Advanced Document Management
Using plugins for advanced document management makes handling files easier on WordPress. Plugins offer extra tools and options beyond the basic upload feature. They help organize, display, and secure documents effectively.
Plugins save time and improve user experience. They allow you to control who can see or download documents. Some plugins also support various file types and formats.
Popular Document Plugins
Many plugins exist for managing documents on WordPress. Some popular ones include WP Document Revisions, Document Gallery, and PDF Embedder. Each plugin has unique features suited for different needs.
WP Document Revisions works well for team collaboration. Document Gallery creates neat file galleries. PDF Embedder focuses on showing PDF files clearly on your site.
Features And Benefits
Document plugins offer multiple features. These include file version control, easy file uploads, and searchable document lists. Some plugins allow visitors to preview files without downloading.
Benefits include better organization and enhanced security. You can set permissions to restrict file access. Plugins also improve site speed by managing file sizes.
Installing And Configuring Plugins
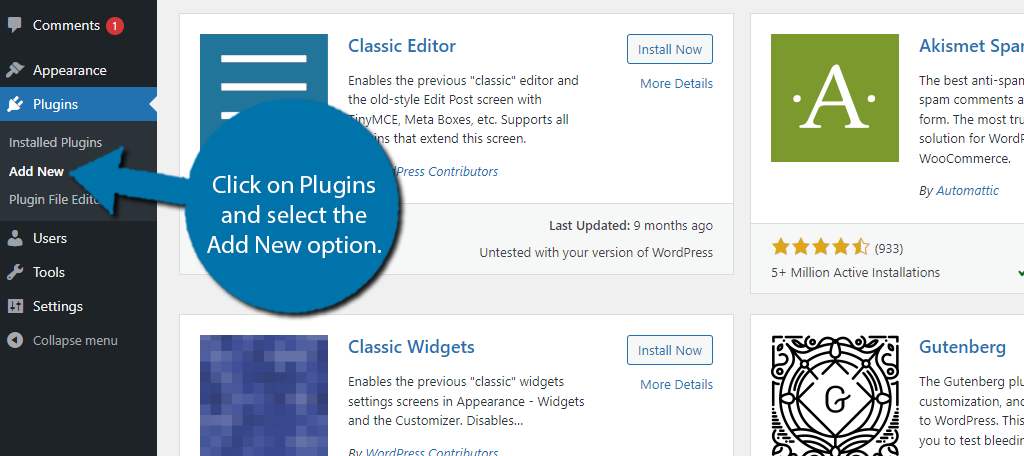
To install a plugin, go to the WordPress dashboard. Click on “Plugins” then “Add New.” Search for the desired plugin and click “Install Now.”
After installation, activate the plugin. Most plugins come with a settings page for customization. Adjust options like file types allowed and user permissions.
Test the plugin by uploading a document. Check how it appears and functions on your site. Make changes in settings if needed to improve performance.
Managing Uploaded Documents
Managing uploaded documents in WordPress helps keep your site organized. It ensures visitors find the right files easily. Proper management improves site performance and user experience.
Regularly checking your documents prevents clutter. It also makes sure all files are up to date. This section explains how to edit, delete, and track your uploaded documents.
Editing And Replacing Files
WordPress lets you update files without deleting the old ones. You can replace a document by uploading a new version. This keeps the link the same, so users always get the latest file.
To edit a file, go to the Media Library. Select the document and choose the option to replace it. Upload the new file and save changes. This is simple and saves time.
Deleting Unused Documents
Old or unused files take up space on your server. Deleting them keeps your site clean and fast. You can remove files from the Media Library easily.
Select the document you want to delete and click the delete button. Confirm the action to remove the file permanently. Regular cleanup helps your site stay efficient.
Tracking Downloads
Knowing how often visitors download your documents is useful. It shows which files are popular and which are ignored. WordPress plugins can track downloads for you.
Install a download tracker plugin and activate it. It will record each time a file is downloaded. Use this data to improve your content and offer valuable files.
Credit: kaydee.net
Troubleshooting Common Upload Issues
Uploading documents to WordPress can sometimes cause issues. These problems stop your files from appearing correctly. Understanding common upload problems helps fix them fast. This section covers three main issues: file size limits, permission errors, and broken links. Each problem has simple solutions to keep your uploads smooth.
File Size Limits
WordPress has a maximum file size limit for uploads. Large documents may not upload if they exceed this limit. Check your site’s upload limit in the media settings. You can increase it by editing the php.ini or .htaccess file. Contact your hosting provider for help if needed. Compressing files before upload also helps stay within size limits.
Permission Errors
Permission errors stop files from uploading to WordPress. These happen when WordPress lacks access to folders. Check folder permissions using your hosting control panel or FTP client. Set folder permissions to 755 and file permissions to 644. Incorrect permissions can block uploads or cause errors. Fixing these settings restores upload ability quickly.
Broken Links
Broken links occur when uploaded documents don’t open properly. This happens if the file path changes or the file is deleted. Always double-check the URL after uploading. Use the WordPress media library to insert files. Avoid moving or renaming files after upload. Fix broken links by updating URLs or re-uploading documents.
Credit: www.greengeeks.com
Frequently Asked Questions
How Do I Upload Documents To WordPress?
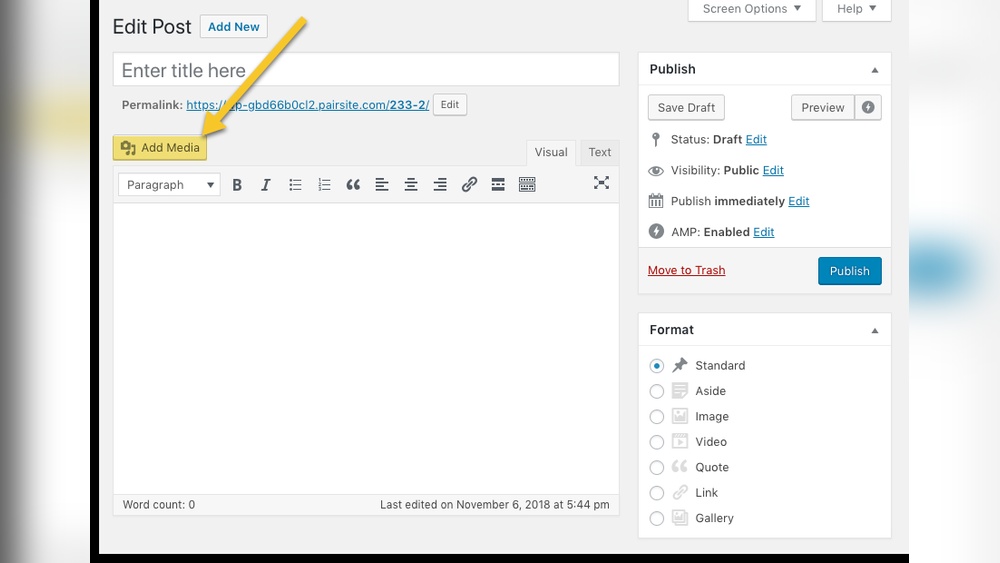
To upload documents, go to your WordPress dashboard and click “Media. ” Select “Add New” and upload your files. You can then insert these documents into posts or pages using the “Add Media” button.
Can I Add Pdfs Directly To WordPress Posts?
Yes, you can upload PDFs through the media library. After uploading, insert the PDF link into your post. Visitors can click the link to view or download the file easily.
What Document Formats Are Supported By WordPress?
WordPress supports various formats like PDF, DOCX, PPT, XLS, and TXT. You can upload these via the media library and link them within your content. This flexibility helps share different document types with your audience.
How Do I Link Documents In WordPress Pages?
After uploading a document, copy its URL from the media library. Highlight text or an image in your page editor, then click the link icon and paste the URL. This creates a clickable link for visitors.
Conclusion
Adding documents to WordPress is simple and quick. Upload files directly through the media library or use plugins for extra features. Organize your documents clearly to help visitors find them easily. Keep file sizes small to improve site speed. Regularly update or remove old files to keep your site fresh.
With these steps, sharing documents on your site becomes hassle-free. Try these tips today and enhance your WordPress site’s content.


