
Are you looking to make your WordPress site stand out with unique fonts? Changing your website’s typography can instantly boost its style and readability.
But how do you add custom fonts to your WordPress theme without breaking a sweat? In this guide, you’ll discover simple, step-by-step methods to easily upload and use fonts that match your brand’s personality. By the end, you’ll have the tools to create a website that looks exactly how you want—no coding headaches required.
Ready to give your site a fresh, professional look? Let’s dive in!

Credit: www.hosted.com
Choosing The Right Fonts
Choosing the right fonts is key to making your WordPress site look good and easy to read. Fonts set the tone and style of your content. The wrong font can make your site hard to read or look unprofessional. Pick fonts that match your brand and message. Keep your visitors in mind. Choose fonts that work well on all devices.
Popular Font Sources
Many websites offer free and paid fonts. Google Fonts is the most popular source. It has hundreds of fonts that load fast and work on all browsers. Adobe Fonts offers a large collection of high-quality fonts. You can sync these with your site easily. Other places like Font Squirrel and DaFont also provide free fonts. Check the license before using any font. Some fonts require permission or a fee for commercial use.
Web-safe Vs Custom Fonts
Web-safe fonts are pre-installed on most devices. Examples include Arial, Times New Roman, and Courier. They load quickly and work everywhere. Custom fonts are unique and help your site stand out. These fonts need to be loaded from external sources or uploaded. Custom fonts may slow down your site if not optimized. Choose web-safe fonts for simplicity and speed. Use custom fonts to add personality and style.
Preparing Font Files
Preparing font files is the first step to use custom fonts in your WordPress theme. You need the right format and size for smooth loading. Fonts must be web-friendly and optimized for fast websites.
Good preparation ensures fonts work on all browsers and devices. It also keeps your site fast and user-friendly. Let’s explore the important details about font files.
Supported Font Formats
Web fonts come in different formats. The most common are TTF, OTF, WOFF, and WOFF2. WOFF and WOFF2 are best for web use. Browsers support these formats widely. TTF and OTF are good for desktop but less ideal for the web.
Use WOFF2 for faster loading and better compression. Include WOFF as a backup for older browsers. Avoid using unsupported formats like EOT or SVG alone. Proper formats ensure fonts display correctly everywhere.
Optimizing Font Files
Font files can be large and slow down your site. Optimize fonts to reduce size without losing quality. Tools like Font Squirrel or Transfonter help convert and compress fonts.
Subset fonts to include only needed characters. Remove unused glyphs to shrink file size. Smaller fonts load faster and improve user experience. Always test optimized fonts on different browsers before use.
Uploading Fonts To WordPress
Uploading custom fonts to WordPress lets you use unique styles for your website. It improves your site’s look and makes it stand out. You can upload fonts directly to your theme folder. This process requires access to your WordPress files. Two common ways are using the Theme File Manager or FTP clients. Both methods are straightforward and safe if done correctly.
Using Theme File Manager
The Theme File Manager lets you upload fonts from your WordPress dashboard. First, go to Appearance > Theme Editor. Find your theme’s folder and open it. Look for the ‘fonts’ folder or create one if it does not exist. Click ‘Upload Files’ to add your font files. Supported formats include .woff, .woff2, .ttf, and .otf.
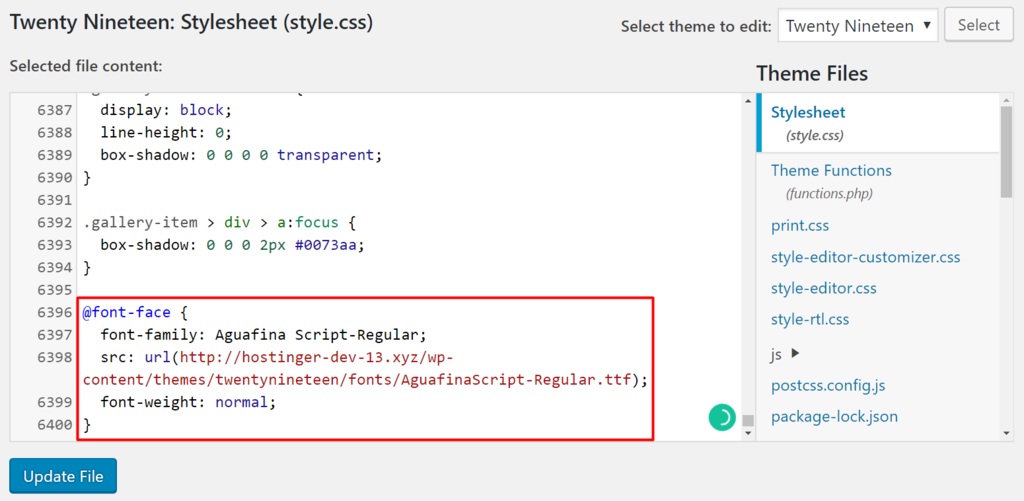
After uploading, you must add the font to your CSS file. Open style.css and use @font-face to define your font. Save your changes and check your site to see the new font in action.
Via Ftp Clients
FTP clients like FileZilla allow direct access to your WordPress files. Connect to your server using your FTP login details. Navigate to /wp-content/themes/your-theme/ folder. Upload your font files to a ‘fonts’ directory there.
Next, edit the theme’s CSS file using a code editor or through the WordPress dashboard. Add the @font-face rule for your new fonts. Save and upload the CSS file back to your server. Refresh your website to confirm the fonts appear correctly.
Adding Fonts With Css
Adding fonts with CSS gives you full control over your WordPress theme’s look. You can use any font you want, making your site unique. This method works well for custom fonts not available through standard options. It requires editing your theme’s CSS files, which is simple with basic knowledge. Below, learn how to add fonts using the @font-face rule and apply them to theme elements.
Using @font-face Rule
The @font-face rule lets you load custom fonts from your server or an external source. Start by uploading your font files (like .woff, .woff2, .ttf) to your WordPress hosting. Then, add the following CSS code to your theme’s stylesheet:
@font-face { font-family: 'CustomFont'; src: url('fonts/CustomFont.woff2') format('woff2'), url('fonts/CustomFont.woff') format('woff'); font-weight: normal; font-style: normal; }Replace 'CustomFont' and the URLs with your font’s name and path. This code tells browsers where to find the font files.
Applying Fonts To Theme Elements
After defining your font, assign it to theme elements using CSS selectors. For example, to apply the font to all paragraphs:
p { font-family: 'CustomFont', Arial, sans-serif; }Use fallback fonts like Arial or sans-serif in case the custom font fails to load. You can target headers, menus, or any element by changing the selector. This step updates your theme’s appearance with the new font style.
Using Plugins For Custom Fonts
Using plugins is a simple way to add custom fonts to your WordPress theme. Plugins handle all the coding and font uploads for you. This makes the process fast and easy, especially for beginners. You can choose from many font styles and apply them to different parts of your site.
Plugins also let you preview fonts before applying them. This helps you pick the best font for your site’s look. Many plugins support Google Fonts and custom font files. You can use free fonts or your own font files without editing code.
Top Font Plugins
Several plugins are popular for adding custom fonts. “Easy Google Fonts” is a favorite. It connects your site with Google Fonts. You can change fonts in the WordPress Customizer. Another plugin is “Use Any Font.” It lets you upload your own font files. This plugin supports TTF, OTF, and WOFF formats.
“Fontsy” is another option. It offers many fonts and easy font management. All these plugins work well with most themes. They give you control over fonts without touching code.
Plugin Setup And Configuration
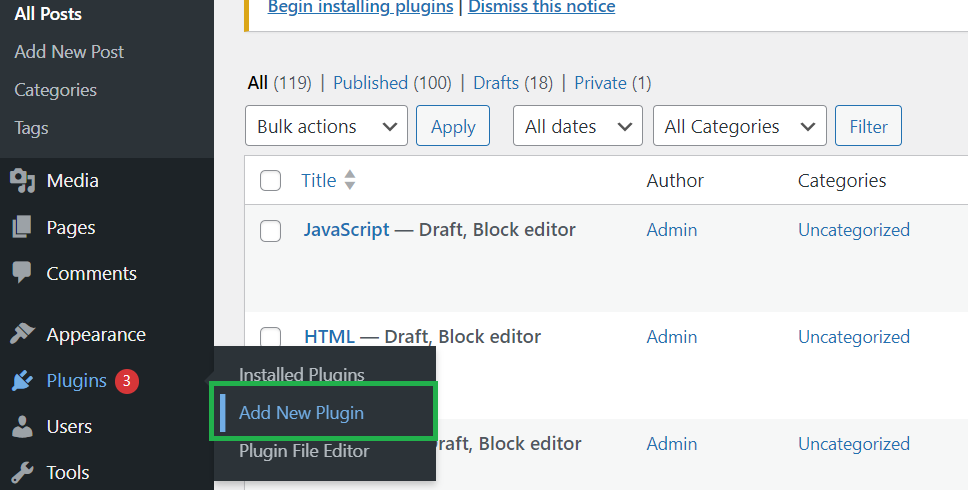
First, install the plugin from the WordPress plugin directory. Activate the plugin after installation. Next, open the plugin settings in your WordPress dashboard. For Google Fonts plugins, pick the fonts you want to use. Assign fonts to headings, paragraphs, or menus.
For custom font upload plugins, upload your font files. Follow the plugin instructions for file formats and size limits. Save your changes and check your website to see the new fonts. Adjust the font size and style if needed. Plugins make font changes easy and safe.
Credit: www.geeksforgeeks.org
Testing And Troubleshooting
After adding custom fonts to your WordPress theme, testing and troubleshooting ensure they work correctly. This step helps find and fix errors early. It also improves your site’s look and user experience.
Checking Font Display
Open your website in different browsers. Check if the custom font shows up on all pages. Look at headings, paragraphs, and menus. Make sure the font style matches your design.
Use browser developer tools to inspect font files. Look for any loading errors or missing files. Clear your browser cache and reload the page. This refreshes the font display.
Common Issues And Fixes
Fonts not showing often result from wrong file paths. Double-check your URL links in the CSS file. Incorrect file formats can cause problems too. Use web-friendly formats like .woff or .woff2.
Sometimes, fonts load slowly or break layout. Optimize font files by reducing their size. Also, add fallback fonts in your CSS. This keeps text readable if the custom font fails.
Best Practices For Custom Fonts
Adding custom fonts to your WordPress theme can enhance your website’s look. Following best practices ensures these fonts do not slow your site or reduce accessibility. Proper use of fonts helps keep your site fast and easy to use for everyone.
Performance Optimization
Choose font formats that load quickly on all devices. Use only the font weights and styles you need. Limit the number of custom fonts to reduce loading time. Host fonts locally to avoid delays from external servers. Use font-display: swap in CSS to show text while fonts load. Compress font files to make them smaller and faster to download.
Accessibility Considerations
Ensure your custom fonts are easy to read on all screens. Avoid fonts with thin or overly decorative characters. Check font size and spacing for clear visibility. Use web-safe fallbacks in your CSS for unsupported fonts. Test your fonts with screen readers to confirm readability. Keep contrast high between text and background colors.
Credit: www.hostinger.com
Frequently Asked Questions
How Do I Add Custom Fonts To WordPress Themes?
You can add custom fonts by uploading font files to your theme folder. Then, use CSS @font-face rules or plugins like Easy Google Fonts to integrate them.
Can I Use Google Fonts In My WordPress Theme?
Yes, Google Fonts can be easily added through plugins or by embedding their link in your theme’s header. php file.
What File Formats Are Supported For Custom Fonts?
Common supported formats include TTF, OTF, WOFF, and WOFF2. Using WOFF and WOFF2 ensures better web compatibility and faster loading.
Do Custom Fonts Affect Website Loading Speed?
Custom fonts can slightly slow your site. Optimize fonts by using only needed styles and formats to maintain fast load times.
Conclusion
Adding custom fonts to your WordPress theme makes your site stand out. It improves the look and feel for your visitors. You can do this by uploading font files or using Google Fonts. Both methods work well and are easy to follow.
Keep your fonts consistent for a clean design. Changing fonts helps match your brand style better. Try it on your site today and see the difference. Simple steps bring great results. Your website will look more unique and professional.



