Looking to make it easy for visitors to reach you on your WordPress site? Adding a contact form is the simplest way to do that.
But what if you could place that form anywhere on your site with just a small piece of code? That’s where contact form shortcodes come in. You’ll discover how to add a contact form shortcode in WordPress quickly and without any hassle.
By the end, you’ll have the power to connect with your audience effortlessly—keep reading to find out how!
Choose A Contact Form Plugin
Choosing the right contact form plugin is a key step in adding a contact form shortcode in WordPress. The plugin controls how your form looks and works on your website. A good plugin should be easy to use and reliable. It should fit your needs without slowing down your site. Many plugins offer different features. Some are simple, while others have advanced options. Picking the right one helps you create a form that visitors can easily use to contact you.
Popular Plugins To Consider
Several contact form plugins are popular and trusted by many WordPress users. Contact Form 7 is one of the oldest and simplest options. It allows basic form creation and shortcode generation. WPForms is beginner-friendly and offers drag-and-drop form building. Ninja Forms provides free and paid versions with many customization options. Each plugin has unique features. Choose one that matches your skill level and needs.
Installing Your Plugin
To install a contact form plugin, go to your WordPress dashboard. Click on “Plugins” then “Add New.” Use the search bar to find the plugin you want. Click “Install Now” and wait for the process to finish. After installation, click “Activate.” Your plugin is now ready to use. You can start creating your contact form and generate the shortcode.
Create A New Contact Form
Creating a new contact form in WordPress is simple and quick. This form lets visitors send messages directly from your website. You can control the fields and design to match your site’s style. Follow these steps to build a form that works well for you.
Setting Up Basic Fields
Start by adding the main fields your form needs. Most forms include name, email, and message boxes. These fields collect important information from visitors. Use clear labels so users know what to enter. Add required settings to make sure people fill out necessary details. Avoid too many fields to keep the form easy and fast to complete.
Customizing Form Appearance
Make your form look nice and fit your website’s colors. Change font styles and sizes to improve readability. Adjust button colors to stand out but match your design. Some form plugins allow you to add borders or background colors. Keep the layout clean and simple. A neat form encourages more people to contact you.
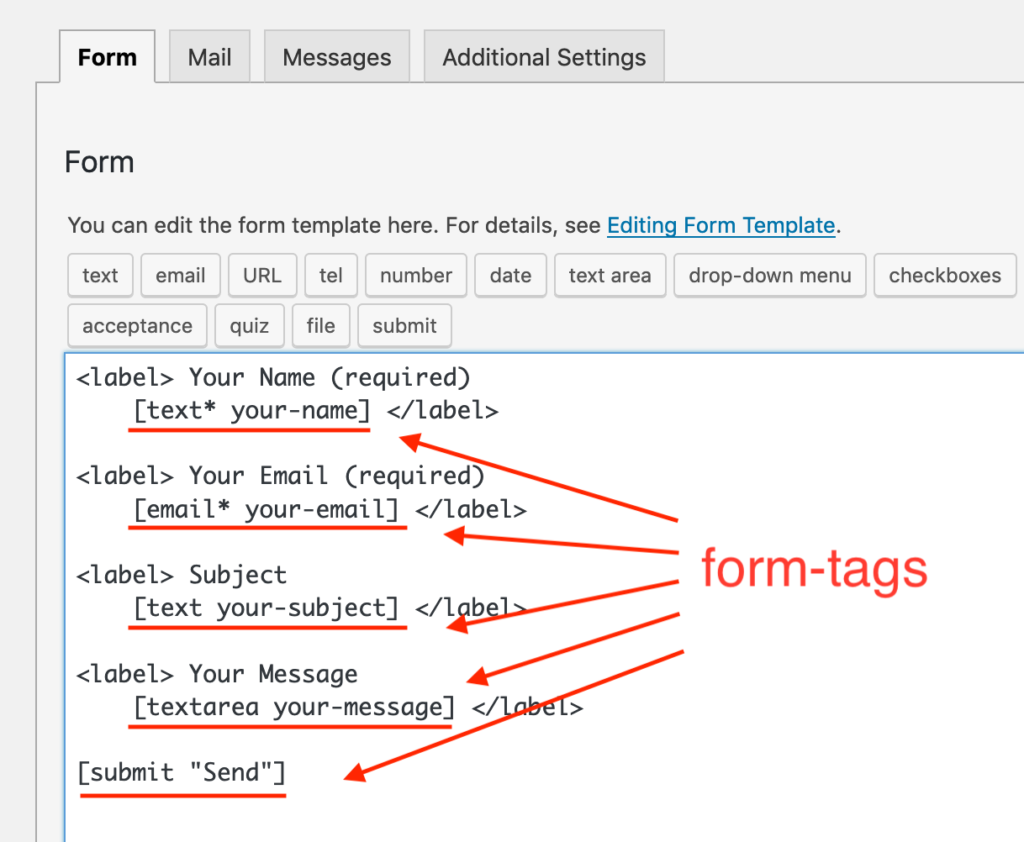
Locate The Contact Form Shortcode
Locating the contact form shortcode in WordPress is a key step to display your form on any page or post. The shortcode acts like a simple code snippet. It tells WordPress where to show your contact form. Without this shortcode, the form will not appear on your site.
Finding and copying the shortcode is quick and easy. It requires just a few clicks inside your WordPress dashboard. Once you have the shortcode, you can paste it anywhere on your site.
Where To Find The Shortcode
Log in to your WordPress dashboard. Go to the “Contact” or “Forms” menu, depending on your plugin. You will see a list of all contact forms you created.
Each form has a shortcode next to its name. This shortcode looks like [contact-form-7 id=”1234″ title=”Contact form 1″].
Note down the shortcode for the form you want to use. This is the code that shows the form on your pages.
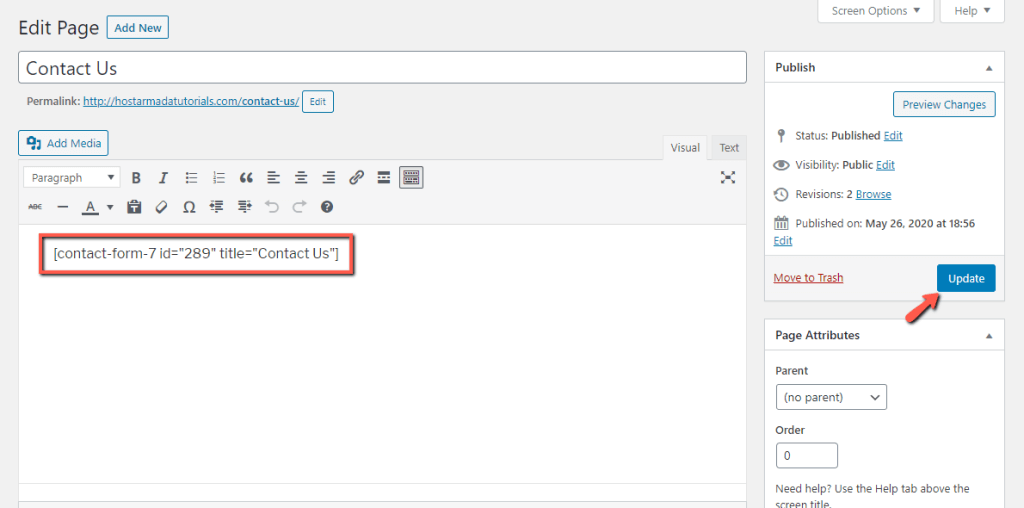
Copying The Shortcode
Click on the shortcode box to select it. Use your mouse or keyboard shortcuts (Ctrl+C or Cmd+C) to copy it.
Make sure you copy the whole shortcode without missing any part. Paste it into the page, post, or widget where you want the form to appear.
Save or update your content. The contact form will show up in that exact place on your website.
Add Shortcode To Pages Or Posts
Adding a contact form shortcode to your WordPress pages or posts is simple. It lets visitors reach you easily without leaving the page. Shortcodes are small pieces of code that show forms where you want.
You can add shortcodes using different editors in WordPress. The two main editors are Gutenberg and Classic. Each editor has a different way to insert shortcodes.
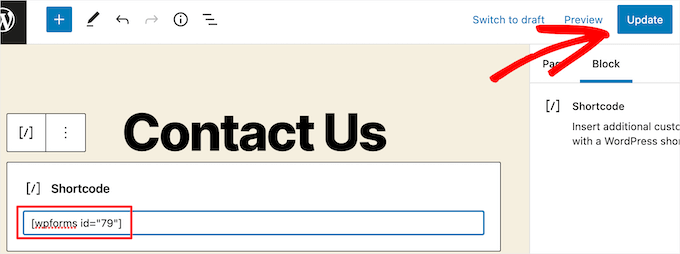
Using Gutenberg Block Editor
Open the page or post in the Gutenberg editor. Click the plus (+) icon to add a new block. Search for the “Shortcode” block and select it. Paste your contact form shortcode into the block. Click “Preview” to see the form. Save or update the page to apply changes.
Inserting Shortcode In Classic Editor
Open the page or post in the Classic editor. Switch to the “Text” tab to see the code view. Paste your shortcode where you want the form to appear. Switch back to the “Visual” tab to check placement. Save or update the post to publish the form.
Add Shortcode To Widgets Or Sidebars
Adding a contact form shortcode to widgets or sidebars helps visitors reach you easily. It places the form in visible areas across your website. This method works well for quick contact options without editing pages directly.
WordPress offers simple ways to insert shortcodes in widget areas. Two common methods are using Text Widgets and Custom HTML Widgets. Both are easy to use and do not require coding skills.
Using Text Widgets
Go to your WordPress dashboard and open Appearance > Widgets. Find the Text widget and drag it to your sidebar or widget area. Paste your contact form shortcode into the text box. Save the changes. The form will appear on your site’s sidebar immediately. This method works well for shortcodes that output simple content.
Using Custom Html Widgets
Access Appearance > Widgets from your dashboard. Select the Custom HTML widget and add it to your desired widget area. Insert the shortcode inside the widget’s content box. Save the widget. This option is best for shortcodes that need HTML support. It ensures the form displays correctly without issues. Both methods provide quick ways to add contact forms to sidebars.
Credit: contactform7.com
Test Your Contact Form
Testing your contact form is a key step after adding the shortcode. It ensures the form works properly and sends messages to your email. Testing helps find errors early and improves user experience.
Try submitting the form as a visitor would. Check if you receive the message quickly and if all fields work correctly. Testing saves time and avoids missed inquiries.
Submitting Test Entries
Fill out the contact form with sample data. Use different names and emails to test variety. Click the submit button and watch for confirmation messages. Verify the email arrives in your inbox. Repeat this several times to confirm consistency.
Troubleshooting Common Issues
No email received? Check your spam or junk folder first. Ensure your email address is correct in the form settings. Clear your website cache and try again. Disable other plugins temporarily to spot conflicts. Confirm your hosting server supports sending emails. These steps fix most contact form problems quickly.
Enhance Contact Form Functionality
Enhancing your contact form’s functionality improves user experience and protects your site. It helps ensure messages are genuine and that you receive important notifications. Simple tools can boost your form’s power without complex coding.
Adding Captcha For Spam Protection
CAPTCHA stops bots from sending fake messages. It adds a simple test users must pass before submitting the form. This filter reduces spam and keeps your inbox clean. Most contact form plugins support easy CAPTCHA integration. Choose a CAPTCHA type, like image or checkbox, and enable it in your form settings.
Integrating Email Notifications
Email notifications alert you when someone sends a message. This feature ensures you never miss an inquiry. Set up your form to send emails to your address automatically. Customize the email content to include all submitted details. Test the notifications to confirm they arrive correctly and promptly.
Credit: hostarmada.com
Credit: www.wpbeginner.com
Frequently Asked Questions
How Do I Find A Contact Form Shortcode In WordPress?
You can find the shortcode in your contact form plugin settings. Navigate to the form list, select your form, and copy the shortcode provided. Paste it into any page or post where you want the form to appear.
Can I Customize A Contact Form Shortcode Appearance?
Yes, many plugins allow customization through settings or CSS. You can change colors, fields, and layout to match your site style. Some plugins offer drag-and-drop editors for easy form customization without coding.
Where Should I Place The Contact Form Shortcode?
Place the shortcode in the content area of any page, post, or widget. Typically, contact pages are best for forms. You can also add it to sidebars or footers using text widgets for better visibility.
Is It Necessary To Use A Plugin For Contact Form Shortcodes?
Yes, most contact form shortcodes come from plugins like Contact Form 7 or WPForms. These plugins generate shortcodes automatically. Without a plugin, you must code the form manually, which is less user-friendly.
Conclusion
Adding a contact form shortcode in WordPress is simple and quick. It helps visitors reach you easily. Just copy the shortcode and paste it where needed. No coding skills are required. This small step improves your website’s interaction. Try it today and see the difference.
Easy to follow and very useful. Your visitors will appreciate the easy way to contact you.