
Are you looking to make your WordPress pages more organized and visually appealing? Adding columns in Elementor is one of the easiest ways to do just that.
Whether you want to split text, images, or other content side by side, columns give your website a clean, professional look. In this guide, you’ll learn exactly how to add columns in Elementor step by step. By the end, you’ll feel confident creating layouts that grab your visitors’ attention and keep them engaged.
Ready to transform your page design? Let’s get started!
Why Add Columns In Elementor
Adding columns in Elementor helps organize your webpage content better. Columns split your page into sections. This makes your site look clean and easy to read. Visitors find the information faster and stay longer on your site.
Columns also improve the design. You can place images, text, and buttons side by side. This creates a balanced and professional look. Using columns lets you control how your page appears on different devices. Your website will look good on phones, tablets, and desktops.
What Columns Do For Page Layout
Columns divide content into separate areas. This stops the page from looking crowded. Each column can hold different types of content. Text goes in one column, images in another. This clear layout helps visitors focus on each part.
How Columns Improve User Experience
Visitors like simple and clear pages. Columns break information into small chunks. It makes reading easier and faster. Users can scan the page and find what they want. This keeps visitors happy and lowers bounce rates.
Why Columns Are Good For Mobile Views
Mobile screens are small. Columns help arrange content neatly on small screens. Elementor allows columns to stack or resize on phones. This keeps your site user-friendly on any device. Visitors enjoy smooth navigation without zooming or scrolling too much.
Credit: elementor.com
Preparing Your Page For Columns
Preparing your page for columns in Elementor sets a strong base for your design. This step ensures your layout looks clean and works well on all devices. Proper preparation helps avoid problems later in the editing process.
Before adding columns, clear unnecessary elements on your page. A tidy workspace makes it easier to focus on your new layout. It also speeds up loading time and editing.
Creating A New Section
Start by creating a new section in Elementor. Sections act as containers for your columns. Choose a full-width or boxed layout based on your design needs.
Click the “+” button to add a new section. Select the structure that fits the number of columns you want. This step is key for organizing content properly.
Setting Section Width And Height
Adjust the width of your section to control how content spreads across the page. Use Elementor’s layout settings to set the section width to full or boxed.
Height settings help control vertical space. Set a minimum height if you want your section to stand out or keep it automatic for natural flow.
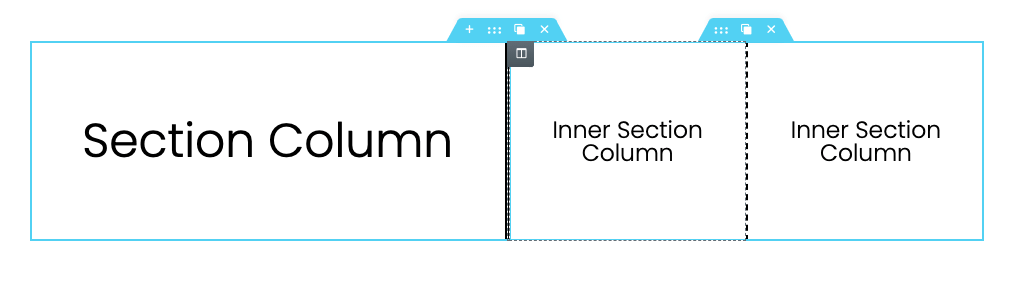
Choosing The Right Column Structure
Pick a column structure that matches your content needs. Elementor offers several presets, like one, two, or three columns.
Balance your content by choosing even or uneven column widths. This choice affects how your page looks and feels.
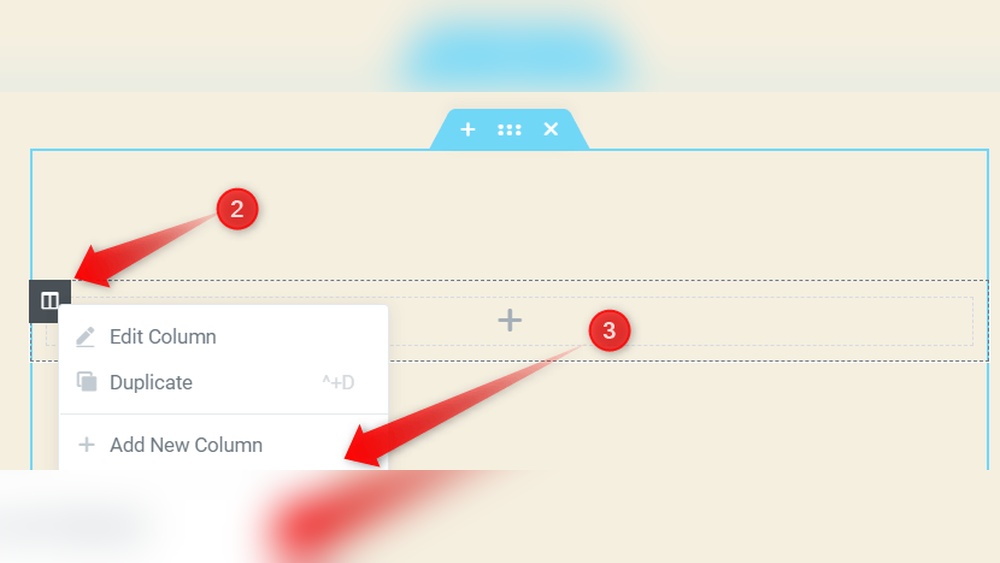
Adding A New Column
Adding a new column in Elementor helps organize your content better. Columns allow you to place text, images, and other elements side by side. This makes your page look clean and professional.
Elementor makes adding columns easy and quick. You do not need any coding skills. Just follow simple steps to create the layout you want.
Using The Elementor Editor
Open the Elementor editor on the page you want to edit. Hover over the section where you want the new column. A small plus icon will appear between existing columns.
Click the plus icon to add a new column. Elementor automatically adds a column next to the existing ones. You can add as many columns as you need.
Adjusting Column Widths
After adding a column, adjust its width to fit your content. Click on the column you want to change. On the left panel, find the width slider or input box.
Drag the slider or enter a percentage to set the width. The total width of all columns in a section should equal 100%. This keeps your layout balanced and neat.
Credit: elementor.com
Customizing Column Layouts
Customizing column layouts in Elementor lets you create clean and organized pages. Columns control how content looks and fits on your site. Adjusting their style helps your site look neat and professional. You can change spacing, padding, backgrounds, and borders easily. These tweaks improve the user experience and make your content stand out.
Spacing And Padding
Spacing controls the space between columns and other elements. Padding adds space inside a column, around its content. Adjusting these helps content breathe and avoids crowding. Elementor offers sliders and number inputs for precise control. Use spacing to separate columns clearly. Padding makes text or images look balanced inside the column. Small changes can make a big difference in layout clarity.
Background And Borders
Backgrounds add color or images behind column content. This helps highlight sections and draw attention. Borders outline columns and define their edges. You can choose colors, thickness, and styles for borders in Elementor. Backgrounds and borders work together to create distinct areas. Use subtle colors for a clean look or bright colors for emphasis. These visual tools guide visitors and improve site flow.
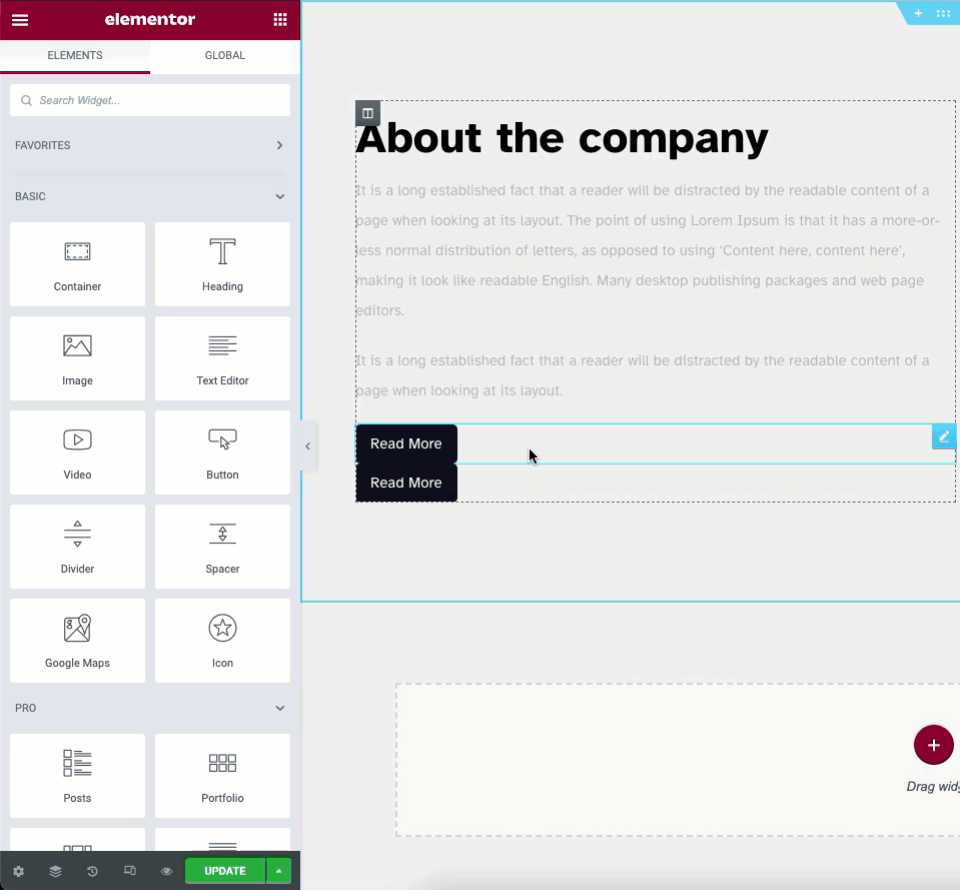
Adding Widgets To Columns
Adding widgets to columns in Elementor is a simple way to customize your website layout. Widgets bring content and functionality inside each column. You can place text, images, buttons, videos, and more.
Each column acts like a container for widgets. Choosing the right widget helps you deliver the message clearly. The drag-and-drop feature makes placing widgets quick and easy.
How To Drag And Drop Widgets
Open Elementor editor and find the widgets panel on the left. Click and hold the widget you want. Drag it over the column area. Release the mouse button to drop the widget inside.
The widget appears immediately inside the column. You can move it later by dragging it again. This lets you arrange content exactly how you want.
Editing Widgets Inside Columns
Click the widget inside the column to open its settings. Change text, colors, sizes, or styles in the panel on the left. Each widget has unique options to customize.
Make sure changes look good on desktop, tablet, and mobile views. Elementor lets you switch views easily for testing.
Adding Multiple Widgets To One Column
You can add more than one widget to a single column. Just drag and drop each widget below the previous one. Widgets stack vertically inside the column by default.
Use spacer or divider widgets to separate content visually. This keeps your layout clean and organized.
Credit: bdthemes.com
Responsive Column Settings
Responsive column settings in Elementor help your website look great on all devices. Columns can adjust size and position depending on the screen size. This keeps your content neat and easy to read on phones, tablets, and desktops.
Making columns responsive improves user experience and keeps visitors engaged. It also helps your site rank better in search engines. Elementor offers simple tools to control how columns behave on different devices.
Mobile Adjustments
Mobile screens are small, so columns need special care. Elementor lets you change column width for mobile views. You can stack columns vertically to fit narrow screens better. This avoids content getting too cramped or tiny.
Use the responsive controls to hide or show columns on mobile. This keeps the page clean and focused. Adjust padding and margins to prevent content from touching screen edges. Small tweaks make big differences on mobile devices.
Tablet Views
Tablets have medium-sized screens, so columns work differently here. Elementor allows you to set custom widths for tablet views. You can create layouts that look balanced and clear on tablets.
Check how columns align and resize on tablets. Adjust spacing between columns for better reading flow. Test your design on a tablet to see real results. Responsive settings help your site feel professional across all devices.
Tips For Stunning Layouts
Creating stunning layouts in Elementor requires more than just adding columns. Thoughtful design choices help your content stand out. Simple tips can make your pages look clean and professional. These tips focus on keeping designs clear and easy to read.
Consistent Design
Keep fonts, colors, and styles uniform across columns. Consistency helps visitors understand your message quickly. Use the same font sizes and colors for headings. Align text and images neatly to create balance. This approach makes your layout look polished and trustworthy.
Using White Space Effectively
White space is the empty area around content. It prevents your design from feeling crowded. Add space between columns for better readability. Leave margins around images and text blocks. This makes each section easy to focus on. White space guides the visitor’s eye smoothly through the page.
Troubleshooting Common Issues
Adding columns in Elementor is usually simple. Still, some common issues may stop the process. This section helps fix these problems quickly. Understanding these problems saves time and frustration.
Problems often come from small errors or settings. Knowing what to check first makes solving faster. Below are typical issues and how to fix them.
Incorrect Column Structure
Sometimes, columns do not appear as expected. This happens when the structure is not set properly. Make sure to select the right column layout in the section settings. Drag and drop columns carefully to keep the layout neat.
Column Width Not Changing
Columns may stay the same size despite changes. This issue occurs if the column width is locked or the section settings override it. Check if the “Column Width” option is unlocked. Also, verify the parent section’s settings to avoid conflicts.
Elements Overlapping In Columns
Overlapping happens when spacing or padding is missing. Adjust the padding inside columns to create space. Use margin settings on widgets to separate elements. This keeps content clear and easy to read.
Changes Not Showing On Live Site
Sometimes edits in Elementor do not appear on the live website. Clear the browser cache first. Also, clear the site cache if using caching plugins. Refresh the page to see updates immediately.
Column Not Responsive On Mobile
Columns can look fine on desktop but break on mobile. Check the responsive settings in Elementor. Adjust column width and padding for mobile views. Test the design on different screen sizes to ensure good display.
Frequently Asked Questions
How Do I Add A New Column In Elementor?
To add a column in Elementor, first select the section. Then click the column icon and choose “Add New Column. ” Adjust its width as needed for your layout.
Can I Customize Column Width In Elementor?
Yes, you can customize column width by dragging the column edges or setting exact percentages in the column layout settings for precise control.
Is It Possible To Add Multiple Columns At Once?
Elementor doesn’t support adding multiple columns simultaneously. You must add columns one by one and then adjust their widths accordingly.
How Do Columns Affect Page Responsiveness In Elementor?
Columns automatically adjust on different devices. You can customize column settings for mobile, tablet, and desktop views individually.
Conclusion
Adding columns in WordPress Elementor is simple and fast. You just need to select the section and choose the column layout. Drag and drop widgets into each column to build your page. This method helps organize content clearly and attractively.
Practicing this will make your website look neat and professional. Keep exploring Elementor’s features to improve your site step by step. You can create layouts that suit your style and needs. Small changes make a big difference in website design.
Try adding columns today and see the results yourself.


