
Are you ready to turn your WordPress site into a smooth, sales-driving machine? Adding a checkout page is the key step that can boost your online store’s success.
But if you’re unsure how to create one that’s simple, secure, and user-friendly, you’re not alone. This guide will walk you through every step to set up your checkout page quickly and easily. By the end, you’ll have the tools to offer your customers a seamless buying experience that keeps them coming back.
Let’s dive in and make your WordPress checkout page work for you!
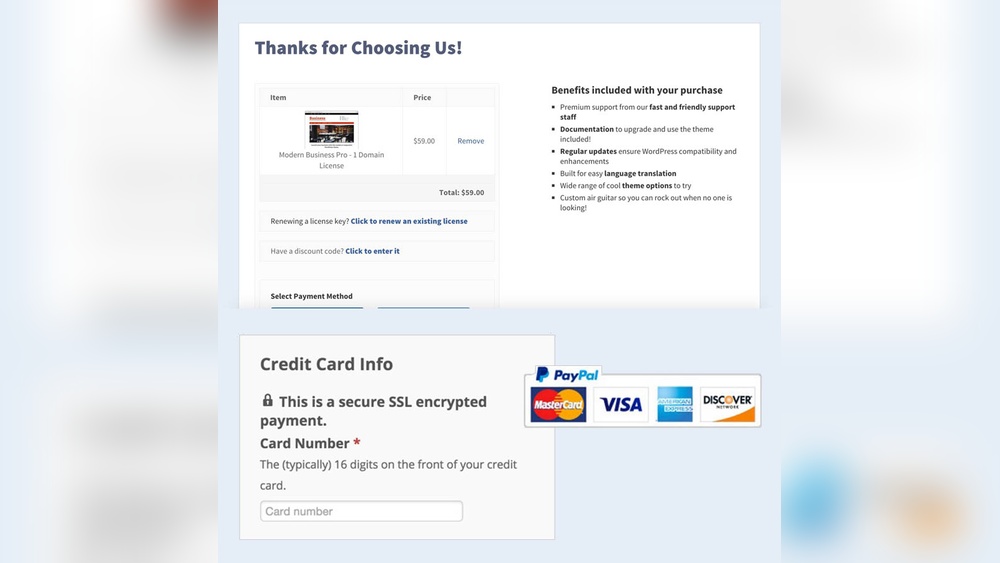
Credit: easydigitaldownloads.com
Choosing The Right Plugin
Choosing the right plugin for your WordPress checkout page is important. The plugin affects how customers pay and how smoothly the process works. Picking the best plugin can help increase sales and reduce abandoned carts. Focus on plugins that fit your needs and site setup.
Popular Checkout Plugins
Several plugins are popular for WordPress checkout pages. WooCommerce is a top choice for many online stores. Easy Digital Downloads works well for selling digital products. WP Simple Pay is good for simple payment forms. These plugins have many users and good support.
Plugin Features To Consider
Look for features that match your business needs. Payment gateway options like PayPal and Stripe are must-haves. Mobile-friendly checkout pages help users on phones. Security features like SSL support keep payments safe. Also, check if the plugin offers coupon codes and tax settings.
Compatibility With Your Theme
The plugin must work smoothly with your WordPress theme. Some plugins may not display properly on certain themes. Test the plugin on your site before full use. Compatibility issues can cause slow loading or broken pages. Pick a plugin that fits your theme without extra tweaks.
Credit: wpsimplepay.com
Setting Up Woocommerce
Setting up WooCommerce is the first step to create a checkout page in WordPress. WooCommerce is a free plugin that turns your site into an online store. It offers many features to sell products easily. You can manage payments, shipping, and taxes all in one place.
This section guides you through installing WooCommerce, configuring its basics, and adding your products. Each step is simple and clear. Follow along to get your store ready fast.
Installing Woocommerce
Log in to your WordPress dashboard. Go to Plugins > Add New. Search for “WooCommerce” in the search bar. Click “Install Now” next to the WooCommerce plugin. Once installed, click “Activate”. The setup wizard will start automatically. It helps you set the main options quickly.
Basic Configuration
Follow the setup wizard to enter your store details. Add your store address, currency, and product types. Choose payment methods like PayPal or Stripe. Set shipping options based on your needs. You can change these settings later anytime. This step makes your store ready to accept orders.
Adding Products
Go to Products > Add New in your dashboard. Enter the product name and description. Upload clear product images. Set the price and stock quantity. Choose product categories to organize your items. Click “Publish” to make the product live. Repeat for all products you want to sell.
Creating A Checkout Page
Creating a checkout page in WordPress is essential for any online store. It allows customers to complete their purchases smoothly. A well-designed checkout page improves user experience and boosts sales.
This section explains how to create a checkout page using WooCommerce. It covers default options, layout customization, and payment setup.
Using Default Woocommerce Checkout
WooCommerce provides a built-in checkout page by default. It includes all necessary fields like billing, shipping, and payment details. You just need to enable WooCommerce and add the checkout page to your menu.
To use the default checkout, go to WooCommerce settings. Under the “Advanced” tab, select the page labeled “Checkout.” This connects the page to WooCommerce automatically.
This option is quick and simple. It works well for most basic online stores without extra customization.
Customizing The Checkout Layout
Customizing the checkout page helps match your site’s style. You can rearrange fields or add new ones for better user flow. Many themes support WooCommerce customization features.
Use page builders like Elementor or Divi to design the checkout page visually. These tools offer drag-and-drop elements and styling options. They make the process easy for beginners.
Custom code can also adjust the checkout layout. Adding or removing form fields improves user experience. Keep the page clean and simple to avoid confusion.
Adding Payment Gateways
Payment gateways let customers pay securely on your site. WooCommerce supports many popular gateways like PayPal, Stripe, and Square. You can install plugins to add these options.
After installing a payment gateway plugin, configure it in WooCommerce settings under “Payments.” Enter your account details and enable the gateway.
Offer multiple payment methods to increase customer trust. Test each gateway to ensure smooth transactions before launching.
Customizing Checkout Fields
Customizing checkout fields helps improve the shopping experience. It lets you collect the right information from customers. You can add new fields or remove ones that are not needed. Tailoring the checkout form makes it simpler and faster for buyers.
Adding New Fields
You can add extra fields to gather specific details. For example, ask for a phone number or delivery instructions. This helps in better order handling and communication. Use simple labels and keep the form clean. Avoid asking for too much information to prevent delays.
Removing Unnecessary Fields
Remove fields that do not apply to your business. This makes the checkout faster and less confusing. For instance, if you do not ship internationally, remove the country field. Keep only the essential fields to reduce cart abandonment. A shorter form encourages customers to complete their purchase.
Using Plugins For Field Customization
Plugins make it easy to customize checkout fields without coding. Many plugins offer drag-and-drop interfaces for quick changes. Choose plugins that are compatible with your WordPress theme. Always test the checkout after adding or removing fields. Plugins save time and avoid technical errors.
Optimizing Checkout Experience
Optimizing the checkout experience is key for any online store. A smooth checkout helps customers finish their purchase faster. It reduces frustration and builds trust. This section covers ways to make your WordPress checkout page better for users. Simple changes can bring big results.
Improving Page Load Speed
Fast loading pages keep customers happy. Slow checkout pages cause users to leave. Use lightweight themes and plugins on your WordPress site. Compress images and enable browser caching. Choose a reliable hosting service. Test your page speed regularly and fix issues quickly.
Mobile-friendly Design
Many customers shop on phones or tablets. A mobile-friendly checkout page is essential. Use responsive design so the page fits all screen sizes. Make buttons big and easy to tap. Keep forms short and simple. Avoid pop-ups that block the screen. Test the checkout on different devices.
Reducing Cart Abandonment
Cart abandonment means lost sales. Make the checkout clear and easy to understand. Show all costs upfront, including shipping and taxes. Offer multiple payment options. Provide guest checkout to avoid forcing account creation. Send reminder emails for unfinished purchases. Build trust with security badges and clear policies.
Credit: easydigitaldownloads.com
Testing Your Checkout Page
Testing your checkout page is a key step before going live. It ensures everything works smoothly and customers can buy without problems.
Check every part of the checkout process carefully. Fix any issues found to avoid losing sales and unhappy buyers.
Placing Test Orders
Make a fake purchase to see how the checkout works. Use test payment methods to avoid real charges.
Follow the entire process from adding items to completing payment. Watch for errors or confusing steps.
Checking Payment Processing
Verify that payment gateways accept test payments correctly. Confirm orders update in your system after payment.
Check email notifications for order confirmation and payment receipt. Ensure customers get clear messages after checkout.
Troubleshooting Common Issues
Look for errors like missing fields or broken buttons. Fix slow loading times and page layout problems.
Use debugging tools or plugin support to solve issues. Test again after each fix to confirm the problem is gone.
Enhancing Security Measures
Enhancing security measures is key to building trust on your WordPress checkout page. Safe transactions protect your customers and your business. Strong security lowers the risk of fraud and data theft. It also helps your site rank better in search engines. Follow these steps to improve your checkout page security.
Ssl Certificates
SSL certificates create a secure link between your website and visitors. This link encrypts data, stopping hackers from stealing it. Most browsers show a padlock icon for SSL-secured sites. This icon reassures customers your site is safe. You can get SSL certificates from hosting providers or free services like Let’s Encrypt.
Secure Payment Gateways
Use trusted payment gateways like PayPal, Stripe, or Square. These gateways handle payment details safely outside your site. They follow strict security rules and keep customer info private. Integrate payment gateways with WordPress plugins for smooth checkout. This reduces risks and improves user experience.
Protecting Customer Data
Limit the data you collect to only what is needed. Store customer data securely using encryption and strong passwords. Regularly update WordPress, themes, and plugins to fix security holes. Use security plugins to monitor threats and block attacks. Clear privacy policies also build customer confidence.
Frequently Asked Questions
How Do I Create A Checkout Page In WordPress?
To create a checkout page, use a plugin like WooCommerce. Install it, then enable the checkout page in settings. Customize the page with your payment options and design.
Which Plugin Is Best For WordPress Checkout Pages?
WooCommerce is the most popular and reliable plugin for WordPress checkout pages. It supports multiple payment gateways and is easy to customize.
Can I Customize The WordPress Checkout Page Design?
Yes, you can customize the checkout page using page builders or WooCommerce hooks. This allows you to change layouts, colors, and fields easily.
How To Add Payment Gateways To WordPress Checkout?
Install payment gateway plugins compatible with WooCommerce. Configure settings like API keys and currency. This enables secure payment processing on your checkout page.
Conclusion
Adding a checkout page to WordPress is simple and clear. Follow the steps carefully and test your page. A smooth checkout helps customers complete purchases fast. Keep your page clean and easy to use. Check for errors before going live.
A good checkout page builds trust and boosts sales. Practice these tips to improve your online store. Start now and see the difference yourself.


