
Are you looking to make your WordPress blog easier to navigate? Adding a clear and simple blog menu can help your visitors find what they want quickly.
When your readers can easily explore your content, they stay longer and come back more often. In this guide, you’ll learn exactly how to add a blog menu in WordPress—step by step, without any confusion. By the end, your blog will look more professional and feel more welcoming.
Ready to improve your site and keep your audience engaged? Let’s dive in!
Choose The Right Menu Location
Choosing the right menu location is important for your WordPress blog. It helps visitors find your posts easily. The menu should be visible and easy to use. A well-placed menu improves the user experience. This section guides you through selecting the best spot for your blog menu.
Explore Default Menu Spots
WordPress themes come with default menu locations. Common spots include the header, footer, and sidebar. The header menu is the most popular choice. It stays at the top and is easy to see. Footer menus work well for extra links. Sidebars offer a vertical menu option. Check these areas to decide where your menu fits best.
Check Theme Compatibility
Not all themes support the same menu locations. Some themes have limited spots for menus. Open your WordPress dashboard and go to Appearance > Menus. Look for “Manage Locations” tab. It shows available menu positions for your theme. Pick a location that matches your blog style. This ensures your menu works without issues.
Create A New Blog Menu
Creating a new blog menu in WordPress helps organize your content clearly. It makes it easier for visitors to find your posts and pages. A well-structured menu improves user experience and keeps readers engaged. Follow simple steps to set up your blog menu quickly.
Access WordPress Menu Settings
Log in to your WordPress dashboard first. On the left side, find the “Appearance” option. Click on it, then select “Menus” from the dropdown. This section lets you create and manage your website menus. You can build a new menu or edit an existing one here.
Add Menu Items
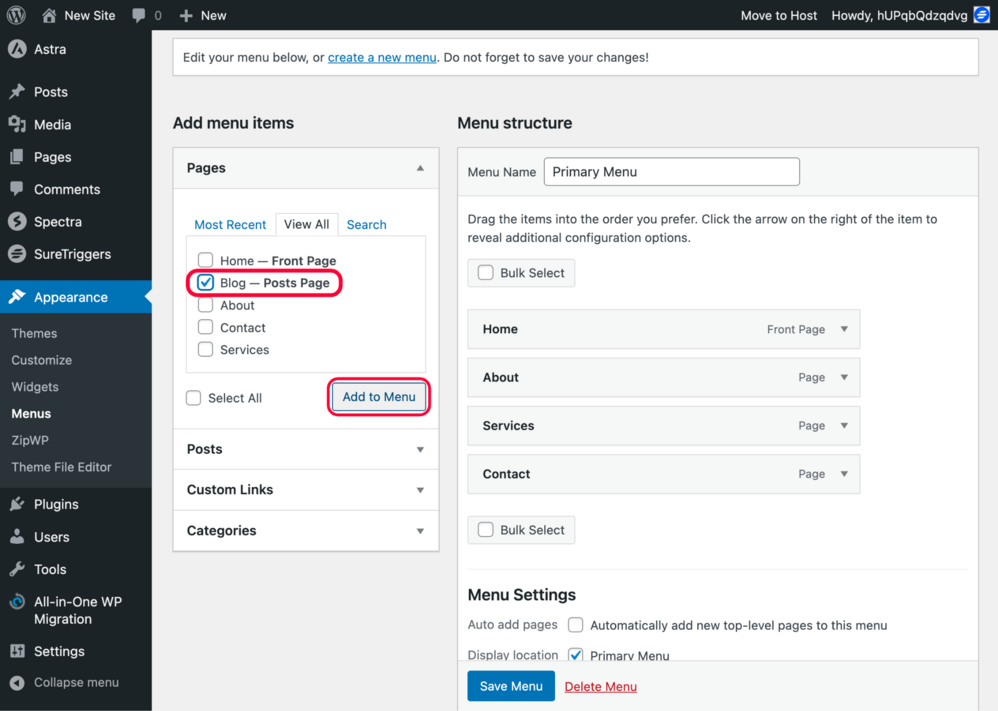
To add items, look at the left panel in the Menus page. You will see options like Pages, Posts, Custom Links, and Categories. Choose the type of item you want to add. Check the boxes next to the items you want in your menu. Click the “Add to Menu” button. The items will appear on the right side under Menu Structure. Drag and drop them to arrange their order. Save the menu once you finish organizing it.
Organize Menu Structure
Organizing your blog menu structure is important for easy navigation. A clear menu helps visitors find content fast. It also improves your site’s user experience. Keep your menu simple and neat. Group related items together. This way, readers can browse without confusion.
Arrange Menu Items
Start by listing all main pages and categories. Put the most important ones at the top. Drag and drop menu items to reorder them. Think about what visitors want to see first. Avoid clutter by limiting the number of top-level items. A clean menu makes your blog look professional.
Create Submenus
Submenus help organize related topics under one heading. To create a submenu, drag a menu item slightly to the right under a main item. This nests it as a child item. Use submenus to group posts by category or topic. This keeps your main menu tidy and easy to scan. Visitors can explore deeper content without feeling lost.
Credit: zipwp.com
Assign Menu To Display Area
Assigning your blog menu to a display area is a simple step in WordPress. It tells your site where the menu should appear. This helps visitors find your blog easily.
WordPress themes have specific places for menus. These places are called menu locations. You must pick one to show your blog menu on the site.
Select Menu Location
Go to the WordPress dashboard. Click on Appearance, then Menus. Find the menu you created for your blog.
Look for the section labeled “Menu Settings” or “Display Location.” Here, you see options like Primary, Footer, or Sidebar.
Choose the location that best fits your blog. Usually, the Primary menu is at the top of your site. This is a common choice for blog menus.
Save Menu Settings
After selecting the menu location, scroll down to find the Save button. Click it to keep your changes.
Saving updates your site to show the blog menu where you want. Always save before leaving the page.
Check your website to confirm the blog menu appears in the chosen place. This ensures visitors can navigate your content easily.
Customize Menu Appearance
Customizing the menu appearance in WordPress helps your blog look unique. A well-styled menu improves user experience. Visitors can find content easily. This section explains simple ways to change your menu’s look.
Use Theme Customizer
The Theme Customizer lets you change menu styles without coding. You can access it from your WordPress dashboard. Go to Appearance > Customize. Find the Menu or Header section.
Here, you can adjust colors, fonts, and spacing. Some themes allow you to change menu layout. Preview your changes live before saving. This tool makes styling menus easy for beginners.
Add Css For Styling
Adding CSS lets you design menus with more control. Use the Additional CSS area in the Customizer. Write simple CSS code to change colors or fonts.
For example, change menu background or text size. You can also add hover effects for links. Make sure to test on desktop and mobile. CSS customization helps create a menu that matches your blog’s style perfectly.

Credit: www.youtube.com
Add Blog Menu To Widgets
Adding a blog menu to your WordPress widgets makes your site easier to navigate. Visitors can find your blog posts quickly. Widgets show menus in sidebars or footers. This section explains how to add a blog menu using widgets. Follow simple steps to set up your menu in visible areas of your site.
Use Navigation Menu Widget
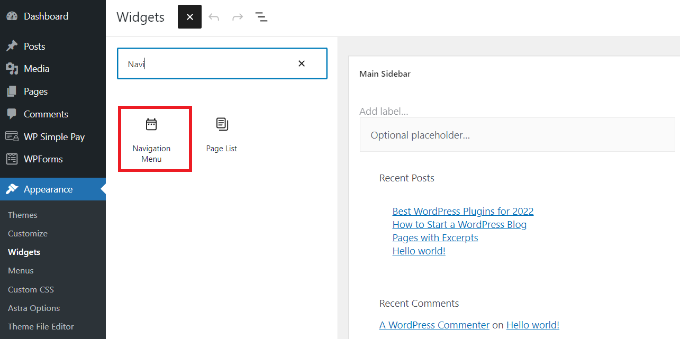
Go to your WordPress dashboard and open the Appearance menu. Click on Widgets to see available widget options. Find the Navigation Menu widget and drag it to your desired widget area. Choose the blog menu you created from the dropdown list. Save your changes to activate the menu in that widget.
Place Widget In Sidebar Or Footer
Sidebars and footers are common places for blog menus. They stay visible as visitors browse your site. Drag the Navigation Menu widget to the sidebar or footer area in the Widgets page. Adjust the widget title to something clear like “Blog” or “Latest Posts.” Save the setup and check your site. The blog menu will now appear where you placed the widget.
Test And Troubleshoot
Testing and troubleshooting your blog menu ensures it works well for all visitors. A smooth menu improves user experience and keeps readers on your site. Checking your menu carefully helps spot problems early. Fixing issues fast keeps your blog professional and easy to navigate.
Check Menu On Different Devices
Test your menu on phones, tablets, and desktops. Each device shows menus differently. Make sure the menu looks right on small and large screens. Try clicking all links to confirm they work. Check for overlapping text or broken layouts. Use browser tools to simulate devices if you lack physical ones.
Fix Common Issues
Menus may not show due to theme conflicts or wrong settings. Clear your site cache if changes don’t appear. Disable plugins one by one to find conflicts. Check that you assigned the menu to the correct location. Update WordPress and themes to avoid bugs. Use default themes to test if the menu appears correctly.
Credit: www.wpbeginner.com
Frequently Asked Questions
How Do I Create A Blog Menu In WordPress?
To create a blog menu, go to Appearance > Menus in your WordPress dashboard. Add pages or categories, then save the menu. Assign it to a location like the primary menu for it to display on your site.
Can I Add Categories To My WordPress Blog Menu?
Yes, you can add categories to your blog menu. In the Menus section, select Categories, choose the ones you want, and click “Add to Menu. ” This helps visitors easily find related blog posts by topic.
How To Customize Blog Menu Items In WordPress?
After adding items to your menu, drag and drop to reorder them. Click the arrow on each item to edit its label or URL. Save changes to update your blog menu’s appearance and navigation structure instantly.
Where Do Blog Menus Appear On WordPress Sites?
Blog menus usually appear in the header, footer, or sidebar, depending on your theme. Assign the menu to a location under Menu Settings to control where it shows for easy visitor navigation.
Conclusion
Adding a blog menu in WordPress helps visitors find your posts easily. It improves your site’s navigation and user experience. You can create a menu quickly from the dashboard without coding. Keeping menus simple and clear works best for all users.
Try organizing your blog categories logically for smooth browsing. Regularly update the menu as your blog grows. This small step makes your website more professional and user-friendly. Start adding your blog menu today to help readers explore your content better.


