
Are you ready to expand your digital presence by adding another domain to your Namecheap hosting? Whether you’re launching a new website or just looking to manage multiple domains seamlessly, Namecheap makes it easy.
However, navigating the process can seem daunting at first. Don’t worry; you’re not alone. Many users face the same challenge, and with the right guidance, you’ll be up and running in no time. Imagine the possibilities of having all your domains under one roof, simplifying your management tasks and boosting your online strategy.
We’ll guide you step-by-step through the process, ensuring you understand each part and feel confident in your ability to handle your hosting needs efficiently. Are you ready to unlock the full potential of your Namecheap hosting? Let’s dive in!
Setting Up A New Domain
Adding a new domain to your Namecheap hosting is easy and rewarding. This process allows you to manage multiple websites from a single account. You’ll gain more flexibility and control over your online presence. Follow the steps below to get started.
Understand Your Hosting Plan
Check your current hosting plan. Ensure it supports multiple domains. Most Namecheap plans allow this feature, but it’s good to confirm. Look for options like shared hosting or business hosting plans.
Log Into Your Namecheap Account
Visit Namecheap’s website. Enter your username and password to log in. If you forgot your password, use the recovery option. Access your dashboard once logged in.
Select The Domain Section
Navigate to the domains section in your account. This area shows all your registered domains. Find the option to add a new domain. Click it to proceed.
Enter Your New Domain Name
Type the domain name you want to add. Make sure it’s spelled correctly. Double-check for any typos or errors. This step is crucial for accurate setup.
Configure Dns Settings
Set up DNS settings for your new domain. Choose between Namecheap’s DNS or custom DNS. This determines how your domain connects to your website. Follow the instructions provided on screen.
Verify Domain Ownership
You might need to verify domain ownership. Namecheap will guide you through this process. It often involves email confirmation or DNS record changes. Complete verification to finalize domain setup.
Test Your New Domain
Check if your new domain is active. Open a web browser and enter your domain name. Ensure it directs to the correct website. Fix any issues that arise during testing.
Credit: www.namecheap.com
Configuring Dns Settings
Setting up DNS settings is crucial for adding a new domain. It ensures your domain connects correctly to Namecheap hosting. These settings control how your domain is found on the internet. A proper configuration leads to a smooth experience for your visitors. Let’s dive into the process of configuring DNS settings for your domain.
Accessing The Domain Management Panel
Log in to your Namecheap account. Navigate to the “Domain List” section. Click the “Manage” button next to the domain you want to configure. This action opens the Domain Management Panel.
Understanding Dns Records
DNS records are like signposts for your domain. They guide internet traffic to the correct destination. Common DNS records include A, CNAME, MX, and TXT. Each type serves a unique purpose.
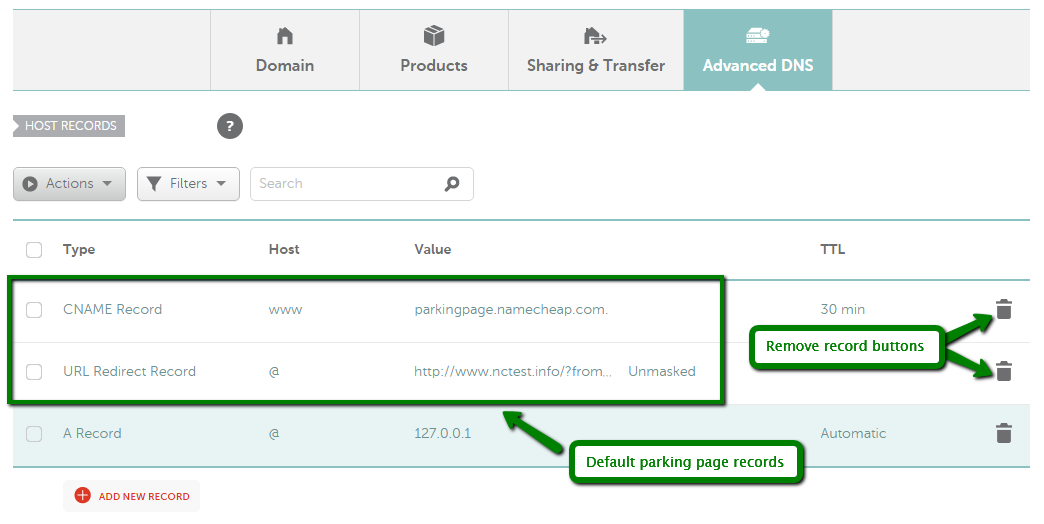
Adding An A Record
To add an A Record, go to the “Advanced DNS” tab. Click “Add New Record.” Select “A Record” from the dropdown menu. Enter your IP address in the “Value” field. Save your changes to update the DNS settings.
Setting Up Cname Records
To configure a CNAME record, click “Add New Record.” Choose “CNAME Record” from the list. Enter the desired subdomain and target domain. Save the configuration to apply the settings.
Configuring Mx Records For Email
MX records manage your domain’s email routing. Add a new MX record for email services. Enter the mail server address and priority. Save the changes to finalize the setup.
Verifying Dns Propagation
DNS changes can take time to propagate. Use online tools to check DNS propagation status. Ensure all records are updated and active. This step confirms the successful configuration of your DNS settings.
Linking Domain To Hosting Account
Linking your domain to your Namecheap hosting account is a crucial step. This connection allows your website to go live on the internet. Without it, your visitors can’t access your site. Let’s explore how to efficiently link your domain to your hosting.
Understanding Domain And Hosting
Domains are your website’s address on the web. Hosting is where your website’s files reside. Connecting them makes your site accessible online. Namecheap provides a simple process for linking domains to hosting accounts.
Accessing Namecheap Dashboard
Log into your Namecheap account. Navigate to the “Dashboard” section. Here, you manage your domains and hosting services. A user-friendly interface helps you find what you need quickly.
Locate Your Domain List
In the dashboard, select “Domain List”. This section displays all your registered domains. Choose the domain you want to link to your hosting account. You can click on the domain name to proceed.
Choose The Hosting Option
After selecting your domain, look for the “Manage” button. Click it to reveal domain settings. Find the “Nameservers” tab. This is where you connect your domain to your hosting account.
Set Nameservers
In the “Nameservers” tab, select “Namecheap Web Hosting DNS”. This option links your domain to Namecheap hosting. After selecting, save your changes. This action makes your domain point to your hosting account.
Verify Domain Connection
Check your domain connection by visiting your website URL. Ensure it loads correctly. If it doesn’t, revisit the steps. Sometimes, DNS changes take time to propagate. Wait a few hours and try again.
Credit: help.mailgun.com

Credit: www.youtube.com
Frequently Asked Questions
How Do I Add Another Domain On Namecheap?
Log into your Namecheap account. Go to the “Dashboard” and select “Domain List. ” Click “Add Domain” and follow the prompts to enter your domain details. Complete the process by confirming and saving your changes.
How Do I Add Another Domain To My Hosting?
Log into your hosting account. Navigate to the domain management section. Select “Add New Domain. ” Enter your domain details, then confirm. Ensure DNS settings are correct for proper functionality.
Can I Have Multiple Domains On One Hosting Account?
Yes, many hosting providers allow multiple domains on one account. Check your hosting plan for specific limits. Using multiple domains can simplify management and reduce costs. Ensure your plan supports the features you need for each domain. Always review the terms and conditions.
How Many Domains Can I Host On Namecheap?
You can host unlimited domains on Namecheap’s Shared Hosting plans. For VPS or Dedicated Servers, the limit depends on server capacity. Always check specific hosting plan details for precise limits.
Conclusion
Adding another domain to Namecheap hosting is simple and straightforward. Follow the steps carefully. Ensure each detail is correct. Double-check your entries. Mistakes can cause issues later. Manage your domains easily with Namecheap. The process is user-friendly. Save time and effort with this guide.
Enjoy the benefits of multiple domains. Expand your online presence. Reach more people with your content. Experiment with different ideas. Host them all under one account. Efficient and convenient. Perfect for growing businesses. Boost your online capabilities today.


