

Want to make your WordPress site more engaging? Adding an Instagram widget is one of the easiest ways to showcase your latest photos and connect with your visitors.
Imagine your website coming alive with fresh, eye-catching content that updates automatically. In this guide, you’ll discover simple steps to add an Instagram widget to your WordPress site—no tech skills needed. Keep reading, and you’ll learn how to boost your site’s look and keep your audience coming back for more.
Choosing The Right Instagram Widget
Choosing the right Instagram widget for your WordPress site is key to a smooth experience. The widget should fit your needs and match your website’s style. This choice affects how visitors see your Instagram feed and interact with it. Picking the wrong widget might slow down your site or cause display issues.
Consider your budget, desired features, and theme compatibility. These factors help you select a widget that works well and looks great.
Free Vs Paid Widgets
Free Instagram widgets offer basic features. They let you show your feed but may limit customization. Updates and support might be slow or missing. Paid widgets provide more options and better support. You get advanced layouts, filters, and faster updates. Think about how much control you want over the widget. Choose the type that fits your website goals and budget.
Key Features To Look For
Look for easy setup and user-friendly controls. The widget should update your Instagram feed automatically. Mobile responsiveness is crucial for visitors on phones. Check if the widget allows customization of colors and layouts. Features like lightbox view or hashtag filtering add value. Make sure the widget loads quickly to keep your site fast. A clean, simple design helps keep visitors focused on your content.
Compatibility With WordPress Themes
Not all widgets work well with every WordPress theme. Choose a widget that matches your theme’s style and code. Test the widget on your site before finalizing it. Look for widgets that support popular page builders if you use one. Compatibility ensures your Instagram feed displays correctly and looks good. Avoid widgets that cause conflicts or slow down your site. A smooth fit improves user experience and keeps your site stable.
Preparing Your Instagram Account
Preparing your Instagram account is the first step to add an Instagram widget to WordPress. Your account needs specific settings to connect with your website. This part explains how to get your Instagram ready for the widget.
Switching To A Business Profile
A Business Profile gives you access to Instagram’s API. This is necessary for the widget to work. Open the Instagram app and go to your profile. Tap the menu icon, then Settings. Find Account and select Switch to Professional Account. Choose Business and follow the prompts. Your profile now supports the widget features.
Generating An Access Token
An Access Token links your Instagram to WordPress. It acts like a key for the widget. To get it, use an Instagram developer tool or a trusted plugin. Log in with your Instagram Business Profile. Allow permissions to access your account data. Copy the Access Token and keep it safe. You will need it when setting up the widget.
Setting Up Privacy Settings
Privacy settings control what the widget can show. Make sure your posts are public. Private accounts cannot display content on websites. Check your profile’s privacy settings in the Instagram app. Turn off the Private Account option if it is on. This lets your posts appear on the WordPress site without issues.
Installing The Instagram Widget Plugin
Installing the Instagram widget plugin on your WordPress site is the first step to show your Instagram photos. The plugin connects your Instagram account to your website. It helps you display your latest posts in a clean and attractive way. This process is simple and takes only a few minutes.
Searching And Installing Plugins
Go to your WordPress dashboard. Find the “Plugins” menu on the left side. Click “Add New” to open the plugin library. Use the search bar to type “Instagram widget.” Look for a plugin with good reviews and regular updates. Click “Install Now” next to the plugin you want. Wait a few moments while WordPress downloads and installs it.
Activating The Plugin
After installation, click the “Activate” button. Activation makes the plugin ready to use. You may find a new menu or settings page in your dashboard. Follow the plugin instructions to connect your Instagram account. Usually, this means logging into Instagram and allowing access.
Common Installation Issues
Sometimes plugins don’t install or activate properly. This can happen due to conflicts with other plugins or themes. Check your WordPress version; some plugins need the latest update. Make sure your internet connection is stable during installation. If you see error messages, note them down. Search online for solutions or ask for help in forums.
Credit: www.wpzoom.com
Configuring The Widget Settings
Configuring the widget settings is a key step to display your Instagram feed correctly. This process lets you control what your visitors see. Adjusting settings makes the widget fit your website design and goals. Follow these steps to set up your Instagram widget effectively.
Connecting Your Instagram Account
Start by linking your Instagram account to the widget. Enter your Instagram username or log in using the widget interface. This step allows the widget to fetch your latest posts. Ensure you give the necessary permissions for access. A successful connection shows your real Instagram feed on your site.
Customizing Display Options
Choose what content you want to show from your Instagram. Select between photos, videos, or both. Set filters to display specific hashtags or user tags. Decide how many posts appear in the widget. Tailoring these options helps keep your feed relevant and engaging.
Adjusting Layout And Style
Pick the layout that matches your website’s look. Options usually include grid, carousel, or list views. Change the number of columns and rows for better spacing. Customize colors, borders, and fonts to blend with your site’s theme. These style tweaks improve user experience and visual appeal.
Adding The Widget To Your WordPress Site
Adding an Instagram widget to your WordPress site helps display your latest photos. It keeps your visitors engaged and shows your social activity. There are several ways to add this widget to your site. Each method fits different needs and skill levels. Choose the one that works best for your site’s design and your comfort with WordPress.
Using The Widget Area
Most WordPress themes have widget areas in sidebars or footers. Navigate to the Appearance > Widgets section in your WordPress dashboard. Find the Instagram widget from the list. Drag and drop it into your preferred widget area. Enter your Instagram username or access token as required. Save the changes and check your site to see the widget live.
Inserting Via Shortcodes
Some Instagram plugins generate shortcodes for easy placement. Copy the shortcode provided by the plugin. Go to the WordPress dashboard and open the page or post editor. Paste the shortcode into the content where you want the widget to appear. Update or publish the page. The Instagram feed will display in that spot without extra coding.
Embedding In Pages Or Posts
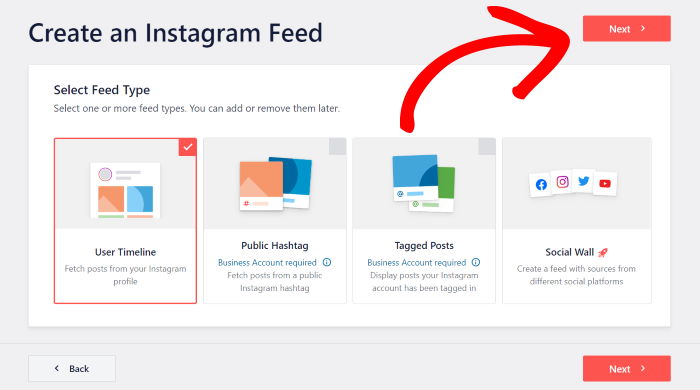
Embedding code from Instagram or plugins allows precise control. Get the embed code from the plugin settings or Instagram itself. Open the WordPress editor for the desired page or post. Switch to the HTML or code view. Paste the embed code directly where the feed should show. Save the changes and preview your page to confirm the feed works.
Credit: smashballoon.com
Troubleshooting Common Problems
Adding an Instagram widget to your WordPress site is easy. Sometimes, problems can appear. These issues stop the widget from showing or working right. This section helps fix common problems fast. Follow simple steps to get the widget running again.
Widget Not Displaying
Check if the widget is active in the WordPress dashboard. Sometimes, it may be turned off by mistake. Clear your browser cache and refresh the page. Slow internet can also delay the widget from loading. Make sure your Instagram account is public. Private accounts often block the widget display.
Api Connection Errors
API errors happen when WordPress cannot talk to Instagram. Check if your access token is still valid. Tokens can expire or be revoked. Reconnect your Instagram account in the plugin settings. Make sure you use the right Instagram API version. Using old versions causes connection problems.
Updating Plugins And Themes
Outdated plugins or themes may cause the widget to break. Always keep your Instagram widget plugin updated. Update your WordPress theme too, as it affects plugin performance. Before updating, back up your website to avoid data loss. After updates, clear your site cache to see changes.
Boosting Engagement With Your Instagram Feed
Showing your Instagram feed on your WordPress site can help visitors connect with your brand. It makes your site feel active and social. This connection can lead to more followers and interaction on Instagram. Engaging your audience through your feed builds trust and loyalty. A well-placed Instagram widget keeps your content fresh and invites users to explore more.
Best Placement For Visibility
Place your Instagram widget where visitors notice it fast. Sidebars and footers are common spots. The top of your homepage works well too. Choose a location that fits your site design. Make sure the widget does not block important content. Clear visibility encourages clicks and follows.
Encouraging Followers From Your Site
Invite visitors to follow you on Instagram. Use short, friendly messages near the widget. Show your latest posts to spark interest. Highlight special offers or behind-the-scenes content. Make following easy with a clear follow button. Friendly prompts can increase your follower count.
Combining With Other Social Media Widgets
Show more than Instagram to widen your reach. Add Facebook, Twitter, or LinkedIn widgets alongside. This mix attracts different user groups. Keep the design simple and balanced. Too many widgets can confuse visitors. A clean layout helps users find your social links quickly.

Credit: qodeinteractive.com
Frequently Asked Questions
How Do I Add An Instagram Widget To WordPress?
To add an Instagram widget, install a plugin like “Smash Balloon. ” Connect your Instagram account and customize the display settings. Then, add the widget to your sidebar or footer via WordPress Appearance > Widgets.
Which Plugin Is Best For Instagram Widgets On WordPress?
Smash Balloon Instagram Feed is highly recommended. It offers easy setup, customization, and responsive design. It works well for both personal and business accounts, ensuring a seamless Instagram feed display.
Can I Customize Instagram Widget Appearance In WordPress?
Yes, most plugins let you customize widget layout, colors, and post count. You can match your site’s design and enhance user engagement with flexible styling options.
Is It Possible To Display Instagram Stories On WordPress Widgets?
Some advanced plugins support Instagram stories integration. However, basic Instagram feed widgets usually show only posts. Check plugin features to ensure story display is available.
Conclusion
Adding an Instagram widget to your WordPress site is simple and effective. It helps show your latest posts directly on your website. You can choose from many plugins or use Instagram’s embed code. This makes your site more lively and keeps visitors interested.
Regular updates from your Instagram feed keep content fresh. Just follow the steps carefully, and your widget will work smoothly. Start sharing your Instagram photos on your site today. It boosts your online presence without extra effort. Simple, clear, and useful for your visitors.



