
Are you looking to make your WordPress site easier to navigate? Adding a page to your WordPress menu is one of the simplest ways to guide visitors exactly where you want them to go.
Imagine your visitors finding important information with just a click—no confusion, no hassle. You’ll discover clear, step-by-step instructions to add pages to your menu quickly and effortlessly. By the end, you’ll have a smooth, organized menu that keeps your audience engaged and coming back for more.
Let’s get started!
Accessing The WordPress Dashboard
Accessing the WordPress dashboard is the first step to adding a page to your menu. The dashboard is the control center for your website. It lets you manage pages, posts, menus, and many other settings.
Getting to the dashboard is quick and easy. You just need to log in with your username and password. After that, you can start customizing your site right away.
How To Log In To Your WordPress Site
Open your web browser and go to your WordPress login page. Usually, this is your website URL followed by /wp-admin or /login. Enter your username and password on the login screen. Then click the “Log In” button to enter the dashboard.
Understanding The WordPress Dashboard Layout
The dashboard has a menu on the left side. This menu helps you find different sections like Pages, Posts, and Appearance. The main area in the center shows recent activity and quick links. You can explore each part to get familiar with its functions.
Basic Dashboard Features To Know
Look for the “Pages” section to manage your website pages. The “Appearance” section lets you edit menus and themes. The top bar gives access to your profile and quick settings. These features help you control your website easily.

Credit: www.youtube.com
Navigating To The Menu Settings
Finding the menu settings in WordPress is the first step to customize your site navigation. This area lets you control what pages appear in your menu. It is simple to reach and easy to use.
Start by logging into your WordPress dashboard. This is the control center for your website. Once inside, you will see various options to manage your site.
Accessing The Appearance Section
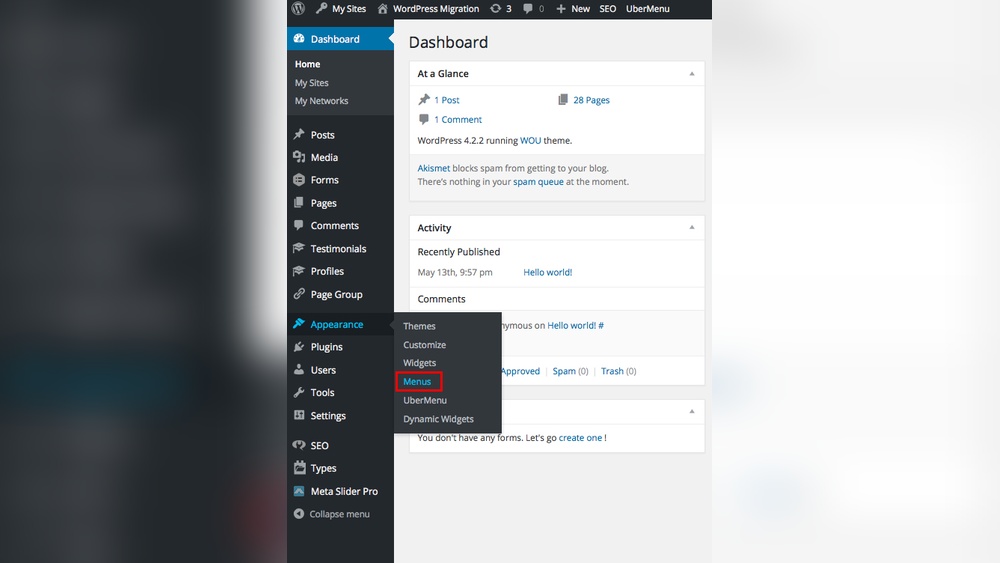
Look for the “Appearance” tab on the left sidebar. Click on it to open a list of design options. This section controls how your site looks and feels.
Selecting Menus
Under the Appearance tab, find and select “Menus.” This takes you directly to the menu management page. Here, you can create and edit your website menus.
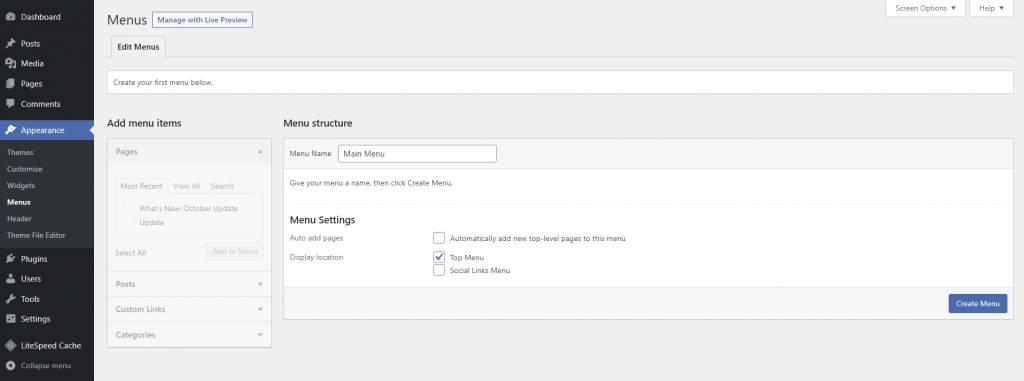
Understanding The Menu Management Page
This page shows all existing menus and their structure. You can pick a menu to edit or create a new one. The interface is user-friendly for easy navigation setup.
Selecting The Menu To Edit
Selecting the right menu to edit is the first step to add a page in WordPress. Your website may have multiple menus. Each menu can appear in different places on your site. Choosing the correct menu ensures your new page shows up where you want it.
This process is simple but important. It helps keep your site organized and easy to navigate. Knowing which menu to edit saves time and avoids confusion.
Selecting The Menu Location
WordPress lets you create menus for different locations. Common places include the header, footer, or sidebar. Each location can have its own menu. You must pick the menu tied to the location where you want your page.
Accessing The Menu Editor
Go to your WordPress dashboard. Find the “Appearance” tab in the menu. Click on “Menus” to open the menu editor. This area shows all your available menus. You can add, remove, or change menu items here.
Choosing The Correct Menu
Look at the drop-down menu at the top of the editor. It lists all existing menus. Select the menu you want to edit. Click the “Select” button to load it. Check the menu items to confirm it’s the right one.
Credit: www.hostinger.com
Adding A New Page To The Menu
Adding a new page to your WordPress menu helps visitors find your content easily. This process is simple and quick. It improves your website’s navigation and user experience. Follow the steps below to add a page to the menu effectively.
Choosing The Page From Available Options
First, go to the WordPress dashboard. Select “Appearance” and then “Menus.” You will see a list of available pages on the left side. Find the page you want to add. Check the box next to the page name. Click the “Add to Menu” button. The page will appear in the menu structure on the right. You can drag it to the position you want.
Customizing The Menu Item Label
After adding the page, you can change its label. Click the down arrow next to the menu item. Find the “Navigation Label” field. Enter a new name that fits your menu style. This label shows in the menu on your website. Keep it short and clear. Save the menu by clicking the “Save Menu” button. Your new page will now show with the chosen label.
Organizing Menu Items
Organizing menu items in WordPress helps visitors find pages quickly. A clear menu structure improves user experience. It also makes your site look professional. WordPress offers easy tools to reorder pages and create submenus. These features keep your menu neat and logical.
Reordering Pages
Drag and drop menu items to change their order. Click on a menu item and hold it. Move it up or down to the desired spot. Release the mouse button to drop it there. This action updates the menu instantly. Visitors will see pages in your chosen order. Simple and fast.
Creating Submenus
Submenus group related pages under a main menu item. To create one, drag a page slightly to the right below another. This indent shows it as a submenu. Submenus help organize content into categories. They reduce clutter and make navigation easier. Visitors find related pages without extra clicks.
Saving And Previewing The Menu
Saving and previewing your WordPress menu is a key step. It makes sure your changes appear on your website. Without saving, your new menu items will not show up. Previewing helps you check the look and feel before going live.
Take time to review your menu after adding pages. This avoids mistakes and ensures smooth navigation for visitors.
Save Your Menu Changes
After arranging your menu items, click the “Save Menu” button. It is usually found at the top or bottom of the menu editor. This action saves all your changes immediately. Without saving, edits will be lost if you leave the page.
Wait for the confirmation message that your menu is saved. This confirms the system has recorded your updates.
Preview The Updated Menu
Preview your website to see the menu live. Open your site in a new browser tab or window. Refresh the page if it was already open.
Check the new page link in the menu. Make sure it works and leads to the correct page. Also, look at how the menu fits with your site’s design.
Make Adjustments If Needed
If the menu does not look right, return to the menu editor. Adjust the order or remove any wrong links. Save again after each change to keep your edits.
Repeat the preview step to confirm improvements. Continue until the menu matches your expectations.
Troubleshooting Common Issues
Troubleshooting is key when adding pages to WordPress menus. Small errors can stop menus from showing or updating. Fixing these issues fast keeps your site user-friendly and easy to navigate.
Understanding common problems helps save time and reduces frustration. This section covers two frequent issues and how to solve them.
Menu Not Appearing
Sometimes the menu does not show on your site. Check if you assigned the menu to a theme location. Without this step, the menu stays hidden.
Go to Appearance > Menus, then find Menu Settings. Tick the box for the desired location, like Primary Menu. Save changes and refresh your site.
Clear your browser cache or WordPress cache plugin. Old data may stop the menu from appearing. Also, check for theme or plugin conflicts by disabling them one by one.
Page Not Showing In Menu Options
New pages sometimes do not appear in the menu options list. This happens if the page is not published. Draft or private pages stay hidden from menus.
Open the page editor and confirm the status is Published. Update the page if needed. Refresh the menu screen to see the page in the list.
Another cause is screen options filtering. On the menu page, click Screen Options at the top right. Ensure the Pages box is checked to display all pages.

Credit: wou.edu
Frequently Asked Questions
How Do I Add A New Page To My WordPress Menu?
Go to Appearance > Menus in your WordPress dashboard. Select the page, click “Add to Menu,” then save the menu to display the page link.
Can I Reorder Menu Items After Adding Pages?
Yes, simply drag and drop menu items to reorder them. After arranging, click “Save Menu” to apply the changes on your site.
How To Create A Dropdown Menu With Pages In WordPress?
Drag a menu item slightly to the right under another item. This nests it as a submenu, creating a dropdown on your menu.
Why Isn’t My New Page Showing In The WordPress Menu?
Ensure you added the page to the correct menu and saved changes. Also, clear your site cache to update the menu display.
Conclusion
Adding a page to your WordPress menu is simple and fast. You can organize your site so visitors find pages easily. Just follow the steps carefully, and your menu will look neat. Keep menus clear and updated for better user experience.
A well-made menu helps your site look professional and works well on all devices. Try adding pages today to keep your website fresh and easy to use.


