
Are you looking to give your WordPress site a fresh look? Adding a new template can transform your website’s appearance and make it stand out.
But if you’re unsure where to start, don’t worry—you’re in the right place. This guide will walk you through simple steps to add a new template to your WordPress site quickly and easily. By the end, you’ll have the confidence to customize your site exactly how you want it.
Ready to make your website shine? Let’s dive in!
Credit: www.greengeeks.com
Choosing The Right Template
Choosing the right template for your WordPress site is important. It sets the look and feel of your website. The right template helps you show your content clearly. It also makes your site easy to use for visitors. Take time to pick a template that fits your needs and style.
Free Vs Premium Templates
Free templates are a good start for beginners. They cost nothing and have basic features. Premium templates come with more options and support. They often include better designs and updates. Choose based on your budget and what features you need.
Compatibility With WordPress Version
Always check if the template works with your WordPress version. Some templates may not work well with older or very new WordPress versions. Using a compatible template avoids errors and crashes. It also ensures your site runs smoothly.
Responsive Design Importance
Responsive design means your site looks good on all devices. Phones, tablets, and desktops show your site correctly. This improves user experience and keeps visitors longer. Google also favors sites with responsive design in search results.

Credit: wordpress.com
Preparing For Template Installation
Preparing your WordPress site before installing a new template is important. It helps avoid problems and keeps your website safe. Taking simple steps now can save time and trouble later. Let’s explore two key tasks you must do first.
Backing Up Your Website
Backing up your website means making a copy of your data. This copy saves all your posts, pages, images, and settings. If something goes wrong during installation, you can restore your site quickly.
Use a reliable backup plugin or your hosting service to create a backup. Store the backup file on your computer or cloud storage. Regular backups protect your site from data loss.
Checking Theme Requirements
Each WordPress theme needs certain conditions to work properly. Check the theme’s requirements before installation. Look for needed WordPress versions, PHP versions, and plugins.
Make sure your website meets these needs. Updating WordPress and plugins can prevent conflicts. Confirm your hosting environment supports the theme’s features.
Installing Templates From WordPress Repository
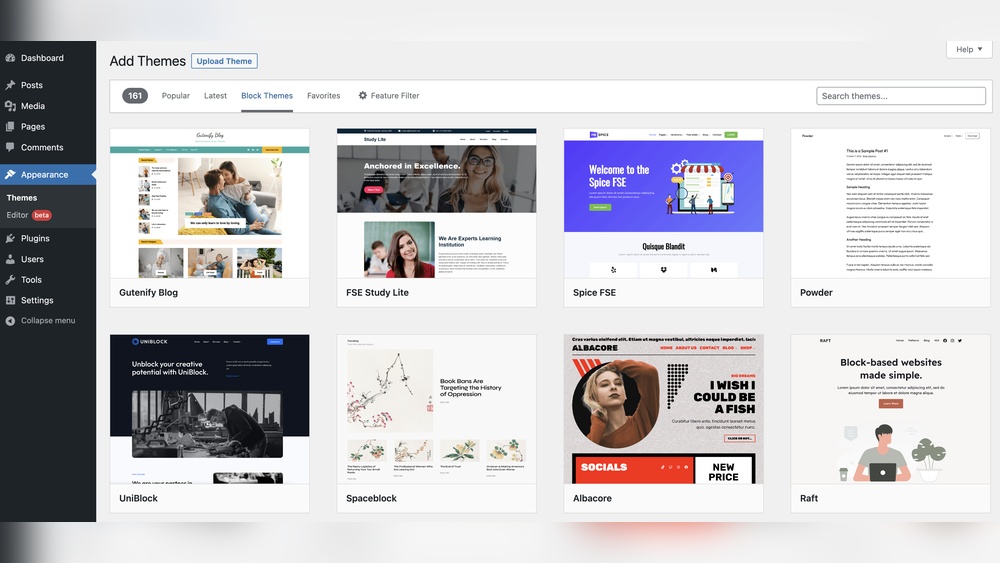
Installing templates from the WordPress repository is a simple way to change your site’s look. The repository offers many free themes made by trusted developers. These themes are easy to find and safe to use.
This process does not require downloading files manually. You can explore, install, and activate themes directly inside your WordPress dashboard.
Accessing The Theme Directory
Start by logging into your WordPress admin area. On the left menu, find and click “Appearance.” Then select “Themes.”
Here, you see your current themes and an option to add new ones. Click the “Add New” button at the top.
This takes you to the WordPress theme directory inside your dashboard. It shows many free themes ready for installation.
Using The Search Feature
Use the search bar at the top right to find a specific theme. Type keywords related to your website style or features.
You can also filter themes by popular, latest, or featured options. Filters help narrow down choices quickly.
Preview any theme by clicking on its thumbnail. This shows how it looks before installing.
Installing And Activating The Theme
Once you find a theme you like, click the “Install” button. WordPress downloads and prepares it automatically.
After installation, click “Activate” to apply the theme to your site. Your website design changes immediately.
You can switch back or try other themes anytime from the “Themes” page.
Uploading Templates Manually
Uploading templates manually to WordPress gives you full control over your site’s look. It allows you to add custom designs beyond the default options. This process is simple and works well for beginners and advanced users alike.
Manual uploading involves two main ways: using the WordPress dashboard or FTP. Each method has its steps and benefits. Let’s break down the process to make it clear and easy.
Downloading Theme Files
First, you need the theme files. Download them from a trusted source. These files usually come as a .zip archive. Keep this file ready for upload.
Make sure the theme is compatible with your WordPress version. Check for any instructions or special requirements. This step prevents issues after installation.
Using The WordPress Dashboard Upload
Log in to your WordPress dashboard. Navigate to Appearance > Themes. Click the “Add New” button at the top.
Next, choose “Upload Theme.” Select the .zip file you downloaded earlier. Click “Install Now” to start uploading.
After the upload finishes, click “Activate” to apply the new template. Your website will now use this design. This method is quick and user-friendly.
Uploading Via Ftp
FTP lets you upload theme files directly to your server. Use an FTP client like FileZilla. Connect to your hosting server using your FTP credentials.
Navigate to /wp-content/themes/ folder. Extract your theme’s .zip file on your computer first. Upload the extracted theme folder here.
Once uploaded, go back to your WordPress dashboard. Activate the new theme under Appearance > Themes. FTP upload is helpful for large themes or slow dashboards.
Customizing Your New Template
Customizing your new template helps make your website unique and user-friendly. It allows you to change the look and feel to match your brand. This process is simple with WordPress tools. You can adjust colors, fonts, layouts, and more. Let’s explore how to customize your new template effectively.
Using The WordPress Customizer
The WordPress Customizer offers a live preview of your changes. You can find it under Appearance > Customize in your dashboard. It lets you change site identity, colors, and background easily. Adjust fonts and layouts without coding. Each change updates immediately in the preview. This saves time and helps you see results instantly.
Adding Widgets And Menus
Widgets add extra features like search bars and recent posts. To add widgets, go to Appearance > Widgets. Drag and drop widgets into the sidebar or footer areas. Menus help visitors navigate your site. Create menus under Appearance > Menus. Add pages, posts, or custom links. Arrange items by dragging them in order.
Modifying Header And Footer
The header and footer frame your website’s content. Customize the header to show your logo or site title clearly. Edit the footer to add contact info or social links. Many templates allow easy changes via the Customizer. Some require going to Appearance > Theme Editor. Always save backups before editing code. Small changes improve your site’s look and usability.
Credit: savvy.co.il
Troubleshooting Common Issues
Troubleshooting common issues helps keep your WordPress site running smoothly. Problems can happen after adding a new template. Knowing how to fix them saves time and stress.
Some problems are easy to solve. Others need more attention. Understanding these issues improves your site’s look and function quickly.
Theme Not Appearing Correctly
Sometimes the new template looks broken or different. Check if you activated the theme properly. Clear your browser cache to see changes. Also, confirm the theme matches your WordPress version. Outdated themes often cause display errors. Try switching to a default WordPress theme to isolate the problem.
Plugin Conflicts
Plugins can stop templates from working well. Disable all plugins first. Then activate them one by one. Watch for when the issue returns. This method finds the conflicting plugin. Update all plugins to their latest versions. Old plugins often clash with new templates.
Template Update Problems
Updating a template can cause loss of settings or customizations. Always back up your site before updates. Use child themes to keep your changes safe. If the update fails, reinstall the previous version. Check the template developer’s site for known issues. Follow their instructions carefully for updates.
Frequently Asked Questions
How Do I Upload A New Template In WordPress?
To upload a new template, go to Appearance > Themes > Add New. Click Upload Theme, choose your template file, and click Install Now. After installation, activate the template to apply it to your site.
Can I Customize A WordPress Template After Adding It?
Yes, you can customize templates via Appearance > Customize. This section allows you to modify colors, fonts, layouts, and other design elements to suit your brand.
Is It Safe To Add Templates From Third-party Sources?
Only download templates from trusted sources to avoid security risks. Check reviews and update frequency to ensure compatibility and safety for your WordPress site.
What File Format Is Required For WordPress Templates?
WordPress templates are usually in. zip format. Ensure your template file is zipped before uploading to the WordPress theme installer for smooth installation.
Conclusion
Adding a new template to WordPress is simple and quick. Choose a template that fits your site’s style and needs. Upload and activate it with just a few clicks. This helps change your website’s look without coding. Keep your site fresh and easy to navigate.
Enjoy creating a unique website that stands out. Experiment with different templates to find what works best. Regular updates keep your site modern and user-friendly. Start now and see the difference a new template makes.



