
Are you looking to make it easier for visitors to log into your WordPress site? Adding a login button right in your menu can do just that.
It saves your users time and improves their experience, encouraging them to come back. You’ll learn simple, step-by-step ways to add a clear and functional login button to your WordPress menu—no complicated coding needed. Keep reading, and you’ll have your site ready for seamless user access in no time.
Prepare Your WordPress Site
Before adding a login button to your WordPress menu, prepare your site carefully. This step ensures smooth integration and avoids errors. Preparation helps your site work well with new features. Follow simple checks and install tools for best results.
Check Theme Compatibility
Your WordPress theme affects how the login button looks and works. Some themes already support login buttons. Check your theme’s documentation or settings first. Test if your theme shows menu items clearly. Make sure it supports custom links or buttons in menus. Choose a theme that matches your site style and needs.
Install Necessary Plugins
Plugins add functions to WordPress sites. To add a login button, install plugins that manage user login. Popular plugins include “Login With Ajax” or “WP Login Menu.” These plugins create easy login links in menus. Search for plugins in your WordPress dashboard. Install and activate the one that fits your needs. Plugins improve security and user experience. Keep plugins updated for best performance.
Create A Custom Login Page
Creating a custom login page gives your website a professional look. It improves user experience by matching your site’s style. A tailored login page also helps with branding and user trust. You can make it simple or add extra features. Let’s explore how to build one easily.
Use A Login Plugin
Login plugins help you create a custom page fast. They offer ready-made forms and easy settings. Many plugins work well with WordPress menus. Choose a plugin that fits your needs and install it. Activate the plugin and follow the setup instructions. Most plugins let you customize the login URL and appearance.
Some popular plugins include WPForms, Theme My Login, and LoginPress. These tools let you add a login button linked to your custom page. No coding skills needed. Plugins save time and keep your site secure.
Design The Login Form
Design matters. Your login form should be clear and simple. Use your site’s colors and fonts for consistency. Keep input fields easy to find and use. Add labels like “Username” and “Password” to avoid confusion. Make sure the login button stands out.
Consider adding a “Remember Me” checkbox for convenience. You can also add a “Forgot Password” link for user help. Test the form on desktop and mobile devices. Good design makes users want to log in again.
Add Login Button To Menu
Adding a login button to your WordPress menu helps visitors sign in quickly. It improves user experience and site navigation. This guide shows easy steps to add a login button without plugins.
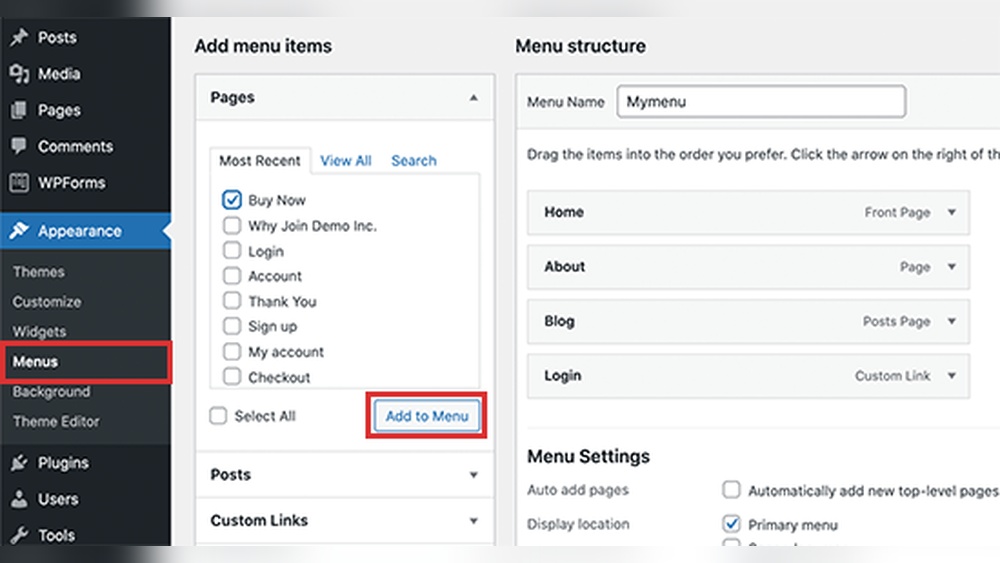
Access Menu Settings
Go to your WordPress dashboard. Find the “Appearance” tab on the left side. Click on “Menus” to open menu settings. Choose the menu where you want to add the login button. This is usually the main or header menu.
Add Custom Link
Look for the “Custom Links” option in the menu settings. Enter your login page URL in the URL field. Usually, this URL is /wp-login.php or a custom login page link. Leave the “Link Text” field empty for now.
Label The Button
Type “Login” or “Sign In” in the “Link Text” box. This label will appear on your menu. Click “Add to Menu” to insert the button. Drag it to the desired position in the menu order. Finally, click “Save Menu” to apply changes.

Credit: www.youtube.com
Make The Login Button Dynamic
Making the login button dynamic improves user experience on your WordPress site. It shows the right option based on whether a visitor is logged in or not. This keeps your menu clean and useful. Visitors see a login button if they are logged out. If they are logged in, the button changes to logout. This simple change helps users navigate your site easily.
Show Login Or Logout Based On User Status
You can display different menu items depending on the user’s status. WordPress has built-in functions to check if a user is logged in. Using these, you can create a menu that shows “Login” for guests and “Logout” for logged-in users. This requires adding some code to your theme’s functions file or using a plugin that supports conditional menus. This method makes your site feel more personal and interactive.
Use Conditional Menu Plugins
Conditional menu plugins let you show or hide menu items based on user roles or login status. Plugins like “If Menu” or “Conditional Menus” are easy to set up. You can create rules so only logged-out users see the login button. Logged-in users can see a logout button or other custom links. These plugins do not require coding skills. They offer a simple way to manage dynamic menus and improve site navigation.
Style The Login Button
Styling the login button helps it stand out and feel part of your website. A well-styled button improves user experience. It guides visitors to log in easily. You can use simple CSS tweaks or match it to your site’s colors and fonts. Both ways make the button look neat and clear.
Customize With Css
Use CSS to change the button’s color, size, and shape. For example, add padding to make it bigger. Change background color to grab attention. Use border-radius for rounded corners. You can also change font size and style for better readability.
Try this CSS code:
.login-button { background-color: 0073aa; color: white; padding: 10px 20px; border-radius: 5px; font-size: 16px; text-decoration: none; } .login-button:hover { background-color: 005177; } Place this code in your theme’s custom CSS area. Adjust colors and sizes to suit your taste.
Match Your Site’s Theme
Keep the button’s style similar to your site’s design. Use the same font family and colors. This creates a smooth and unified look. Check your theme’s color codes and fonts. Apply these styles to your login button.
For example, if your site uses blue and white, style the button with those colors. Use the same font as your menu items. This helps users feel the button belongs on your site.

Credit: www.youtube.com
Test The Login Button
Testing the login button is important after adding it to your WordPress menu. It ensures users can access their accounts without trouble. A smooth login experience builds trust and keeps visitors engaged. Check the button on different devices to confirm it works well everywhere.
Check Functionality On Desktop
Open your website on a desktop browser. Click the login button and see if it leads to the login page. Try entering your username and password to test the process. Make sure the page loads fast and without errors. Confirm the button looks good and is easy to find.
Verify Mobile Responsiveness
Use a smartphone or tablet to open your website. Tap the login button and watch how it behaves. The button should be clear and easy to tap. Ensure the login page fits the smaller screen without scrolling. Test the login process to confirm it works smoothly on mobile.
Troubleshooting Common Issues
Adding a login button to your WordPress menu is useful. Sometimes, issues appear after adding it. Troubleshooting common problems helps keep your site smooth. This guide shows how to fix two frequent problems.
Fix Broken Links
Broken links make your login button useless. Check the URL in the menu settings first. Make sure it points to the correct login page. Use the full URL including “https://” for best results. Clear your browser cache and reload the page. If the link still breaks, try resetting the permalink settings in WordPress. Go to Settings > Permalinks, then click Save without changes. This refreshes your site links and may fix the issue.
Resolve Plugin Conflicts
Plugins can clash and cause login button problems. Deactivate all plugins except the one for the login button. Check if the button works now. If yes, activate plugins one by one. Test the button after each activation. This helps identify the conflicting plugin. Once found, look for an alternative plugin or contact the plugin support. Keeping plugins updated also reduces conflicts. Always backup your site before making changes.
Credit: loginpress.pro
Frequently Asked Questions
How Do I Add A Login Button To WordPress Menu?
Go to WordPress dashboard, navigate to Appearance > Menus. Add a custom link with your login URL. Label it “Login” and save the menu. This places a login button in your site’s main menu for easy user access.
Can I Customize The Login Button Appearance?
Yes, you can customize it using CSS. Add custom styles via Appearance > Customize > Additional CSS. Target the menu item by its CSS class or ID to change colors, fonts, and sizes for a unique login button look.
Is A Plugin Needed To Add A Login Button?
No plugin is necessary for basic login buttons. WordPress menus allow adding custom links easily. However, plugins like “Login Menu” offer enhanced features like conditional display or dropdown forms if you want advanced options.
How To Make Login Button Visible Only To Logged-out Users?
Use conditional menu plugins or custom code snippets. These tools let you show the login button only to visitors who are not logged in, improving user experience by hiding redundant login options for logged-in users.
Conclusion
Adding a login button to your WordPress menu is simple and useful. It helps visitors access their accounts quickly. You can do it using plugins or custom code. Make sure your menu looks clean and easy to use. Test the button on different devices for best results.
This small change improves your site’s user experience. Keep your website friendly and easy to navigate. Try these steps today and see the difference yourself.


