
Are you ready to bring your WordPress site to life but don’t know where to start? Activating your WordPress site is the crucial first step to make your online presence real and visible to the world.
Imagine your site going from a blank page to a fully functional platform that attracts visitors and grows your audience. In this guide, you’ll discover simple, clear steps to activate your WordPress site quickly—no confusing jargon or complicated tech talk.
Stick with me, and by the end, you’ll have the confidence to launch your site and start making an impact right away. Let’s get your WordPress site up and running!
Credit: wpengine.com
Choosing A Domain And Hosting
Choosing the right domain and hosting is the first step to activate your WordPress site. These choices affect your site’s identity and performance. A good domain name makes your site easy to find. Reliable hosting keeps your site fast and online.
Picking The Right Domain Name
Your domain name is your website’s address on the internet. It should be short, simple, and easy to remember. Use keywords related to your site’s topic for better search visibility. Avoid numbers and hyphens as they confuse visitors. Choose a domain extension like .com or .net for trustworthiness. Check if your domain name is available before buying it.
Selecting A Reliable Hosting Provider
Hosting stores your website files and makes them accessible online. Choose a host with strong uptime, at least 99.9%. Fast servers improve user experience and search rankings. Look for hosts with good customer support. Consider features like automatic backups and security tools. Compare prices but focus on quality and reliability. Pick a plan that fits your site’s current needs and allows easy upgrades.
Installing WordPress
Installing WordPress is the first step to building your website. It is simple and fast to set up. You can choose between automatic and manual methods. Each method has clear steps to follow. Choose the one that fits your needs and skills best.
Using One-click Installers
One-click installers make WordPress setup quick. Many web hosts offer tools like Softaculous or Fantastico. These tools install WordPress with a few clicks. You just enter basic site details. The installer handles the rest automatically. No need to download files or create databases manually. This method is perfect for beginners and saves time.
Manual Installation Process
Manual installation gives you full control over setup. Start by downloading WordPress from the official site. Upload the files to your web server using FTP. Create a new database using your hosting control panel. Run the WordPress installer by visiting your site URL. Enter database info and site details as requested. This method requires more steps but offers flexibility. It is useful for advanced users who want custom setups.
Configuring Basic Settings
Configuring basic settings is the first step to activate your WordPress site properly. These settings shape how your site appears and functions. Adjusting them early ensures a smooth experience for visitors and site managers.
Start with clear, simple details. This helps visitors recognize your site easily. Next, set the correct timezone and language. Accurate time settings keep your posts and updates on track.
Setting Site Title And Tagline
The site title is your website’s name. It shows on the browser tab and search results. Pick a name that matches your brand or content clearly. The tagline is a short phrase that explains your site’s purpose. Keep it brief and meaningful. You can change these anytime from the WordPress dashboard under Settings > General.
Adjusting Timezone And Language
Choose the timezone where your site mainly operates. This controls post dates and scheduled tasks. Setting the correct timezone avoids confusion for you and your visitors. Select the language your audience understands best. This changes the WordPress dashboard and some site texts. Both timezone and language are found in Settings > General. Make sure these match your target audience for better user experience.

Credit: wordpress.org
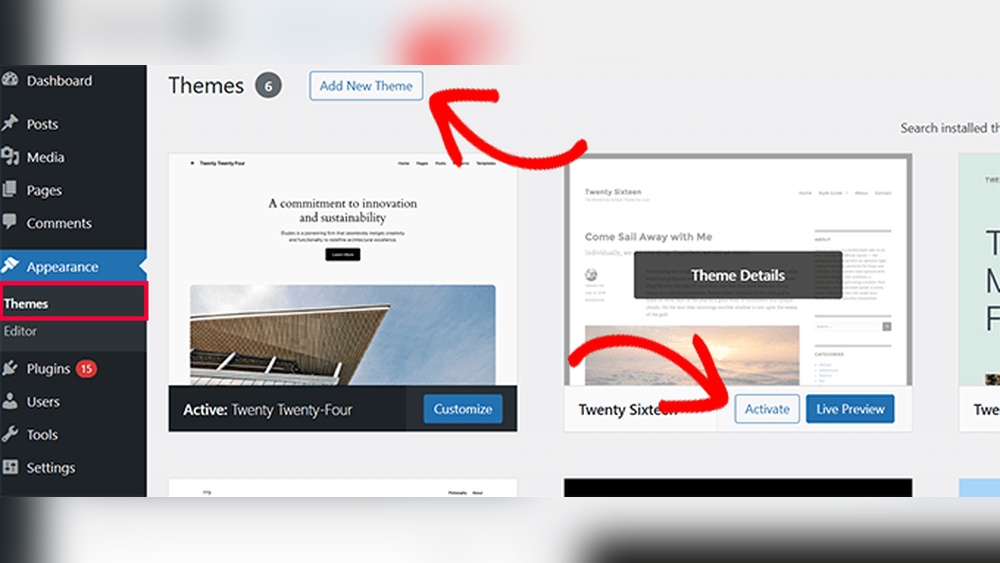
Selecting And Customizing A Theme
Selecting and customizing a theme shapes your WordPress site’s look and feel. It controls how visitors see your content. A good theme fits your site’s purpose and style. Customizing it helps make your site unique. It improves user experience and keeps visitors engaged.
Choosing A Suitable Theme
Start with a clear idea of your site’s goal. Choose a theme that matches your topic. Check if the theme is mobile-friendly. A responsive design works well on phones and tablets. Look for themes with good reviews and regular updates. Avoid themes with too many features you won’t use. Simpler themes load faster and are easier to manage.
Personalizing The Design
Change colors to match your brand or style. Use your logo and custom fonts to create a unique look. Adjust the layout to highlight important content. Add widgets to improve navigation and user interaction. Preview changes before saving to see how they appear. Personalization helps your site stand out from others. Keep your design clean and easy to read for visitors.
Installing Essential Plugins
Installing essential plugins is a crucial step to activate a WordPress site. Plugins add important features and improve your site’s performance. They help with security, SEO, backups, and more. Choosing the right plugins sets a strong foundation for your website.
Not all plugins are necessary. Focus on those that bring real value and keep your site fast. Avoid installing too many plugins to prevent slow loading times. Select plugins that match your site’s purpose and needs.
Must-have Plugins For Launch
Start with plugins that improve site security and SEO. A security plugin protects your site from threats. An SEO plugin helps your site rank better on search engines. Backup plugins save your data in case of errors.
Consider a caching plugin for faster loading times. A contact form plugin allows visitors to reach you easily. Image optimization plugins reduce image sizes for better speed. These plugins cover basic needs and improve user experience.
How To Install And Activate Plugins
Log in to your WordPress dashboard first. Go to the “Plugins” menu on the left side. Click “Add New” to open the plugin search page. Use the search box to find the plugin you want.
Click “Install Now” to add the plugin to your site. Wait a few seconds while WordPress installs it. After installation, click “Activate” to enable the plugin. The plugin is now ready to use.
Adjust the plugin settings if needed. Some plugins add a menu to your dashboard. Others appear under “Settings.” Follow on-screen instructions to configure features. Keep plugins updated for security and performance.
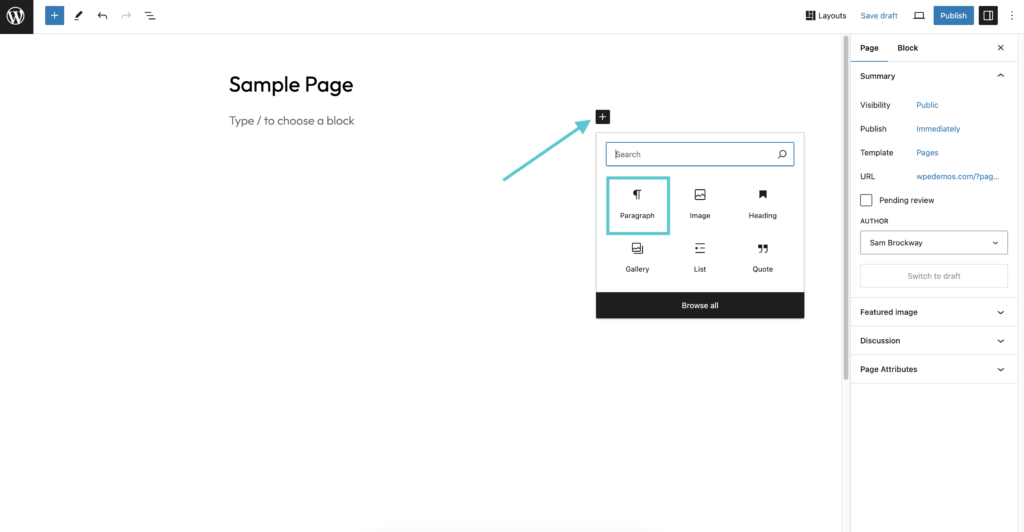
Creating Key Pages
Creating key pages is a vital step to activate your WordPress site. These pages give visitors important information and help build trust. They also improve your site’s structure and user experience. Focus on the About, Contact, and Privacy pages first. These pages show who you are and how users can reach you.
Adding About, Contact, And Privacy Pages
The About page tells your story. Share who you are and what your site offers. Keep the text clear and simple. The Contact page helps visitors get in touch with you easily. Include a form, email, or phone number. The Privacy page explains how you protect user data. This page is important to follow laws and build trust.
Setting Up Navigation Menus
Navigation menus guide visitors through your site. Create menus that include your key pages. Use clear labels like “About,” “Contact,” and “Privacy.” Place menus in visible areas such as the header or footer. Make sure the menu works well on phones and tablets. Easy navigation keeps visitors on your site longer.
Optimizing Site For Launch
Optimizing your WordPress site before launch is crucial. It ensures visitors have a smooth experience. A well-optimized site loads fast and works on all devices. This builds trust and keeps users engaged. Focus on key areas to prepare your site for the public.
Testing Site Speed And Performance
Site speed affects user experience and search rankings. Use tools like Google PageSpeed Insights or GTmetrix. They show how fast your site loads and suggest improvements. Compress images to reduce file size without losing quality. Limit the number of plugins to avoid slowdowns. Enable caching to speed up repeat visits. A fast site keeps visitors happy and lowers bounce rates.
Ensuring Mobile Responsiveness
Most users browse on phones or tablets. Your site must look good and work well on small screens. Use responsive themes that adjust layout automatically. Test your site on different devices and screen sizes. Check that buttons are easy to tap and text is readable. Mobile-friendly sites rank better on search engines. They also create a better experience for all visitors.

Credit: wordpress.com
Launching Your WordPress Site
Launching a WordPress site is an exciting step. It means your website is ready for visitors. Before you go live, some important tasks need your attention. This ensures your site works well and looks professional.
Taking these steps helps you avoid common mistakes. It also improves user experience and site performance. Let’s explore what to check before launching and how to promote your new website.
Final Checks Before Going Live
Check all pages for broken links and missing images. Test your site on different devices and browsers. Make sure your contact forms work properly. Verify that your website loads quickly to keep visitors happy.
Review your content for spelling and grammar errors. Set up SEO basics like titles, descriptions, and keywords. Confirm your site is secure with SSL enabled. Backup your website to avoid data loss.
Promoting Your New Website
Share your website on social media platforms. Tell friends, family, and colleagues about your launch. Submit your site to search engines for faster indexing. Use email newsletters to reach your audience directly.
Join online communities related to your site’s topic. Engage with users and share helpful content. Consistent promotion helps attract visitors and build trust. Keep updating your site with fresh content to stay relevant.
Frequently Asked Questions
How Do I Activate My WordPress Site After Installation?
To activate your WordPress site, log in to your WordPress dashboard. Then, select a theme and customize it. Finally, configure essential settings like site title, permalink structure, and plugins. This process makes your site live and ready for visitors.
What Is The Fastest Way To Activate WordPress Hosting?
The fastest way is to use one-click WordPress installation from your hosting provider. After installation, follow prompts to set up your site name, admin account, and basic settings. This method activates your WordPress site quickly and efficiently.
Can I Activate A WordPress Site Without A Domain Name?
No, a domain name is necessary to activate and access your WordPress site. It serves as your site’s address on the internet. Without it, visitors cannot find or visit your WordPress website.
How To Troubleshoot WordPress Activation Issues?
Check your internet connection and hosting server status first. Ensure your domain points correctly to your hosting server. Clear browser cache and disable conflicting plugins. Contact your hosting support if problems persist during WordPress site activation.
Conclusion
Activating your WordPress site is simple and quick. Follow the steps carefully and check each setting. Keep your login details safe for future use. Regular updates help keep your site secure and fast. Practice makes perfect—don’t hesitate to explore more features.
Your website is now ready to welcome visitors. Enjoy building your online presence with confidence.


