Have you ever accidentally deleted a post or page on your WordPress site and thought it was gone forever? It happens to the best of us.
But here’s the good news: WordPress has a Trash feature that acts like a safety net, giving you a second chance to recover your content. If you’re wondering how to find and access this hidden lifesaver, you’re in the right place.
Keep reading, and you’ll learn exactly where to find your Trash folder and how to restore or permanently delete items with ease. Don’t let fear of lost content hold you back—take control of your WordPress site now!
Locate The Trash Folder
Finding the trash folder in WordPress is simple. It helps you recover deleted items or permanently remove them. Each content type has its own trash area. Knowing where to find these folders saves time and avoids confusion.
Accessing Posts Trash
Go to the WordPress dashboard. Click on “Posts” in the left menu. At the top, find the “Trash” link next to “All” and “Published.” Click it to see deleted posts. Here, you can restore or delete posts forever.
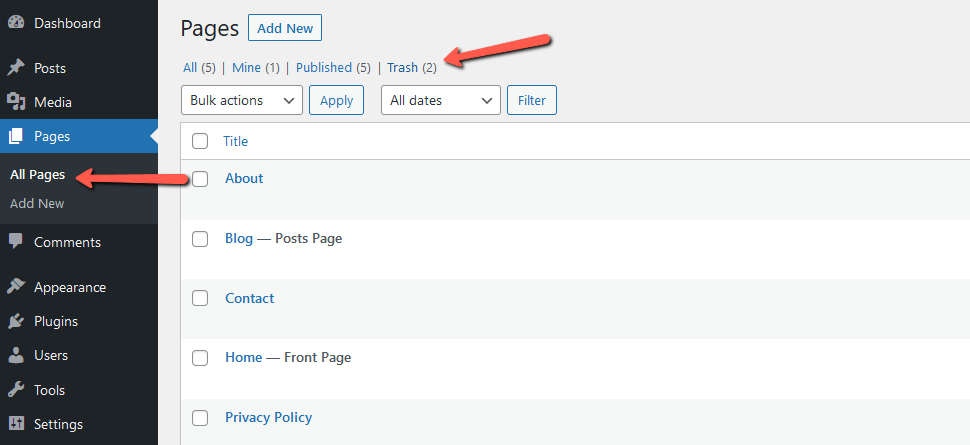
Accessing Pages Trash
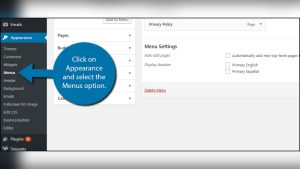
In the dashboard, select “Pages” from the menu. The “Trash” link appears near the top of the page list. Click on it to view deleted pages. You can restore pages or remove them permanently from this folder.
Trash For Media Files
Media files have a separate trash area. Click “Media” in the dashboard menu. Unlike posts and pages, WordPress does not have a direct trash link here. Deleted media files usually move to the trash in the Media Library. Check the “Trash” filter at the top of the Media Library to find deleted files.
Credit: www.wpbeginner.com
Restore Deleted Items
Restoring deleted items in WordPress is simple and quick. The trash feature keeps your deleted content safe for a while. You can easily bring back posts, pages, and media files from the trash folder. This helps avoid losing important work by mistake.
Deleted items stay in the trash for 30 days. After that, WordPress removes them permanently. So, act fast to recover your content.
Restoring Posts And Pages
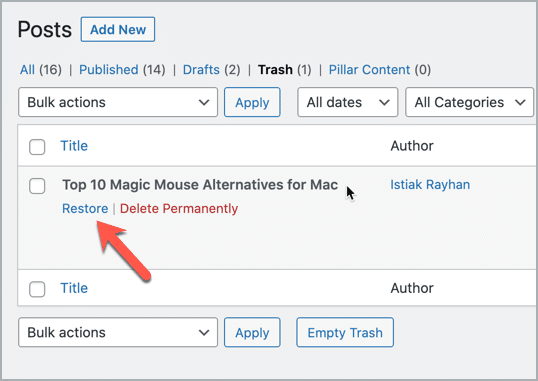
Go to your WordPress dashboard. Click on “Posts” or “Pages” in the menu. Then, click the “Trash” link at the top. You will see all deleted posts or pages there.
Find the item you want to restore. Hover over it and click “Restore.” Your post or page will return to its original place. Now, you can edit or publish it again.
Recovering Media Files
Access the “Media” section from the dashboard menu. Click on “Library” and then select the “Trash” tab. Here, you see all deleted images, videos, and files.
Choose the media file to recover. Click “Restore” below the file name. Your media file will appear again in the media library. You can use it in posts or pages as before.
Permanently Delete Trash
Permanently deleting trash in WordPress clears unwanted files from your site. This helps keep your site clean and fast. Removing trash also frees up server space. It stops old posts, pages, or comments from cluttering your dashboard.
WordPress offers two ways to delete trash permanently. You can empty the trash manually or set it to delete automatically. Both ways make sure trash does not stay forever.
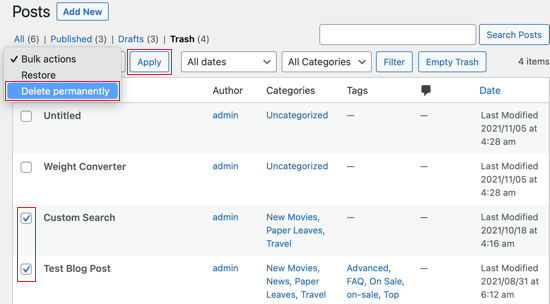
Emptying Trash Manually
To empty trash manually, go to the Trash folder in WordPress. You will find it under Posts, Pages, or Comments. Click on the Trash link to see deleted items. Select the items you want to remove forever. Then click the “Delete Permanently” button. This action cannot be undone. Take care before deleting items permanently.
This method gives you control over what stays and what goes. You can remove trash anytime you want. It is simple and quick for small amounts of trash.
Automatic Trash Deletion
WordPress can delete trash automatically after 30 days. This helps keep the site tidy without manual work. After the set time, WordPress clears trash items on its own. You do not need to check or delete anything.
This feature works in the background. It helps if you forget to clean your trash regularly. You can change the 30-day period by adding code to your site. But the default time works well for most users.
Credit: ultimateblocks.com
Troubleshooting Trash Access
Accessing the Trash in WordPress is usually simple, but sometimes problems occur. Troubleshooting Trash access helps find and fix these issues fast. This guide covers common problems and easy solutions. Follow along to restore your deleted items or Trash view.
Trash Not Visible
The Trash menu may disappear from WordPress. This happens if user roles limit access or plugins interfere. Check your user role permissions first. Admins should see the Trash. If you are not an admin, ask one to check your role.
Deactivate all plugins temporarily. Sometimes plugins hide the Trash accidentally. After deactivating, refresh the dashboard to see if Trash returns. If Trash appears, reactivate plugins one by one. This finds the plugin causing the issue.
Deleted Items Missing
Deleted items may not appear in Trash. This happens when items are permanently deleted or Trash is emptied. WordPress automatically clears Trash after 30 days. Check if the item was deleted long ago.
Check the database for deleted items if you suspect data loss. Use a backup to restore missing content. If no backup exists, you might need help from a developer or hosting support.
Best Practices For Content Recovery
Recovering deleted content in WordPress can save hours of work. Best practices help keep your site safe and content intact. Regular care and smart tools make content recovery easier. Here are some key methods to protect and restore your posts and pages.
Regular Backups
Backups are the simplest way to save your site’s data. They keep a copy of your content in a safe place. Create backups often, like weekly or after big changes. Use your web host’s backup service or a manual method. Store backups on a separate device or cloud service. This way, you can restore content quickly if needed.
Using Plugins For Recovery
Plugins add extra features to help recover deleted content. Some plugins save multiple versions of your posts. Others let you restore deleted pages from the trash easily. Choose plugins that are updated and have good reviews. Test them on a small scale before full use. Plugins reduce risk and save time during content recovery.
Credit: www.fastcomet.com
Frequently Asked Questions
How Do I Find The Trash Folder In WordPress?
To find Trash, log in to your WordPress dashboard. Go to Posts or Pages. Click the “Trash” tab at the top. This shows all deleted items for easy recovery or permanent deletion.
Can I Restore Deleted Posts From WordPress Trash?
Yes, you can restore posts from Trash. Go to the Trash tab in Posts or Pages. Hover over the post and click “Restore. ” The post will return to its original status.
How Long Does WordPress Keep Items In Trash?
WordPress keeps items in Trash for 30 days by default. After 30 days, items are permanently deleted automatically. You can also manually empty Trash anytime to free space.
Is It Possible To Permanently Delete Trash In WordPress?
Yes, you can permanently delete Trash. Go to the Trash tab, then click “Empty Trash. ” This removes all deleted items permanently and frees up your site’s storage.
Conclusion
Accessing the trash in WordPress is simple and quick. You can restore or delete posts easily from there. This helps keep your site clean and organized. Remember to check the trash before deleting anything for good. Managing trash well saves time and avoids mistakes.
Use these steps whenever you need to handle deleted content. Your WordPress site stays tidy and runs smoothly this way. Keep practicing, and it will become second nature soon.