Are you ready to bring your website idea to life? Installing WordPress is the first step to creating a powerful, easy-to-manage site that looks just the way you want.
But maybe you’re wondering, “How do I install WordPress without getting stuck or overwhelmed? ” Don’t worry—you’re in the right place. This guide will walk you through every step, using simple language and clear instructions. By the end, you’ll have WordPress up and running, ready for you to build your online presence with confidence.
Let’s get started!
Credit: kinsta.com
Choosing A Hosting Provider
Choosing the right hosting provider is a key step in installing WordPress. Hosting affects your website’s speed, security, and uptime. A good host keeps your site running smoothly and safely. It also impacts how easy it is to manage your site. Take time to select a hosting plan that matches your needs and budget.
Shared Vs Dedicated Hosting
Shared hosting means your website shares a server with other sites. It is cheaper and good for small sites. Performance can slow if many sites use the server at once. Shared hosting is easy to set up and manage.
Dedicated hosting gives you a whole server for your website alone. It costs more but offers better speed and control. This option fits big sites or those with high traffic. You can customize settings to fit your exact needs.
Recommended Hosting Services For WordPress
Many hosting providers specialize in WordPress hosting. They offer features like one-click WordPress install and automatic updates. Some popular options include Bluehost, SiteGround, and DreamHost. These hosts provide good speed, strong security, and helpful support.
Choose a host with strong uptime and fast servers. Customer service should be easy to reach and helpful. Check if the host offers backups and SSL certificates for security. These features protect your website and data effectively.
Setting Up Your Domain
Setting up your domain is the first step to creating a WordPress website. Your domain is the web address where visitors find your site. It needs to be easy to remember and related to your content or brand.
This section explains how to register your domain name and connect it to your hosting service. Both steps are important for your website to go live and be accessible.
Registering A Domain Name
Choose a domain name that matches your website’s purpose. Keep it short and simple. Avoid numbers or special characters that confuse users.
Use a trusted domain registrar to buy your domain. Some popular registrars include GoDaddy, Namecheap, and Google Domains. Search for your desired name to check its availability.
Once you find a free domain, register it by following the registrar’s instructions. You will need to provide contact details and pay a yearly fee. After registration, you own the domain for that time period.
Connecting Domain To Hosting
After registering, link your domain to your web hosting provider. Hosting stores your website files and shows them online.
Go to your domain registrar’s control panel. Find the DNS settings or Name Server settings. Replace the default name servers with the ones provided by your hosting company.
This process points your domain to the hosting server. It can take a few hours to 48 hours to update worldwide. Your website will be live once the connection is complete.
Installing WordPress Automatically
Installing WordPress automatically saves time and effort. It suits beginners and those who want a quick setup. This method uses tools that do most steps for you. No need to upload files or create databases manually. Just a few clicks, and WordPress is ready to use.
Using One-click Installers
One-click installers simplify WordPress installation. They are part of many web hosting services. You just select WordPress from a menu. Then, enter basic details like site name and admin info. The installer handles all technical tasks. This way, WordPress is set up in minutes. No coding or manual setup needed.
Popular Auto-install Tools
Several tools help install WordPress automatically. Softaculous is a common choice. It offers many apps including WordPress. Another tool is Fantastico, found in many hosting panels. Installatron is also popular for easy installs. These tools provide a user-friendly interface. They reduce errors and speed up the process.

Credit: developer.wordpress.org
Manual WordPress Installation
Manual WordPress installation gives you full control over your website setup. It helps you understand each step clearly. This method is useful for custom server setups or when automatic installers are unavailable.
Follow each step carefully. You will need access to your web hosting account and a basic understanding of FTP and databases.
Downloading WordPress
Start by visiting the official WordPress website. Download the latest version of WordPress in a zip file. Save it on your computer for easy access.
Uploading Files Via Ftp
Use an FTP client to connect to your web server. Extract the WordPress zip file on your computer. Upload all extracted files to your website’s root directory. Wait for the upload to complete before moving on.
Creating A Database
Log into your hosting control panel. Find the database section and create a new database. Create a user and assign it to the database. Note the database name, username, and password for later use.
Running The Installation Script
Open your web browser and enter your site’s URL. The WordPress installation page will appear. Enter the database details you saved earlier. Follow the prompts to set your site title and admin account. Click “Install” to finish the setup.
Configuring Basic Settings
Configuring basic settings is an important step after installing WordPress. This step helps you set up your site’s identity and look. It also prepares your site for visitors and search engines. Proper configuration improves user experience and site performance.
Setting Site Title And Tagline
The site title is the name of your website. It appears on the browser tab and search results. The tagline is a short description of your site’s purpose. To set these, go to the WordPress dashboard, then to Settings > General. Enter your site title and tagline in the fields provided. Keep the title clear and the tagline simple. This helps visitors understand your site quickly.
Choosing A Theme
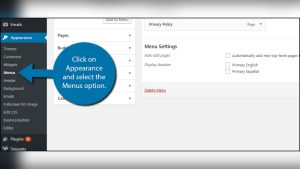
A theme controls your website’s design and layout. Choose a theme that fits your site’s topic and style. To select a theme, go to Appearance > Themes in your dashboard. You can browse free themes or upload a premium one. Install and activate the theme you like. Pick a responsive theme so your site looks good on all devices.
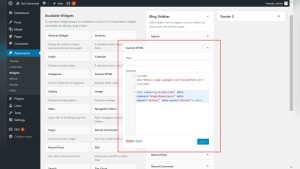
Installing Essential Plugins
Plugins add extra features to your website. Some plugins improve security, speed, and SEO. Others add contact forms or social media buttons. To install plugins, go to Plugins > Add New. Search for plugins you need and click Install, then Activate. Start with a few essential plugins to keep your site fast and safe.
Credit: www.themeum.com
Troubleshooting Common Issues
Installing WordPress can sometimes cause issues. These problems slow down your progress. Knowing common troubles helps you fix them fast. This section covers common issues and easy fixes. It makes the installation smoother and less stressful.
Fixing Installation Errors
Errors during installation often happen due to file problems. Check if WordPress files are fully downloaded and not corrupted. Use FTP to upload files again if needed. Make sure file permissions allow WordPress to run. Permissions should be set to 755 for folders and 644 for files. Clear your browser cache and try installing again. Sometimes errors happen because of server limits. Contact your host to increase limits like memory or execution time.
Resolving Database Connection Problems
Database connection errors occur when WordPress cannot access the database. Double-check your database name, username, and password in the wp-config.php file. These details must match your hosting database settings. Confirm the database server address is correct, often ‘localhost.’ If unsure, ask your hosting provider. Sometimes, the database user lacks permissions. Grant all necessary rights to the database user. Restart your web server to refresh connections. These steps usually restore connection and solve the problem.
Frequently Asked Questions
How Do I Install WordPress On My Hosting?
To install WordPress, log into your hosting account, find the WordPress installer, and follow the setup steps. It’s usually quick and guided for beginners.
What Are The Basic WordPress Installation Requirements?
You need a web server with PHP 7. 4+, MySQL 5. 6+, and a domain name to install WordPress successfully.
Can I Install WordPress Manually Without A Script Installer?
Yes, download WordPress from wordpress. org, upload files via FTP, create a database, and run the installation script in your browser.
How Do I Secure My WordPress Installation?
Use strong passwords, update WordPress regularly, install security plugins, and set proper file permissions to keep your site safe.
Conclusion
Installing WordPress is easier than it seems. Follow each step carefully for best results. You can create a website without needing advanced skills. Keep your login details safe and update WordPress regularly. Explore themes and plugins to customize your site.
Practice makes perfect, so don’t worry about mistakes. Start your online journey today with confidence and ease.