
Are you ready to unlock the full potential of your WordPress website? Installing Google Analytics is the key to understanding exactly how visitors interact with your site.
Imagine having clear insights into what works, what doesn’t, and how to grow your audience faster. In this guide, you’ll learn simple, step-by-step instructions to set up Google Analytics on your WordPress site—no tech skills needed. Keep reading, and you’ll soon be making smarter decisions that boost your website’s success.

Credit: www.wpbeginner.com
Choosing The Right Google Analytics Account
Choosing the right Google Analytics account is important for tracking your website’s visitors correctly. It helps you gather useful data about how people use your site. This data can guide your decisions to improve your website’s performance.
To start, you need to create a Google Analytics account. Then, set up a property for your website. These steps ensure you collect accurate and organized information.
Creating A Google Analytics Account
Go to the Google Analytics website. Click on the “Start for free” button. Use your Google email to sign in or create a new account. Enter your account name clearly. The name should reflect your business or website. Choose your data sharing settings carefully. These settings control how Google uses your data.
Setting Up A Property For Your Website
After creating your account, add a new property. A property represents your website or app in Google Analytics. Enter your website name and URL. Select your website’s industry category. Choose the correct time zone for accurate reports. Click “Create” to finish setting up the property. This step allows tracking of your website’s traffic and user behavior.
Getting Your Tracking Id
Getting your tracking ID is the first step to connect Google Analytics with your WordPress website. This ID allows Google Analytics to collect data from your site. You need it to track visitors, page views, and other important metrics.
Finding and understanding your tracking ID is simple. It helps you start measuring your website’s performance right away. Let’s explore how to locate this ID and the different types available.
Locating The Tracking Code
Sign in to your Google Analytics account. Go to the Admin section in the bottom left corner. Select the property for your website. Under the Property column, click “Tracking Info.” Then choose “Tracking Code.”
Your tracking ID appears at the top of the page. It starts with “UA-” for Universal Analytics or “G-” for Google Analytics 4. Copy this ID carefully. You will need it for your WordPress setup.
Understanding Different Tracking Versions
Google Analytics has two main tracking versions. Universal Analytics uses IDs starting with “UA-.” It’s older but still widely used. Google Analytics 4 uses IDs starting with “G-.” This version focuses more on user behavior.
New websites often use Google Analytics 4. It offers better data and future updates. Knowing your version helps you follow the correct installation steps. Use the right tracking ID to avoid errors.
Adding Google Analytics To WordPress
Adding Google Analytics to WordPress helps you track your website’s visitors. It shows who visits, what they do, and how they find your site. This data helps improve your content and user experience. There are two main ways to add Google Analytics to WordPress. Choose the way that fits your skills and needs.
Using A Plugin For Easy Integration
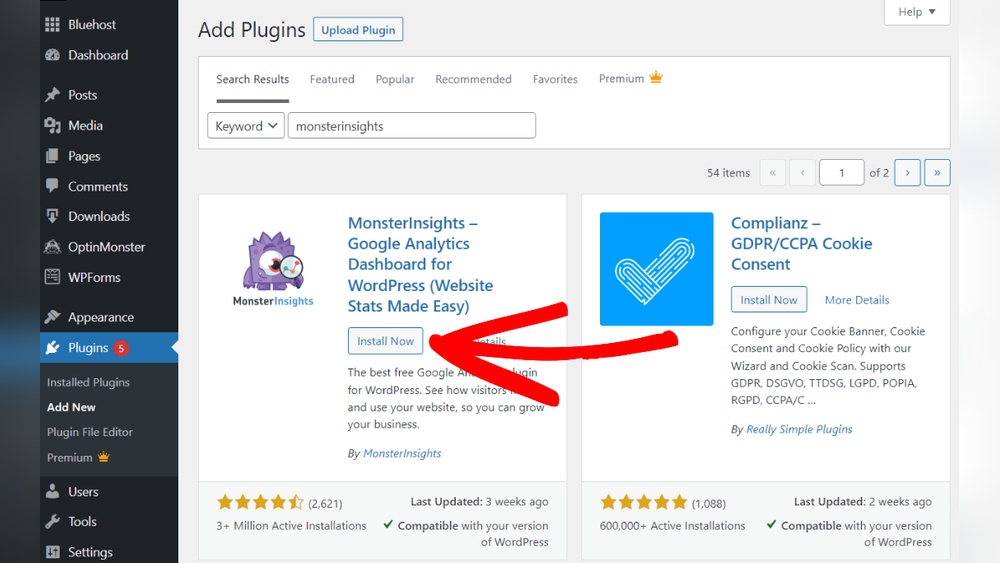
Plugins make adding Google Analytics simple and quick. You do not need to touch any code. Popular plugins like “MonsterInsights” or “Site Kit by Google” connect your site to Google Analytics easily.
Install the plugin from your WordPress dashboard. Activate it and follow the setup steps. Usually, you log in to your Google account through the plugin. The plugin then adds the tracking code automatically. It also shows basic analytics data inside WordPress.
This method is perfect for beginners or those who want a fast setup. It keeps your tracking code safe and updated. You can focus on your content, not on technical details.
Manual Insertion Of Tracking Code
Manual insertion means adding the Google Analytics code yourself. First, get your tracking code from your Google Analytics account. It looks like a small piece of JavaScript code.
Next, access your WordPress theme files. Use the “Appearance” > “Theme Editor” option or an FTP client. Find the header.php file. Paste the tracking code right before the closing tag.
Save the file and check if the code works. This method gives you full control. But it needs careful editing to avoid errors. It suits users comfortable with basic coding and WordPress files.
Credit: www.hostinger.com
Verifying Your Setup
After installing Google Analytics on your WordPress site, verifying the setup is important. This step ensures data tracking works correctly. Without verification, you might miss key visitor information. Testing the setup early helps catch errors fast. It also confirms that your site sends data to Google Analytics properly.
Checking Real-time Analytics
Open your Google Analytics account. Navigate to the “Real-Time” section. Visit your WordPress site in a new browser tab. Watch the real-time report for active users. If you see your visit there, tracking works. No visitors showing up means tracking is off. Try refreshing or rechecking your setup.
Using Google Tag Assistant
Google Tag Assistant is a free browser extension. It checks Google tags on your site. Install the extension in Chrome. Visit your WordPress site and activate Tag Assistant. It will scan for Google Analytics tags. Green means tags are working well. Yellow or red signals a problem. Follow Tag Assistant tips to fix errors.
Optimizing Analytics For Better Insights
Optimizing Google Analytics helps you get clearer data about your website. This makes it easier to see what works and what does not. You can track specific actions visitors take. This helps improve your site’s performance and user experience.
By setting up goals and tracking e-commerce activities, you understand visitor behavior better. This data shows which pages lead to sales or sign-ups. It also reveals where visitors leave your site. Use this information to make smart changes.
Setting Up Goals And Conversions
Goals let you track important actions on your site. These can be form submissions, newsletter sign-ups, or downloads. To set up a goal, open your Google Analytics account. Go to Admin, then Goals, and click New Goal. Choose a goal type and enter details. Save the goal and test it to make sure it works. Tracking goals shows how well your site meets its objectives.
Enabling Enhanced E-commerce Tracking
Enhanced e-commerce tracking gives detailed data about shopping behavior. It tracks product views, adds to cart, and purchases. This data helps improve your online store. To enable it, go to Google Analytics Admin. Under E-commerce Settings, turn on Enable E-commerce and Enable Enhanced E-commerce Reporting. Next, add the right code or use a plugin on WordPress. This tracks user actions and sends data to Analytics. Use this data to improve sales and reduce cart abandonment.

Credit: www.hostinger.com
Frequently Asked Questions
How Do I Add Google Analytics To WordPress?
To add Google Analytics, create an account on Google Analytics. Get your tracking ID, then install a plugin like “GA Google Analytics” on WordPress. Paste the tracking ID in the plugin settings, and save. Your site will start tracking visitor data.
Can I Install Google Analytics Without A Plugin?
Yes, you can add Google Analytics manually. Copy the tracking code from Google Analytics. Paste it into the header.php file of your WordPress theme before the closing tag. Save changes, and your website will track visitors without a plugin.
How Long Does Google Analytics Take To Work?
Google Analytics usually starts collecting data within 24 hours. Sometimes, it can take a few hours to show your website activity. Check your Google Analytics dashboard regularly to see visitor data updates and confirm the tracking code is installed correctly.
Is Google Analytics Free To Use On WordPress?
Yes, Google Analytics is completely free for all website owners. It offers detailed visitor insights without any cost. You only need a Google account and to install the tracking code on your WordPress site to start using it.
Conclusion
Installing Google Analytics on your WordPress site helps track visitors easily. It shows which pages your audience likes most. You can improve your website with this data. The setup process is simple and quick. Just follow each step carefully. Check your analytics regularly to see progress.
This tool helps your website grow smartly. Start using Google Analytics today and watch your site improve.


