
Are you ready to make your website truly yours? Connecting your domain to WordPress is the key step that turns a simple web address into your personal online space.
But if you’re wondering how to do it without headaches or confusion, you’re in the right place. This guide breaks down every step clearly and simply, so you can get your site up and running fast. Keep reading, and by the end, you’ll have your domain linked to WordPress like a pro.
Choose A Domain Registrar
Choosing the right domain registrar is the first step to connect your domain to WordPress. A domain registrar is a company that sells and manages domain names. Picking a good registrar helps you keep control of your domain easily. It also ensures your domain works well with WordPress hosting.
Many registrars offer similar services, but some stand out in terms of price, support, and features. Understanding these differences helps you make the best choice for your website.
Popular Domain Registrars
Some well-known domain registrars include GoDaddy, Namecheap, Google Domains, and Bluehost. These companies have helped millions of users buy and manage domains. They offer easy-to-use dashboards and good customer support. Each registrar may provide different deals and extra tools for website management.
Factors To Consider
Check the price of domain registration and renewal fees. Some registrars offer low initial prices but charge more later. Look for clear and fair pricing to avoid surprises. Customer support is important too. Choose a registrar that offers quick and helpful support via chat, email, or phone.
Consider domain management tools like DNS settings and email forwarding. These features make it easier to connect your domain to WordPress. Also, check if the registrar provides domain privacy protection. This service keeps your personal information hidden from public records.
Credit: wordpress.com
Register Your Domain
Registering your domain is the first step to create a website on WordPress. It gives your site a unique address on the internet. A good domain name helps visitors find your site easily. Choose a name that matches your brand or topic. Follow simple steps to register your domain and start building your online presence.
Search For Available Domains
Start by checking if your desired domain name is free. Use domain search tools on popular registrars. Enter your name ideas and see which ones are available. Try different extensions like .com, .net, or .org. Keep names short, clear, and easy to remember. Avoid numbers or hyphens to reduce confusion.
Complete The Registration Process
Once you find a free domain, register it quickly. Fill out your personal details accurately. Choose the registration period, usually one year or more. Opt for privacy protection to keep your info safe. Pay the registration fee using secure payment methods. After payment, you will receive confirmation. Your domain is now officially yours and ready for WordPress setup.
Select A WordPress Hosting Provider
Selecting a WordPress hosting provider is an important step. It affects your website speed, security, and uptime. Good hosting ensures your site loads fast and stays online. It also offers support and easy WordPress installation. Choose a provider that fits your needs and budget.
Types Of Hosting
Shared hosting is the cheapest option. You share server space with other users. It works for small blogs or personal sites.
VPS hosting gives more power and control. It divides a server into virtual parts. It suits growing websites needing more resources.
Dedicated hosting means you get a whole server. It is best for large sites with high traffic.
Managed WordPress hosting focuses only on WordPress. It handles updates, security, and backups. This option saves time and effort.
Recommended Providers
Bluehost is popular for beginners. It offers easy WordPress setup and good support.
SiteGround provides excellent speed and security features. It has managed WordPress plans available.
HostGator offers affordable shared hosting and simple tools. It is user-friendly for new site owners.
WP Engine specializes in managed WordPress hosting. It suits businesses needing strong performance and support.
Set Up Your WordPress Site
Setting up your WordPress site is the next step after connecting your domain. It prepares your website for content and design. This process is simple and quick. Follow these steps to get your site ready.
Install WordPress
Most hosting providers offer a one-click WordPress installation. Log in to your hosting account. Find the WordPress installer in the control panel. Click the installer and fill out the required details, such as site name and admin email. The system will set up WordPress automatically. Installation usually takes only a few minutes.
Access The WordPress Dashboard
After installation, access your WordPress dashboard. Visit yourdomain.com/wp-admin in a web browser. Enter the username and password created during installation. The dashboard is your website’s control center. From here, you can add posts, customize themes, and manage settings. It is user-friendly and easy to navigate.
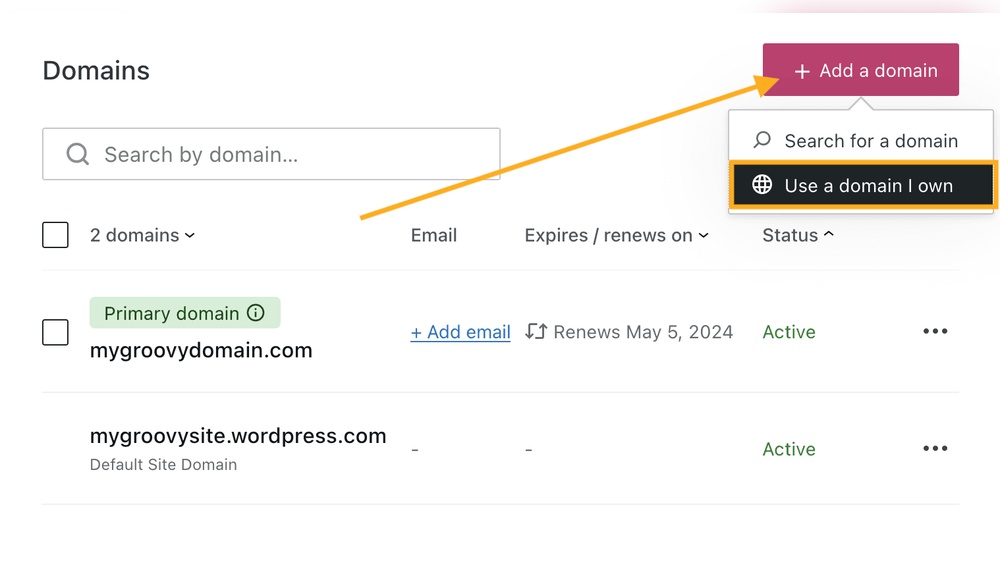
Connect Domain To WordPress
Connecting your domain to WordPress is a key step to make your website live. This process links your website’s address with the WordPress platform. It allows visitors to find your site using your custom domain name.
The process involves changing settings at your domain registrar and pointing your domain to your hosting server. These steps are simple but important. Follow them carefully to avoid downtime and ensure your site loads correctly.
Update Dns Settings
Start by logging into your domain registrar account. Find the DNS or name server settings section. DNS controls how your domain directs traffic to your website.
Replace the current name servers with those provided by your WordPress host. This change tells the internet where to find your website files. It usually takes a few hours to a day to update worldwide.
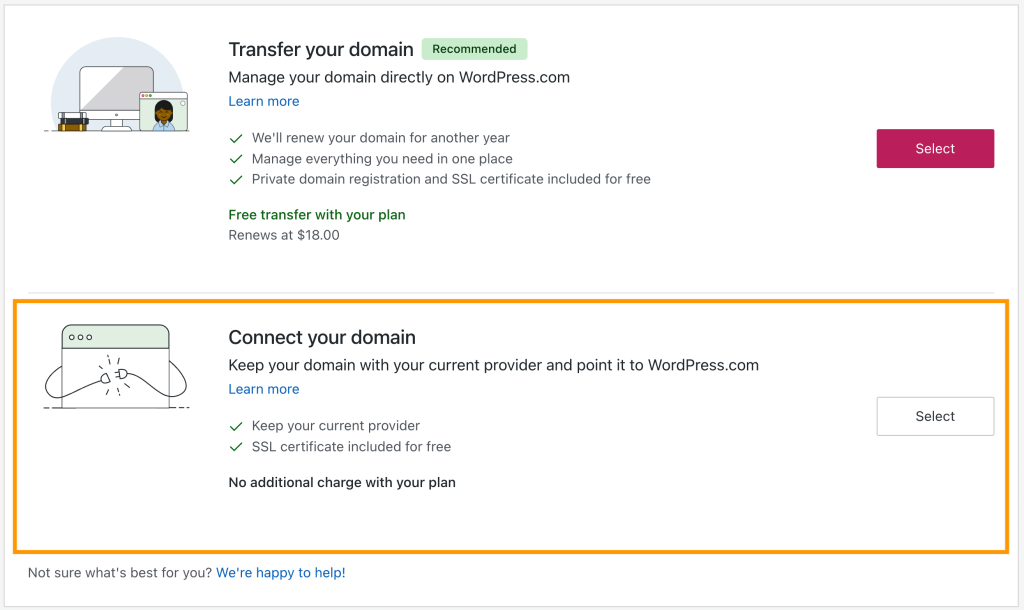
Point Domain To Hosting Server
Next, log into your hosting account where WordPress is installed. Locate the section for adding or managing domains.
Add your domain name to your hosting account. This links your domain with your WordPress files. Make sure the domain points to the correct server IP address. This step ensures your website loads properly when visitors enter your domain.
Credit: www.namecheap.com
Verify Domain Connection
Verifying your domain connection is a key step after linking your domain to WordPress. This process confirms that your website is live and accessible through your domain name. It ensures that all settings are correct and your site loads properly. Skipping this step can lead to errors or downtime.
Verification also helps search engines find your site faster. It improves site trust and user experience. Checking your domain connection regularly avoids surprises and keeps your website running smoothly.
Check Propagation Status
DNS changes take time to spread across the internet. This is called propagation. It can take from a few minutes to 48 hours. Use online tools to check propagation status. These tools show if your domain points to WordPress servers worldwide.
Enter your domain name in these tools. Look for correct IP addresses or name servers. If propagation is complete, your site should be visible everywhere. Patience is important during this phase.
Troubleshoot Common Issues
Sometimes domain verification fails. This can happen due to incorrect DNS settings or typos. Double-check your domain records in your registrar’s dashboard. Make sure they match the details provided by WordPress.
Clear your browser cache and try accessing your site again. Use a different device or network to rule out local issues. Contact your domain provider or WordPress support for help if problems persist.
Configure Ssl For Security
Configuring SSL is essential for website security and trust. It protects data by encrypting the connection between visitors and your site. SSL also improves your site’s ranking in search engines. Setting it up on WordPress helps keep user information safe and shows a secure padlock in browsers.
Obtain Ssl Certificate
Start by getting an SSL certificate for your domain. Many hosting providers offer free SSL certificates via Let’s Encrypt. You can also buy one from trusted certificate authorities. After obtaining, install the SSL certificate through your hosting control panel. This step ensures your domain supports secure connections.
Enable Https On WordPress
Switch your WordPress site to use HTTPS instead of HTTP. Update your WordPress Address and Site Address in the settings to use https://. Use plugins like Really Simple SSL to handle the transition smoothly. Check your website for mixed content errors and fix them. This step completes the SSL setup and makes your site fully secure.
Manage Domain Settings In WordPress
Managing domain settings in WordPress helps your website run smoothly. It ensures visitors see the correct site address. Proper settings also improve site performance and user experience. Adjusting these settings is simple and takes little time.
Update Site Url
Start by updating the site URL in WordPress. Go to the WordPress dashboard and select “Settings.” Click on “General” to find the site address fields. Change both “WordPress Address (URL)” and “Site Address (URL)” to your new domain name. Save the changes at the bottom of the page. This step tells WordPress to use your custom domain. It avoids broken links and keeps your site accessible.
Set Permalinks
Permalinks control how your web addresses look. In the dashboard, go to “Settings” and then “Permalinks.” Choose a structure that fits your site, like “Post name.” This makes URLs clean and easy to read. Save the changes to apply the new format. Proper permalinks boost SEO and improve navigation.
Credit: www.fasthosts.co.uk
Frequently Asked Questions
How Do I Connect My Domain To WordPress?
To connect your domain, update your domain’s DNS settings. Point the domain’s nameservers to your WordPress host or change the A record to your WordPress IP address. Then, add your domain in your WordPress dashboard under “Domains” or “Site Address” settings.
Can I Link A Domain Bought Elsewhere To WordPress?
Yes, you can link any domain to WordPress. Change your domain’s DNS records to point to WordPress hosting servers. After this, add the domain in your WordPress settings to complete the connection.
How Long Does Domain Connection To WordPress Take?
Domain connection usually takes 24-48 hours due to DNS propagation. Sometimes, it may update faster, within a few hours. Be patient and clear your browser cache to see changes.
Do I Need To Buy Hosting To Connect My Domain?
Yes, hosting is necessary for your WordPress site. Your domain directs visitors to your hosted website. Without hosting, the domain cannot display your WordPress site.
Conclusion
Connecting your domain to WordPress is easier than it seems. Just follow the steps carefully and stay patient. Your website will go live and look professional. This helps people find your site quickly online. Keep your domain settings updated for smooth performance.
Take your time to double-check each step. Soon, your WordPress site will be ready to grow. Simple actions lead to great results. Your online presence starts here.


