
Are you struggling to make your products stand out on your WordPress site? Adding clear, attractive product images can instantly boost your sales and grab your visitors’ attention.
But if you’re unsure how to upload and display these images properly, don’t worry—you’re in the right place. This guide will walk you through the simple steps to add product images in WordPress, helping you showcase your items like a pro.
By the end, you’ll know exactly how to make your products look their best and keep your customers coming back for more. Keep reading to unlock the secrets!
Preparing Your Product Images
Preparing your product images is a key step before adding them to WordPress. Good images attract customers and improve your site’s performance. Proper preparation ensures fast loading and clear display.
Follow simple steps to get your images ready. These steps help your site look professional and rank better in search engines.
Choosing The Right Image Format
Select image formats that balance quality and file size. JPEG works well for photos with many colors. PNG is best for images with transparency or sharp edges. Use WebP for faster loading without losing quality.
Optimizing Image Size
Large images slow down your website. Resize images to fit your product display area. Compress images using free tools to reduce file size. Smaller images load quickly and keep visitors happy.
Naming Image Files Properly
Use clear and simple names for your image files. Include keywords related to your product. Separate words with hyphens, not spaces. Proper names help search engines understand your images better.

Credit: www.youtube.com
Accessing WordPress Media Library
Accessing the WordPress Media Library is the first step to adding product images. This library stores all your photos, videos, and other media files. It helps organize and manage images for your website easily.
You can use the Media Library to find images you already uploaded. You can also add new images directly here. This makes adding product pictures faster and smoother.
Navigating To Media Section
Start by logging into your WordPress dashboard. Look for the “Media” option in the left menu. Click on it to open the Media Library. You will see a grid or list of all your uploaded files. You can browse or search here to find any image.
Uploading Images Manually
To add a new image, click the “Add New” button at the top of the Media Library page. You can drag and drop files or click the “Select Files” button to upload from your computer. Wait for the upload to finish. The new image will appear in your library, ready to use in your product pages.
Adding Product Images In Woocommerce
Adding product images in WooCommerce helps shoppers see what you sell. Clear images improve trust and sales. This guide explains how to add images step-by-step.
Creating A New Product
Log in to your WordPress dashboard. Go to Products > Add New. Enter the product name and description. This is where you start building your product page.
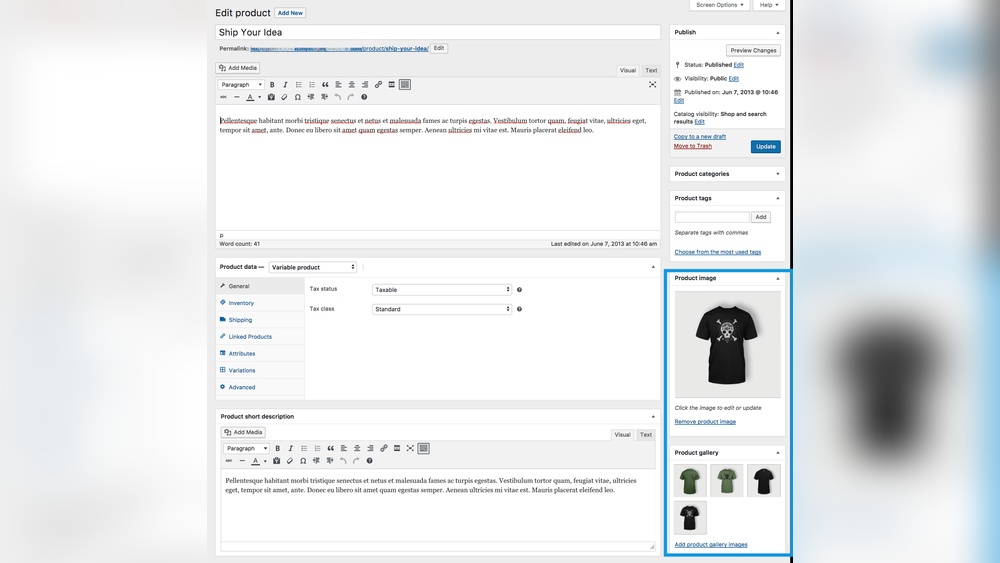
Setting A Featured Image
On the right side, find the Featured Image box. Click “Set featured image.” Upload a clear photo of your product. This image shows first on your store and search results.
Adding Product Gallery Images
Below the Featured Image, find Product Gallery box. Click “Add product gallery images.” Upload more photos to show different angles or colors. Multiple images help customers understand the product better.
Credit: aovup.com
Using Classic Editor For Product Images
The Classic Editor in WordPress offers a simple way to manage product images. It helps you place images directly into your product descriptions. This method gives more control over how images appear alongside your text.
Using the Classic Editor feels like working with a word processor. You can easily add, move, and style images without needing special skills. This section explains how to insert and adjust product images using this editor.
Inserting Images Into Product Description
Click the “Add Media” button above the editor toolbar. This opens the media library where you can choose an existing image or upload a new one. Select your product image and press “Insert into post.”
The image appears in your description where the cursor was placed. You can add multiple images to show different views of your product. Each image helps customers understand your product better.
Aligning And Resizing Images
Click on the inserted image to reveal alignment options. Choose left, center, or right alignment depending on your layout. Proper alignment keeps your product description neat and readable.
Drag the corners of the image to resize it. Smaller images load faster and fit well with text. Use the image details panel to set exact dimensions for consistency.
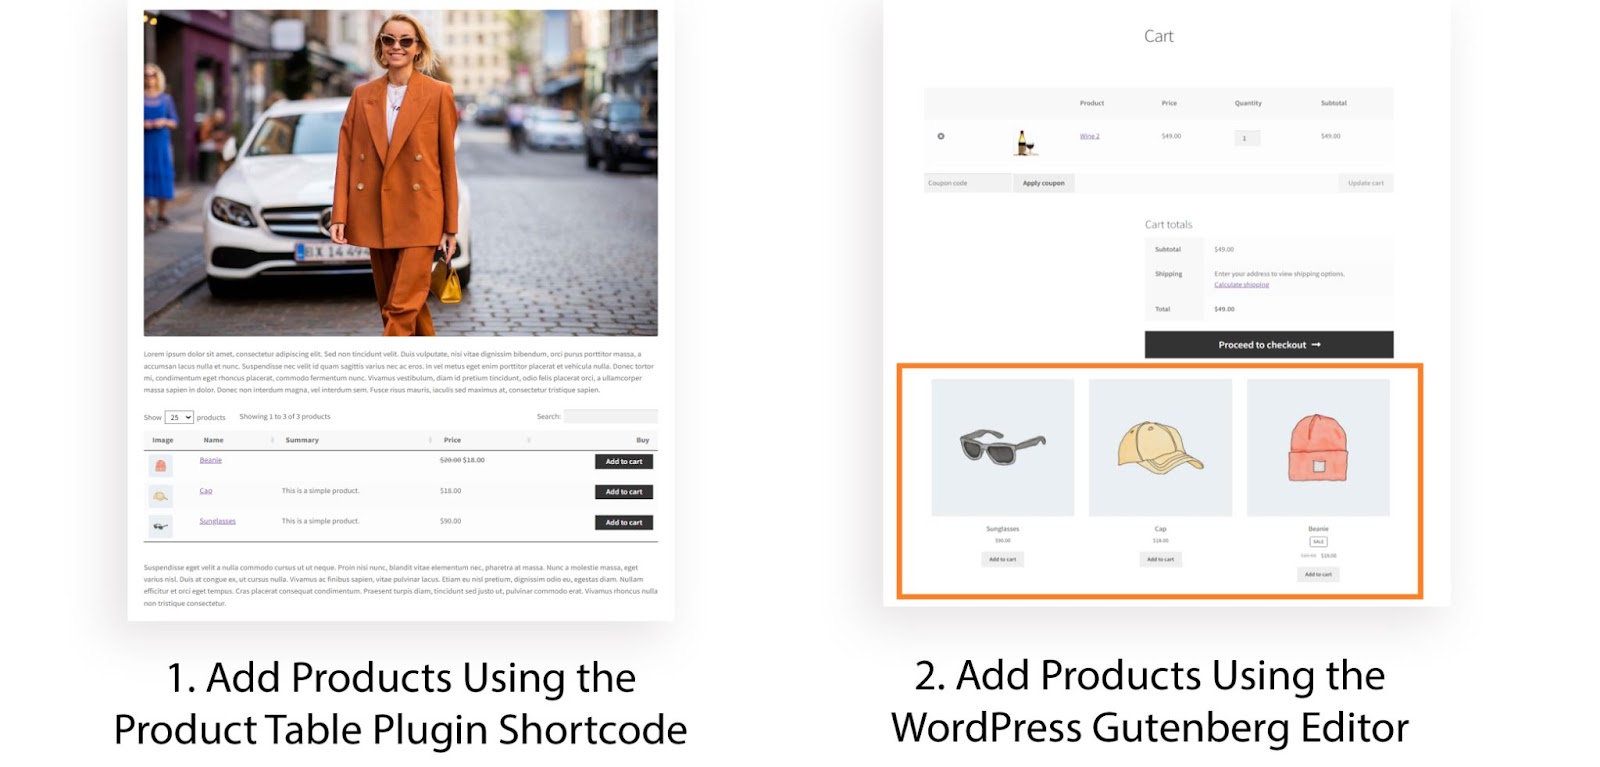
Using Gutenberg Editor For Product Images
Using the Gutenberg editor to add product images in WordPress is simple and efficient. Gutenberg uses blocks to create content, making image placement easy. You can add, move, and customize images without extra plugins.
This editor helps you show product pictures clearly. It keeps your page clean and organized. Each image can be adjusted to fit your design and needs.
Adding Image Blocks
Start by opening your product page in the Gutenberg editor. Click the plus (+) icon to add a new block. Select the “Image” block from the options.
Upload a new picture from your computer or choose one from the media library. You can add multiple images by repeating the process. Each image block can be placed anywhere on the page.
Customizing Image Display
Once the image is added, use the block settings on the right side. Change the image size to small, medium, large, or full size. Align images left, center, or right for better layout.
Add alt text to describe the image for better SEO. You can also add captions below the images. Adjust the image style with borders or shadows if needed.
Credit: www.inmotionhosting.com
Troubleshooting Common Image Issues
Adding product images in WordPress can sometimes lead to issues. These problems can stop images from uploading or showing correctly. Troubleshooting helps fix these common image problems fast. This section explains easy ways to solve them.
Fixing Image Upload Errors
Image upload errors happen for many reasons. One cause is file size limits. WordPress sets a max upload size. Try reducing your image size before uploading. Another cause is file format. Use JPEG, PNG, or GIF files only. Sometimes, server settings block uploads. Contact your hosting provider if uploads keep failing. Also, check your internet connection. A slow or broken connection can cause errors.
Resolving Image Display Problems
Images may upload but not show on your site. This issue could be due to broken links. Check the image URL to ensure it is correct. Another cause is theme conflicts. Switch to a default WordPress theme to test. Caching plugins can also block updated images from showing. Clear your cache to fix this. Permissions on the uploads folder might stop images from loading. Set the folder permissions to 755 or 775 for proper access.
Enhancing Product Images For Better Sales
Product images play a key role in online sales. Clear and attractive images help customers understand the product better. Good visuals build trust and encourage buyers to make a purchase.
Enhancing product images can increase sales and reduce returns. Small improvements can make a big difference in how customers see your products.
Using High-quality Photos
High-quality photos show the product clearly. Use bright lighting and a plain background. Avoid blurry or pixelated pictures. Show the product from different angles. Clear images help customers feel confident about buying.
Adding Zoom And Lightbox Features
Zoom lets customers see details up close. Lightbox opens images in a larger view on the same page. These features improve user experience. They help shoppers examine products without leaving the page. Use plugins or built-in tools in WordPress to enable these features easily.
Frequently Asked Questions
How Do I Add A Product Image In WordPress?
To add a product image, go to your WordPress dashboard. Open the product editor, find the “Product Image” section, click “Set Product Image,” and upload or select your image from the media library. Then, save or update the product to display the image.
Can I Add Multiple Product Images In WordPress?
Yes, you can add multiple images as product gallery images. In the product editor, locate the “Product Gallery” section. Click “Add Product Gallery Images,” then upload or select multiple images. These will appear as additional views of your product.
What Image Size Is Best For WordPress Products?
The ideal product image size is 800×800 pixels for clear display. WordPress and most themes automatically resize images. Use high-quality images with a square aspect ratio for the best appearance on your product pages.
How To Optimize Product Images For Faster Loading?
Compress images using tools like TinyPNG before uploading. Use JPEG or WebP formats for smaller file sizes. Also, enable lazy loading in WordPress or use a caching plugin to speed up your product page load times.
Conclusion
Adding product images in WordPress is simple and quick. Clear images help customers see your products better. Use good quality photos for best results. Always check that images load fast on your site. Remember to add descriptions to improve search rankings.
Keep your product pages neat and easy to navigate. With these steps, your online store will look professional. Start adding images today and watch your site improve.


