
If you run a website, adding clear Terms and Conditions is a must. They protect you and your visitors by setting the rules for using your site.
But how do you add them to your WordPress site without hassle? You’ll discover simple, step-by-step ways to create and add Terms and Conditions that fit your needs. Keep reading to make your website safer and more professional in just a few easy steps.
Why Add Terms And Conditions
Adding Terms and Conditions to your WordPress site is important for many reasons. These rules help protect your website and guide users on how to use your content. Clear Terms and Conditions make your site look professional and trustworthy. They also help you follow legal rules that apply to online businesses and websites. Below are key reasons why you should add Terms and Conditions to your site.
Protecting Your Website
Terms and Conditions set clear rules for using your website. They limit your responsibility if users misuse your content. You can explain what users can and cannot do on your site. This helps prevent misuse or theft of your work. It also protects your site from legal problems caused by user actions.
Building User Trust
Users feel safer when they see clear Terms and Conditions. These rules show your site is serious and professional. Users know what to expect when using your services or buying products. Clear guidelines reduce confusion and complaints. Trust encourages visitors to return and engage more with your site.
Legal Compliance
Many countries require websites to have Terms and Conditions. These rules help you meet laws about online business and data use. Without them, your site might face fines or legal trouble. Terms and Conditions explain how you handle user data and rights. This keeps your website compliant with legal standards.
Credit: www.termsfeed.com
Preparing Your Terms And Conditions
Preparing your Terms and Conditions is an important step before adding them to your WordPress site. These rules protect your business and inform users about their rights and responsibilities. A clear and simple Terms and Conditions page builds trust with your visitors. It also helps avoid legal issues by setting clear guidelines.
Start by understanding what to include. Then, use templates to save time. Finally, customize the text to fit your site’s needs. This approach makes the process easier and more effective.
Key Elements To Include
Include basic information about your business and services. Explain user responsibilities clearly. Cover payment terms if you sell products or services. Add sections on privacy and data use. Include disclaimers to limit liability. Mention the rules for account termination if applicable. State how disputes will be resolved. Use simple words to ensure everyone understands.
Using Templates And Examples
Templates provide a solid starting point. They help cover common legal topics quickly. Look for templates designed for websites or e-commerce. Many free and paid options exist online. Compare several examples to find the best fit. Templates reduce the chance of missing important parts. They also save time by giving you ready-made text.
Customizing For Your Site
Adjust the template language to match your brand voice. Remove sections that don’t apply to your site. Add details specific to your products or services. Check local laws to ensure compliance. Make the terms easy to read and understand. Test the page on different devices for clarity. Tailoring the text makes it more relevant and trustworthy.
Adding Terms And Conditions Manually
Adding Terms and Conditions manually in WordPress gives you full control over the content and presentation. It ensures your users can easily find and read your rules and policies. This method works well for small to medium websites that need a clear legal page without complex plugins.
Creating A New Page
Start by logging into your WordPress dashboard. Go to Pages and click Add New. Give your page a clear title, like “Terms and Conditions”. Keep the title simple and direct to help visitors find it quickly. You can leave the page blank for now or add a short introduction.
Inserting The Terms Content
Next, add your terms and conditions text in the page editor. Write or paste your legal content carefully. Break the text into sections with headings to make it easy to read. Use simple language and short sentences. Avoid long paragraphs to keep visitors engaged. Preview the page to check the layout before publishing.
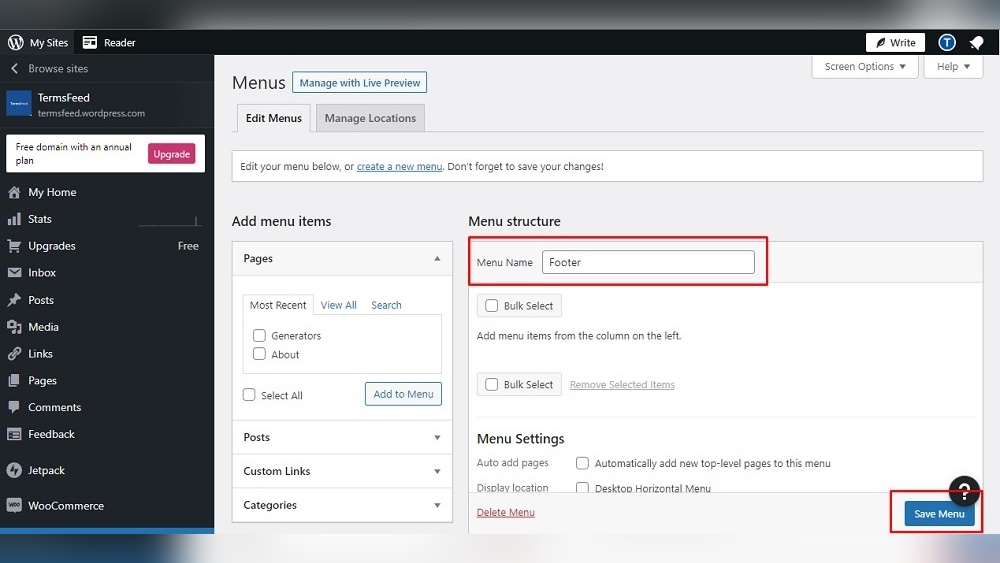
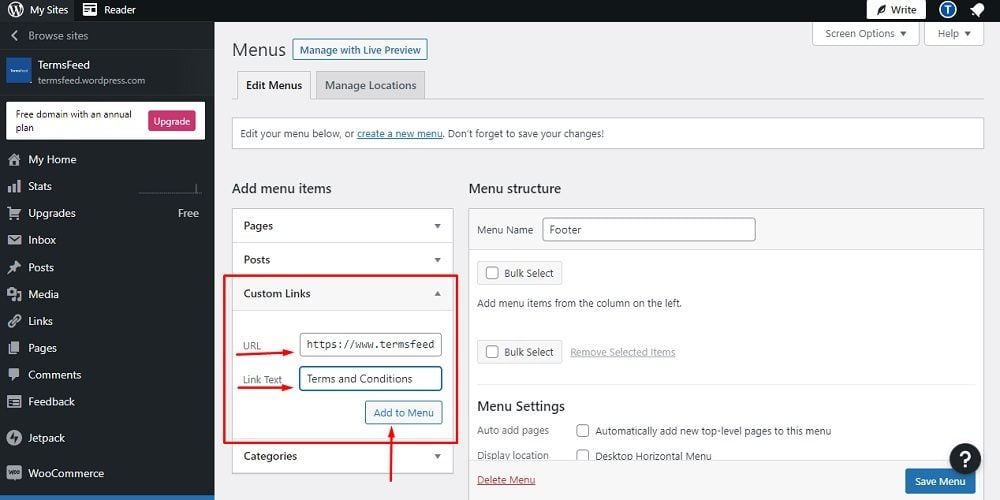
Linking In Footer Or Menu
Make your Terms and Conditions page visible by adding a link to your footer or menu. Go to Appearance and select Menus or Widgets. Add the new page link to your site’s footer or main navigation menu. This placement helps users find your terms easily. Save your changes and visit your website to confirm the link works properly.

Credit: wplegalpages.com
Using Plugins For Terms And Conditions
Using plugins to add Terms and Conditions in WordPress is a simple way to protect your website. Plugins help you create, display, and manage your terms easily. They save time and require no coding skills. Choose a plugin that fits your site’s needs and customize it quickly.
Top Plugins To Consider
Several plugins offer Terms and Conditions features. “WP AutoTerms” helps generate legal pages fast. “Terms and Conditions Popup” shows terms before users register or buy. “Easy Terms and Conditions” allows easy editing and display. Each plugin has unique tools for your site.
Installing And Activating Plugins
Go to your WordPress dashboard and open the Plugins menu. Click “Add New” and search for your chosen plugin. Select it and click “Install Now.” After installation, click “Activate” to enable the plugin. The plugin is now ready to use on your website.
Configuring Plugin Settings
Access the plugin settings from your dashboard menu. Customize the terms text to match your website’s policies. Choose where and how the terms appear to visitors. Save your changes and test the display on your site. Adjust settings for better user experience if needed.
Integrating Terms With User Registration
Integrating terms and conditions with user registration is important for website security and legal protection. It ensures users agree to your rules before joining your site. This step helps you avoid disputes and keeps your site trustworthy.
Adding terms to the registration process is simple in WordPress. You can make users confirm their agreement with a checkbox. This small action protects your business and informs users clearly.
Adding Checkbox To Registration Form
Start by editing the registration form in WordPress. Use a plugin or custom code to add a checkbox. Label it clearly, such as “I agree to the Terms and Conditions.”
Place the checkbox near the submit button. Make sure it is visible and easy to find. This step helps users notice the terms before signing up.
Enforcing Agreement Before Signup
Set the checkbox as required to prevent form submission without consent. This stops users from joining without agreeing. Use validation tools in your plugin or code to enforce this rule.
This method ensures all new users accept your terms. It protects your site from unauthorized use and legal issues.
Handling User Consent Records
Keep a record of user consent for future reference. Store the date and version of the terms agreed to. This helps resolve disputes or questions later.
Use plugins or custom code to save this data securely. Make sure the records follow privacy laws and are easy to access if needed.
Displaying Terms On Checkout Pages
Displaying terms and conditions on checkout pages is important for online stores. It helps customers understand the rules before buying. This step builds trust and reduces disputes. Showing clear terms keeps your business safe and professional.
Woocommerce Integration
WooCommerce is a popular tool for WordPress shops. It makes adding terms and conditions easy. In WooCommerce settings, you can link a terms page directly. This page appears on the checkout screen automatically. No coding is needed for this setup.
Customizing Checkout Terms Notice
You can change the message customers see on checkout. Write clear, simple words that explain your terms. Use the WooCommerce options to edit this notice. A well-written notice helps customers know what they agree to. Keep the notice visible and easy to read.
Ensuring Customer Acknowledgement
Make sure customers agree to your terms before paying. Add a checkbox for them to confirm. This step protects you legally and confirms consent. Without this, orders might cause problems later. The checkbox should be required to complete checkout.
Keeping Terms Updated
Keeping your Terms and Conditions updated is essential for protecting your website and users. Laws and business practices change often. Your terms should reflect the latest rules and your current services. Regular updates avoid confusion and legal issues.
Clear and updated terms build trust. Users feel safer when they know the rules are fair and current. This section explains how to keep your Terms and Conditions fresh and clear for everyone.
Reviewing Periodically
Set a schedule to check your Terms regularly. Every six months is a good start. Look for changes in laws, payment methods, or services. Update any sections that no longer fit your website.
Ask a legal expert for advice if needed. Small updates can make a big difference in protection.
Notifying Users Of Changes
Tell your users about changes clearly. Use pop-ups or banners on your site. Send emails if you have their contacts. Explain what changed and why it matters.
Give users time to read and understand the new terms. This helps avoid disputes and keeps users informed.
Version Control Tips
Keep a record of each Terms version. Note the date and changes made. Store old versions safely for reference.
Show the current version date on your Terms page. This shows users you keep things up to date. Use simple file names and folders to organize versions.
Troubleshooting Common Issues
Adding terms and conditions in WordPress is simple. Sometimes, issues appear. These problems can stop your terms from showing or working right. This section helps fix common troubles fast. Follow each step carefully to keep your site smooth.
Terms Not Displaying Correctly
Sometimes, terms and conditions may not show on your page. Check if the shortcode or block is placed correctly. Make sure you saved the page after adding the terms. Clear your website cache and browser cache. Outdated cache often blocks new content from appearing.
Also, confirm the terms content is not empty. Double-check the text inside the terms section. Use a simple text editor to avoid hidden code issues. If you use a page builder, ensure it supports the terms block.
Plugin Conflicts
Many plugins can clash and cause trouble with your terms display. Disable all other plugins except the terms plugin. Check if the terms show correctly after disabling. Reactivate plugins one by one to find the conflict.
Some plugins change page layouts or scripts. These changes can break the terms display. Keep your plugins updated to avoid compatibility issues. If conflicts continue, seek support from plugin developers.
User Acceptance Problems
Users might not see or accept your terms and conditions. Make the acceptance checkbox clear and easy to find. Place it near the submit button or registration form.
Test the acceptance process yourself. Check if the form stops without acceptance. Confirm that acceptance is recorded in user data. This step is important for legal protection.
Credit: www.privacypolicies.com
Frequently Asked Questions
How Do I Add Terms And Conditions In WordPress?
To add Terms and Conditions, create a new page in WordPress. Then, paste your terms content and publish the page. Link this page in your website footer or during user registration for visibility.
Why Are Terms And Conditions Important On WordPress Sites?
Terms and Conditions protect your website legally. They set rules for users and limit your liability. This helps avoid disputes and ensures clear communication with visitors.
Can I Use Plugins To Add Terms And Conditions?
Yes, WordPress offers plugins like WP Terms Popup and Terms & Conditions Checkbox. These make adding, displaying, and managing Terms and Conditions easier without coding.
Where Should I Display Terms And Conditions On My WordPress Site?
Common places include the website footer, checkout pages, and user registration forms. Displaying terms in these locations ensures users see and agree to them before using your service.
Conclusion
Adding terms and conditions to your WordPress site protects your business and users. It helps set clear rules and builds trust. You can create and display them easily with plugins or manual steps. Keep your terms simple and update them regularly.
Clear terms prevent confusion and legal issues. Start today to make your website safer and more professional.


