
Are you looking to improve your WordPress site’s SEO or verify your site with search engines? Adding a meta tag to the head section of your WordPress site is a simple yet powerful way to do this.
But if you’re not sure how to get started, don’t worry—you’re in the right place. In this post, you’ll discover easy, step-by-step methods to add meta tags to your WordPress site’s head area without any hassle. Keep reading, and you’ll be able to boost your site’s performance and visibility in no time.
Why Add Meta Tags In WordPress
Meta tags play a key role in WordPress websites. They provide important information about your site to browsers and search engines. This information helps your site rank better, share well on social media, and behave correctly in browsers. Adding meta tags improves your site’s visibility and user experience. Below, learn why meta tags matter for your WordPress site.
Impact On Seo
Meta tags help search engines understand your website content. They describe your page title, description, and keywords. This description appears in search results. Clear meta tags make your site more attractive to users. Better descriptions can increase click-through rates. Search engines rank sites higher with relevant meta tags. Proper meta tags improve your site’s search visibility.
Improving Social Sharing
Meta tags control how your site looks on social media. They set the title, image, and description shown on platforms like Facebook and Twitter. Good meta tags make your links stand out. This encourages more people to click and share. Without proper tags, social shares look plain or broken. Social meta tags boost your site’s reach and traffic.
Enhancing Browser Behavior
Browsers use meta tags to handle your site correctly. They set the character set, page refresh, and viewport settings. Meta tags help your site load faster and display well on all devices. They also control caching and security features. Proper meta tags give users a smoother browsing experience. This keeps visitors happy and engaged on your site.
Accessing WordPress Theme Files
To add a meta tag to the head section in WordPress, you need to access your theme files first. These files control the design and structure of your website. Editing them allows you to insert custom code like meta tags. You can access these files in two main ways. Each method has its own steps and tools.
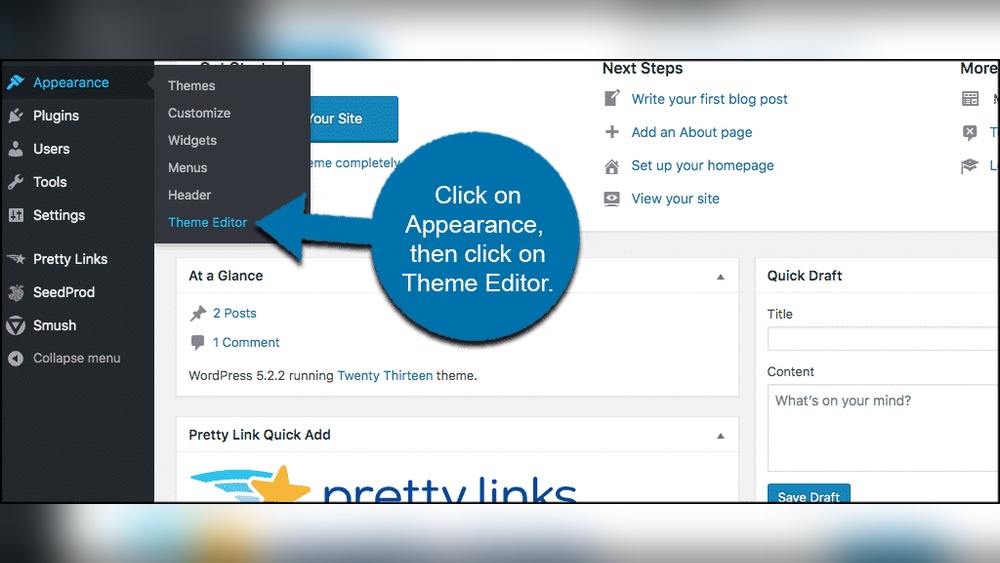
Using Theme Editor
The easiest way to access theme files is through the WordPress dashboard. Go to Appearance, then select Theme Editor. This tool lets you view and edit your theme’s code directly. Find the file named header.php. This file contains the head section of your website. Insert your meta tag code here, just before the closing tag. Save changes to update your site.
Using Ftp Or File Manager
Another way is to use FTP or your hosting control panel’s file manager. FTP requires a client like FileZilla. Connect using your site’s FTP details. Navigate to wp-content/themes/your-theme-folder. Find the header.php file. Download it and add your meta tag before the closing tag. Upload the file back to the server. Refresh your site to see the changes.
Adding Meta Tags Manually
Adding meta tags manually in WordPress gives you full control over your site’s SEO and appearance in search results. Meta tags provide important information to browsers and search engines. These tags include descriptions, keywords, and social media data.
Manually inserting meta tags allows precise customization. It ensures tags are exactly where you want them. This method requires editing your theme files directly.
Locating The Header File
The header file is usually named header.php. It controls the content inside the section of your site. To find it, go to your WordPress dashboard. Then navigate to Appearance > Theme Editor.
In the Theme Editor, look for header.php on the right side. Open this file to start adding your meta tags. Be careful not to change other parts of the file.
Inserting Meta Tags Correctly
Place your meta tags inside the section of header.php. Insert tags before the closing tag. Each tag should have proper HTML syntax.
Example of a meta description tag:
Save your changes after adding the tags. Clear your site cache if you use a caching plugin. This ensures your new tags appear on your live site.

Credit: wpengine.com
Using Plugins To Add Meta Tags
Using plugins to add meta tags in WordPress is simple and effective. Plugins help insert meta tags without touching any code. They offer user-friendly interfaces for easy management. This method is ideal for beginners and saves time.
Popular Meta Tag Plugins
Several plugins help add meta tags to WordPress sites. Yoast SEO is one of the most popular choices. It provides options for meta descriptions, titles, and social media tags. All in one SEO Pack is another good plugin. It supports various meta tags and is easy to use. Rank Math also offers powerful meta tag management. These plugins keep your site SEO-friendly without manual coding.
Step-by-step Plugin Setup
First, go to your WordPress dashboard. Click on “Plugins” and then “Add New.” Search for your chosen meta tag plugin by name. Click “Install Now” and then “Activate.” Next, find the plugin settings in the dashboard menu. Enter your meta tag information in the available fields. Save your changes before leaving the settings page. Clear your site cache to see the updates live.
Adding Meta Tags Via Functions.php
Adding meta tags via the functions.php file is a clean way to include important metadata in your WordPress site. This method keeps your site organized and helps avoid plugin overload. It also ensures meta tags load properly in the head section of every page.
Using functions.php requires editing theme files, so proceed with care. Creating a child theme first protects your changes during theme updates. After that, you can safely insert the meta tag code into the functions file.
Creating A Child Theme
A child theme lets you customize your site without changing the original theme. Start by creating a new folder in the wp-content/themes directory. Name it after your current theme with -child at the end. For example, twentytwentyone-child.
Inside this folder, create a style.css file. Add a comment block at the top with the child theme name and the parent theme name. Next, create a functions.php file to enqueue the parent theme styles. This setup keeps your changes safe.
Inserting Code In Functions File
Open the child theme’s functions.php file in a text editor. Add a function to print your meta tag inside the section. Use the wp_head hook to insert your code properly.
function add_custom_meta_tag() { echo ''; } add_action('wp_head', 'add_custom_meta_tag'); Change the content value to match your site’s description or keywords. Save the file and upload it to your server if editing locally. Refresh your website and check the source code to confirm the meta tag appears inside the head.

Credit: www.youtube.com
Verifying Meta Tag Implementation
Verifying meta tag implementation is important after adding it to your WordPress site. It ensures search engines and social platforms read your site correctly. Without verification, your efforts might not show any result.
Checking the meta tag confirms it is placed in the right spot. It also helps find errors early. This saves time and improves your site’s visibility on the web.
Inspecting Page Source
Open your website in a browser. Right-click on the page and select “View Page Source.” A new tab with the HTML code will open.
Search for the meta tag by pressing Ctrl + F (Cmd + F on Mac). Type part of the meta tag content or name. Check if it appears inside the
section.If you see the meta tag in the head, it means your code is in place. If not, review your WordPress setup.
Using Online Tools
Online tools can check meta tags quickly. They scan your page and show all meta tags found.
Tools like “Meta Tag Analyzer” or “SEO Site Checkup” are easy to use. Enter your website URL and run the scan.
These tools highlight missing or incorrect tags. They help you fix errors and improve your site’s SEO.
Common Mistakes To Avoid
Adding meta tags to the head section of your WordPress site improves SEO and page information. Avoiding common errors helps keep your site clean and effective. Small mistakes can cause big problems in how search engines read your site.
Duplicate Meta Tags
Duplicate meta tags confuse search engines and lower your SEO score. Check your site for repeated tags. Only one meta description or keyword tag should appear per page. Plugins or themes might add tags automatically. Disable extras or remove duplicates manually.
Incorrect Tag Placement
Meta tags must go inside the
section of your HTML. Placing them in the body or footer causes errors. WordPress users often insert tags in the wrong file or location. Use the header.php file or a dedicated plugin for proper placement. This ensures search engines find and read your meta tags correctly.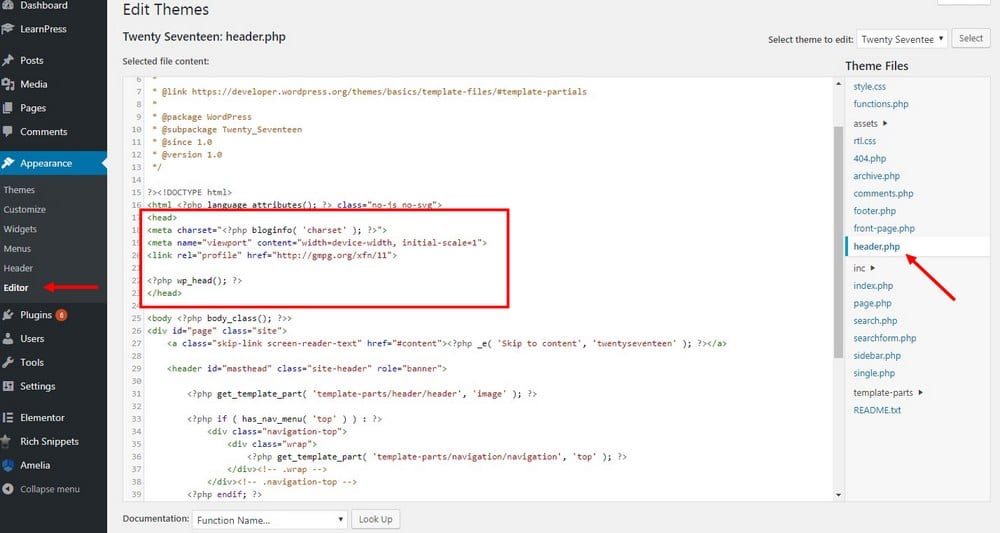
Credit: www.shoshitamam.com
Frequently Asked Questions
How Do I Add A Meta Tag To WordPress Header?
You can add a meta tag by editing the header.php file or using a plugin. For direct editing, insert the meta tag within the
section. Using plugins like “Insert Headers and Footers” simplifies this without coding.Why Add Meta Tags To WordPress Site?
Meta tags improve SEO by providing search engines with site info. They also control page descriptions, keywords, and social sharing details, enhancing your site’s visibility and click-through rates.
Can I Add Multiple Meta Tags In WordPress Header?
Yes, you can add multiple meta tags in the header. Each tag should be placed between the
tags. Plugins or theme file edits allow adding various tags for SEO and social media optimization.Is Using A Plugin Better For Meta Tags?
Using a plugin is safer and user-friendly, especially for beginners. Plugins avoid theme file edits, reducing errors and updates issues. They offer easy management of all meta tags from one place.
Conclusion
Adding a meta tag to your WordPress site helps improve search results. It lets search engines understand your page better. You can do this by editing your theme or using plugins. Always back up your site before making changes. Keep your meta tags clear and relevant.
This small step can boost your site’s visibility. Now, your WordPress site is ready to share more information with search engines. Simple changes, big benefits.


